Dashboard
Overview
This screen displays general device information, and NCC information in widgets that you can rearrange to suit your needs. You can also edit and refresh individual widgets.
The menus and options are fewer in local GUI, The rest of the Root (Plus)’s features must be configured through NCC.
 After registering the Root (Plus) with NCC, we recommend managing and configuring it exclusively through NCC. Using both NCC and the local GUI may cause configuration settings to overwrite one another, making configuration changes difficult to track.
Dashboard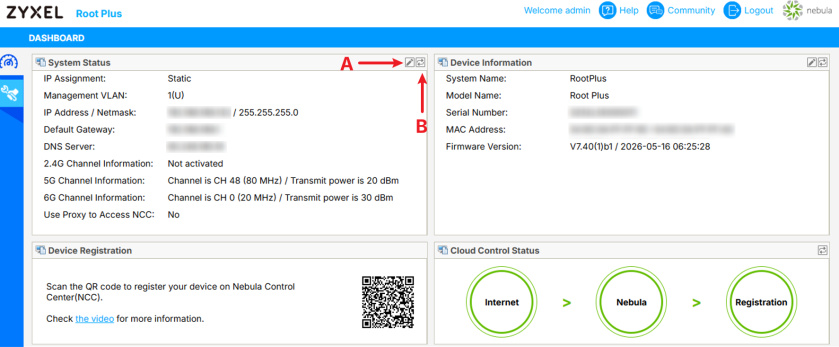
The following table describes the labels in this screen.
Label | Description |
|---|---|
Edit (A) | Click this to open the setup window to configure settings such as the IP address, VLAN, system name, and other network parameters. |
Refresh Now (B) | Click this to update the widget’s information immediately. |
System Status | |
IP Assignment | This field displays how the interface gets its IP address. Static – This interface has a static IP address. DHCP Client – This interface gets its IP address from a DHCP server. |
Management VLAN | This field displays the management VLAN ID for the Root (Plus). |
IP Address / Netmask | This field displays the current IP address and subnet mask assigned to the interface. If the IP address is 0.0.0.0, the interface is disabled or did not receive an IP address and subnet mask through DHCP. If the interface has a dynamic IP address, click Renew to update the IP address for the interface. |
Default Gateway | This field displays the IP address of the default outgoing gateway. |
DNS Server | This field display the IP address of the DNS server. |
2.4G Channel Information | This field displays the channel number the Root (Plus) is using and its output power in the 2.4 GHz spectrum. This shows Not activated if the wireless LAN is disabled. |
5G Channel Information | This field displays the channel number the Root (Plus) is using and its output power in the 5 GHz spectrum. This shows Not activated if the wireless LAN is disabled. |
6G Channel Information | This field displays the channel number the Root (Plus) is using and its output power in the 6 GHz spectrum. This shows Not activated if the wireless LAN is disabled. |
Use Proxy to Access NCC | This displays whether the Root (Plus) uses a proxy server to access the NCC. |
Device Information | |
System Name | This field displays the name used to identify the Root (Plus) on any network. |
Model Name | This field displays the model name of this Root (Plus). |
Serial Number | This field displays the serial number of the Root (Plus). |
MAC Address | This field displays the MAC address of the Root (Plus). |
Firmware Version | This field displays the firmware version of the Root (Plus). |
Device Registration | This field displays the information on NCC registration. |
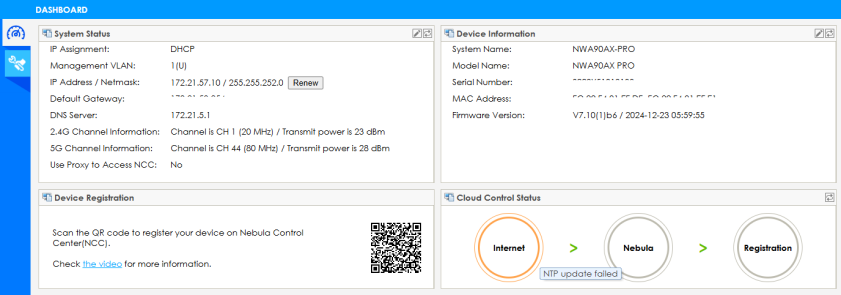
Cloud Control Status | This field displays: • The Root (Plus) Internet connection status. • The connection status between the Root (Plus) and NCC. • The Root (Plus) registration status on NCC. Mouse over the circles to display detailed information. To pass your Root (Plus) management to NCC, first make sure your Root (Plus) is connected to the Internet. Then go to NCC and register your Root (Plus). 1. Internet Green – The Root (Plus) is connected to the Internet. Orange – The Root (Plus) is not connected to the Internet. 2. Nebula Green – The Root (Plus) is connected to NCC. Orange – The Root (Plus) is not connected to NCC. 3. Registration Green – The Root (Plus) is registered on NCC. Gray – The Root (Plus) is not registered on NCC. |
If the Root (Plus) cannot connect to the Internet or to NCC, move the mouse over the status circle to check the error message. See the NCC (Nebula Control Center) User’s Guide for more information.
Edit System Status
Use this screen to configure the Root (Plus)’s network setting and allow a proxy to access NCC.
Network
Use this screen to configure the VLAN ID, IP address and time server. To access this screen, click Dashboard > Edit (System Status) > Network.
Dashboard > Edit (System Status) > Network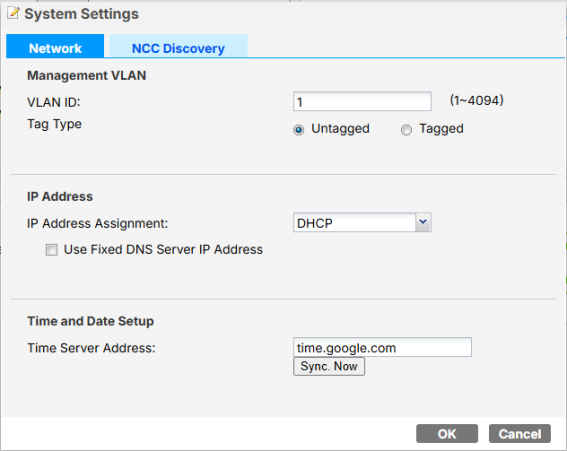
Each field is described in the following table.
Label | Description |
|---|---|
Management VLAN Configure in NCC: Site-wide > Devices > Access points > Select the device > Edit LAN IP | |
VLAN ID | Enter a VLAN ID for the Root (Plus) to use to tag traffic originating from this SSID. Make sure your VLAN settings allow the Root (Plus) to connect to the Internet so you could manage it with NCC. |
Tag Type | Select tagged to make the Root (Plus) adds the Management VLAN ID to outbound traffic transmitted through its Ethernet port. If you select Untagged, the outbound traffic transmitted through the Root (Plus) Ethernet port will NOT be tagged with the Management VLAN ID. |
IP Address Configure in NCC: Site-wide > Devices > Access points > Select the device > Edit LAN IP | |
IP Address Assignment | Select DHCP to make the interface a DHCP client and automatically get the IP address, subnet mask, gateway and DNS Server IP address from a DHCP server. Select Static IP to specify the IP address, subnet mask, gateway and DNS server IP address manually. |
Use Fixed DNS Server IP Address | Select this if you have a preferred DNS server that you want to specify manually even if the IP type is DHCP. Setting a fixed DNS server IP address may help if you experience unreliable DNS resolution. |
IP Address | Enter the IP address for this interface. |
Subnet Mask | Enter the subnet mask of this interface in dot decimal notation. The subnet mask indicates what part of the IP address is the same for all computers in the network. |
Gateway | Enter the IP address of the gateway. The Root (Plus) sends packets to the gateway when it does not know how to route the packet to its destination. The gateway should be on the same network as the interface. |
DNS Server IP Address | Enter the IP address of the DNS server. |
Time and Date Setup | |
Time Server Address | Enter the IP address or URL of your time server. Check with your ISP/network administrator if you are unsure of this information. |
Sync. Now | Click this button to have the Root (Plus) get the time and date from the time server (see the Time Server Address field). This also saves your changes. |
OK | Click OK to save your changes. |
Cancel | Click Cancel to exit this screen without saving your changes. |
NCC Discovery
Use this screen to allow a proxy to access NCC. Configure a proxy server only if your network requires devices to connect to the Internet through a proxy. If your device can access the Internet directly, no proxy configuration is required.
For example, an organization may use a proxy server to control or monitor Internet access. The following figure shows the Root (Plus) connected to the organization's local network (S) and accessing NCC through a proxy server (P).
Proxy Server Example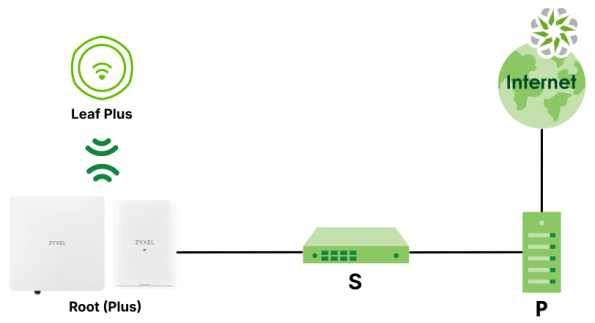
To access this screen, click Dashboard > Edit (System Status) > NCC Discovery.
Select the checkbox and click OK so that the Root (Plus) can access the NCC through the proxy server.
Dashboard > Edit (System Status) > NCC Discovery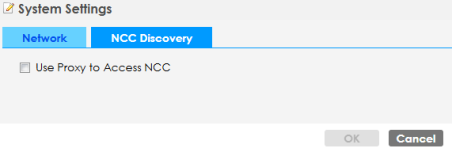
Edit Device Information
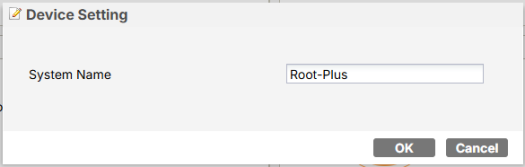
Use this screen to configure the Root (Plus)’s system name. To access this screen, click Dashboard > Edit (Device Information).
Enter the system name and click OK to save the change.
Dashboard > Edit (Device Information)