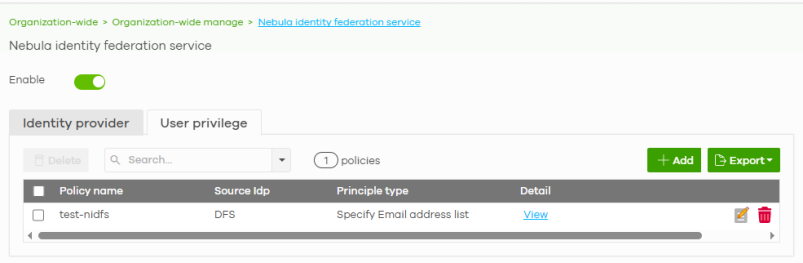
Configure Nebula Identify Federation Service (NID FS)
An Identity Federation Service (IFS) is a system that integrates multiple Identity Providers (IdPs), so that users just use one identity to access multiple services. NID FS (Nebula IDentity Federation Service) is IFS implemented by Nebula.
Users log into services as usual and are authenticated through NID FS by the IdP (Identity Provider) to receive access to those services. This is the work flow.
User – accesses –> Service, such as SSL VPN and Captive Portal – redirect user for authentication –> Identity Federation Service (IFS) – request to authenticate user –> IdP – returns identity –> IFS – forwards identity (signed token) –> Service –> allows or denies access –> User.
 To use Nebula Identify Federation Service (NID FS), you must have a Nebula Professional Pack (standard or trial) license.
 If the Nebula Professional license expires and reverts to a Nebula Base license, then all NID FS settings are kept, but you cannot enter the Organization-wide > Organization-wide manage > Nebula identity federation service page in NCC until you buy a Nebula Professional Pack license.
Users should already have an account with an IdP, such as Google Workspace or Microsoft Entra ID.
Configuration Overview
This is what you have to do.
• Create identity provider profiles for existing Identity Providers (IdPs) in Organization-wide > Organization-wide manage > Nebula identity federation service > Identity provider.
• Apply NID FS as the authentication method for the required services, such as Captive Portal (Site-wide > Configure > Firewall > Captive portal) and SSL VPN (Site-wide > Configure > Firewall > Remote access VPN).
• Set privileges in user policies in Organization-wide > Organization-wide manage > Nebula identity federation service > User privileges > Add to define which users authorized by what IdP can access which services.
• NID FS accordingly denies or allows users access to the services.
NCC and Microsoft Entra ID
This tutorial shows you how to configure OIDC and claims on NCC and Microsoft Entra ID.
See the related Microsoft documentation for the latest menu information. Configure OIDC on NCC and Microsoft Entra ID
Set the user’s email address to allow authentication through OIDC.
1 Go to Organization-wide > Organization-wide manage > Nebula identity federation service > Identity provider. In the configured Identity Provider, copy the Redirect URL. You will need this later.
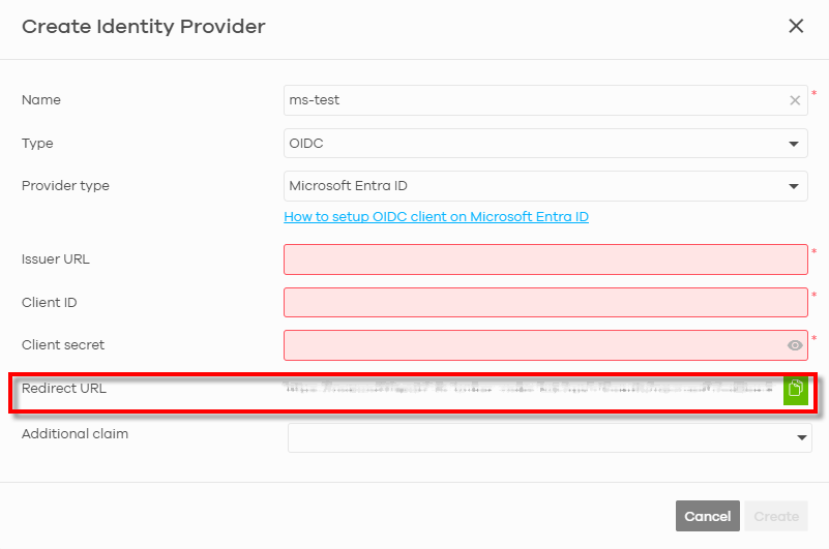
2 Next, register an application in Microsoft Entra ID. Sign in and go to App registrations > New registration > + New registration. Enter a name for your application. Under Supported account types, select the account types that should be allowed to access the Nebula identity federation service. Under Redirect URI, select Web as the platform. Paste the Redirect URL copied from NCC. Click Register. Now, record the following values in the application detail page:
• Application (client ID)
• Directory (tenant ID).
3 Next, create an OIDC Client Secret in Microsoft Entra ID. Go to Manage > Certificates & secrets. Click + New client secret. Enter a value for the secret. Select an appropriate expiration period. Now, copy and safely store the client secret value.
4 Configure the Identity Provider in NCC. Go to Create Identity Provider in NCC as shown above and enter the following details:
• Issuer URL: https://login.microsoftonline.com/<tenant_id>/v2.0
• Client ID: <Application (client) ID>
• Client Secret: <Client Secret Value>
Click Save to complete the Identity Provider configuration.
Configure Claims on NCC and Microsoft Entra ID
Claims are additional user attributes included in each OIDC authentication response. They enforce specific user privilege policies.
1 Sign in to the Microsoft Entra to configure Claims to Be Included in Tokens on Microsoft Entra ID. Go to App registrations > Owned applications. Select the application associated with the Nebula identity federation service. In Manage > Token configuration, click Add optional claim or Add group claims. Select ID as the token type. Choose the claims you want to include. Save the name of the Claim from the resulting list.
2 Sign in to NCC to configure which claims IFS forwards to relying parties. Go to Organization-wide > Organization-wide manage > Nebula identity federation service > Identity provider. Select the required Identity Provider and click Edit. In Additional claim, enter the claim names you saved above. They must exactly match those configured in Microsoft Entra ID.
3 To configure privileges for user policies based on claims, go to Organization-wide > Organization-wide manage > Nebula identity federation service > User privilege. Click Add. Select the required Identity Provider and set Principle type to Group by claims. Click Add to define claim conditions.
• In the Name field, enter the claim name
• In the Value field, specify the matching value
Repeat for multiple claims. If you configure multiple claims, each claim name must match each user name exactly. A claim can have multiple values. A match to any value is sufficient. The claim value of groups must match the Object Id in the Groups screen. Click Next.
4 Under Select service, define which services matched users can access. Click Next. Finally, click Create.
NCC and Microsoft Google Workspace
This tutorial shows you how to configure OIDC and claims on NCC and Google Workspace.
See the related Google documentation for the latest menu information. Configure OIDC on NCC and Google Workspace
1 Go to Organization-wide > Organization-wide manage > Nebula identity federation service > Identity provider. In the configured Identity Provider, copy the Redirect URL. You will need this later.
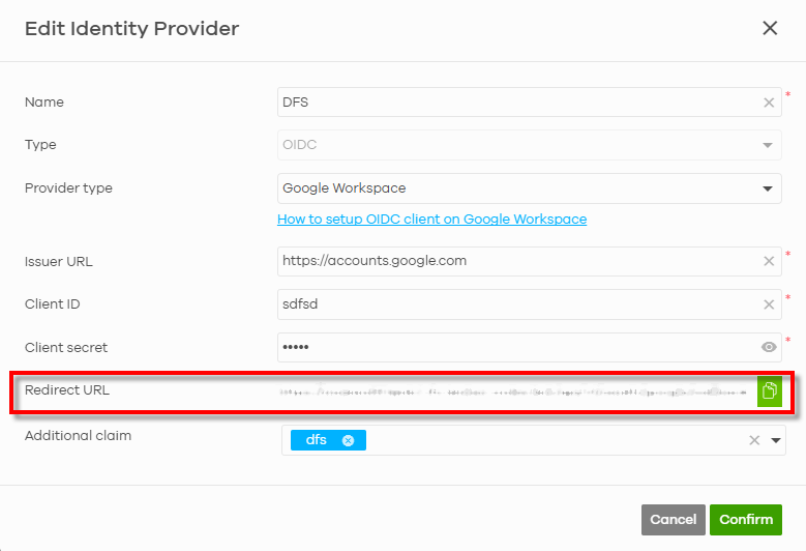
2 Next, register an application in Google Workspace. Sign in and go to Google Cloud Console > APIs & Services > OAuth. Begin the project wizard. Set the Audience to Internal to restrict access to users within your organization and ensure environment isolation. Enter the required Contact Information, then click Create.
3 Next go to Clients and click Create Client. Select Web application as the application type. Assign a recognizable name to the client. Under Authorized redirect URIs, paste the Redirect URL copied from NCC. Click Create to complete the client setup. Finally, copy and safely store the Client ID and Client Secret.
4 Configure the Identity Provider in NCC. Go to Edit Identity Provider in NCC as shown above and enter the following details:
• Issuer URL: https://accounts.google.com
• Client ID: <Client ID>
• Client Secret: <Client Secret>
Click Save to complete the Identity Provider configuration.
Configure Claims on NCC and Google Workspace
Claims are additional user attributes included in each OIDC authentication response. They enforce specific user privilege policies.
At the time of writing, you can only use the default claims provided by Google Workspace. For the latest list of supported claims, see Google’s documentation. 1 Sign into NCC to configure which claims to forward to applications requiring IFS authentication. Go to Organization-wide > Organization-wide manage > Nebula Identity federation service > Identity provider. Select the required Identity Provider and click Edit. In Additional claim, enter the claim names that Google provided. They must exactly match those provided by Google workspace.
2 To configure privileges for user policies based on claims, go to Organization-wide > Organization-wide manage > Nebula identity federation service > User privilege. Click Add. Select the required Identity Provider and set Principle type to Group by claims. Click Add to define claim conditions.
• In the Name field, enter the claim name
• In the Value field, specify the matching value.
Repeat for multiple claims. If you configure multiple claims, each claim name must match each user name exactly. A claim can have multiple values and a match to any value is sufficient. The claim value of groups must match the Object Id in the Groups screen. Click Next.
3 Under Select service, define which services matched users can access. Click Next. Finally, click Create.
Set User Privileges
After you create IdPs, you create policies to set which users can use which IdP to access what services.
1 First, go to a service, such as Captive portal, to set a Trusted Identity provider for a Captive portal policy.
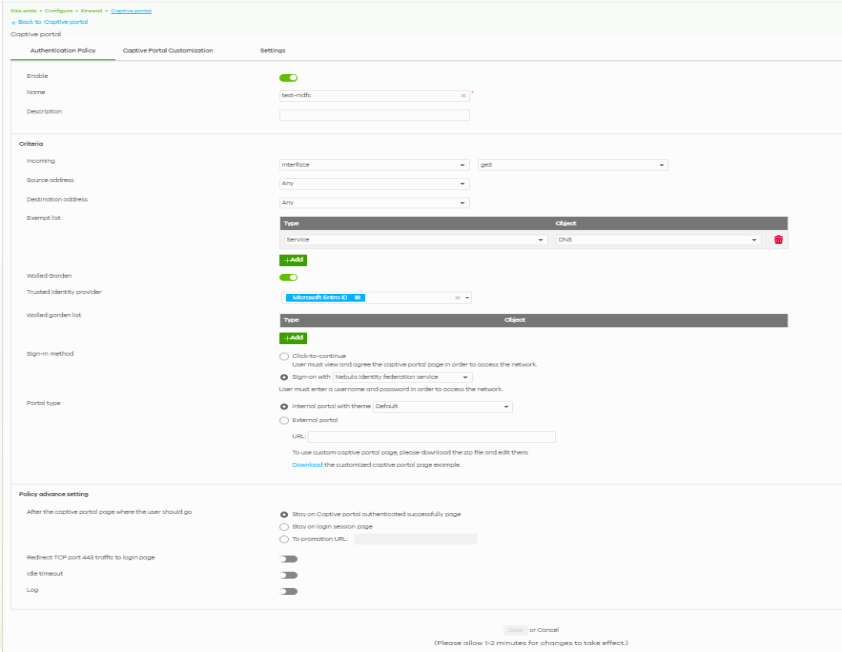
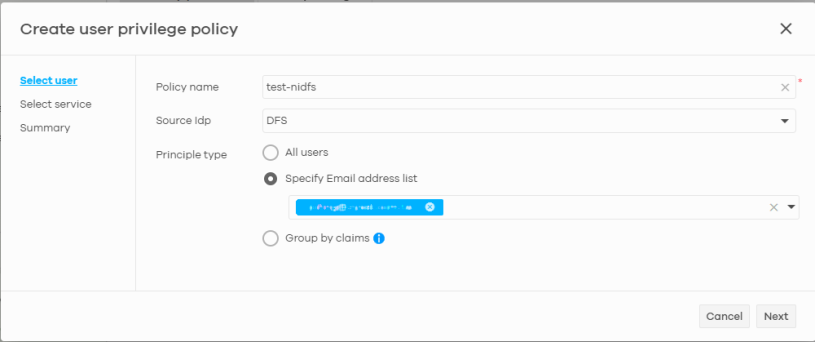
2 Then, go to Organization-wide > Organization-wide manage > Nebula identity federation service > User privileges > Add to define which users authorized by what IdP can access the above policy. Create a policy name, then choose a Source IdP configured in Organization-wide > Organization-wide manage > Nebula Identity federation service > Identity provider. You can specify all users from this IdP or specific users by email address (for WiFi networks (SSIDs) such as those configured in Site-wide > Configure > Access points > SSID settings, for example). At the time of writing, you can only choose users by claims for Remote Access VPN and Firewall captive portal. When using claims, a user must match all claims. For each claim, any Value match is OK.
3 Then select a service or services from those available in your Organization that you configured in step 1 above.
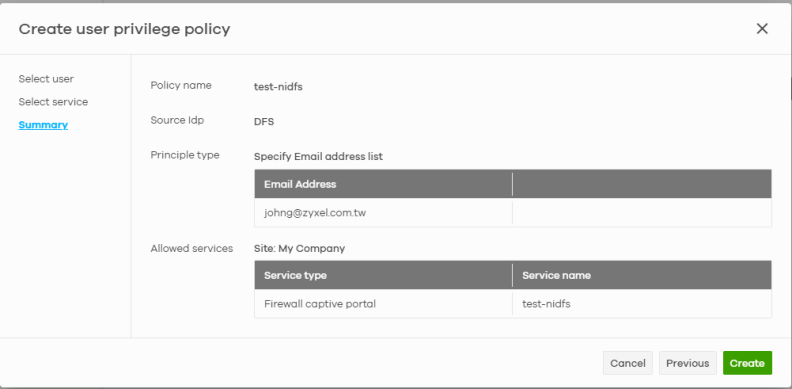
4 Review the Summary screen, and if all is correct, click Create.
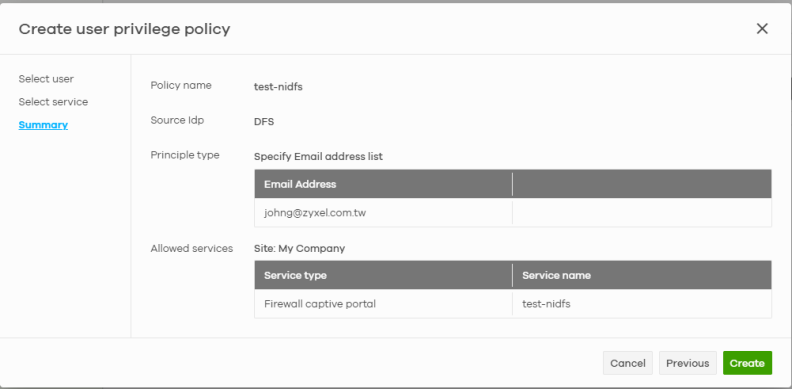
5 The policy then appears in Organization-wide > Organization-wide manage > Nebula identity federation service > User privileges.