Web Configurator
Overview
The Web Configurator is an HTML-based management interface that allows easy system setup and management through Internet browser. Use a browser that supports HTML5, such as Microsoft Edge, Mozilla Firefox, or Google Chrome. The recommended minimum screen resolution is 1024 by 768 pixels.
In order to use the Web Configurator you need to allow:
• Web browser pop-up windows from your computer.
• JavaScript (enabled by default).
• Java permissions (enabled by default).
Access the Web Configurator
1 Make sure your Zyxel Device hardware is properly connected (refer to the Quick Start Guide).
2 Make sure your computer has an IP address in the same subnet as the Zyxel Device.
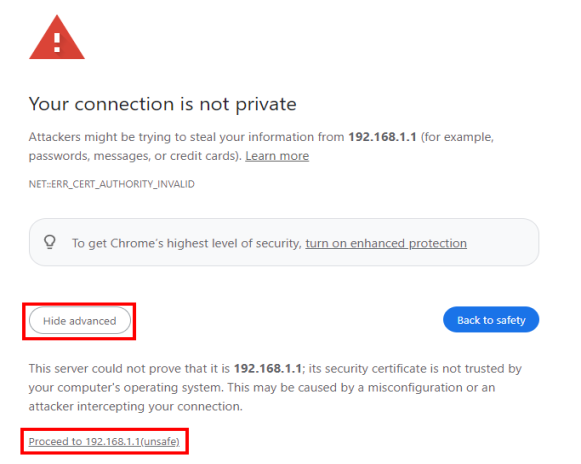
3 Launch your web browser. Type https://192.168.1.1 in your browser address bar.
4 If a “Your connection is not private” message appears, click Advanced, then click Proceed to 192.168.1.1(unsafe) to go to the login screen.
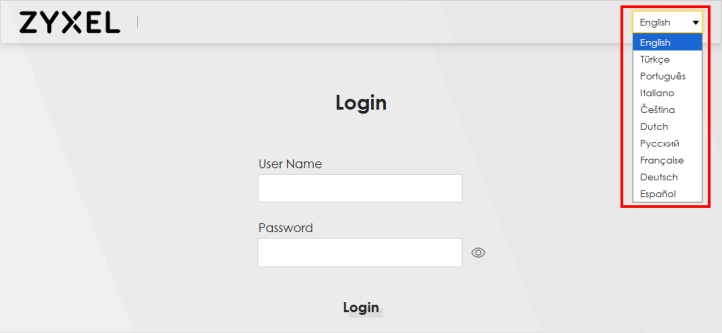
5 A login screen displays. Select the language you prefer (upper right).
6 To access the administrative Web Configurator and manage the Zyxel Device, enter the default user name admin and the randomly assigned default password (see the Zyxel Device label) in the Login screen and click Login. If you have changed the password, enter your password and click Login.
L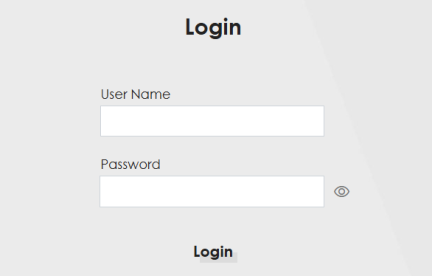
When the Zyxel Device is managed by NCC, you will be prompted to use the Nebula-assigned password to log in. The Nebula-assigned password can be found in Nebula Web Portal: Site-wide > Configure > Site settings: Device configuration.

7 The Connection Status screen appears. Use this screen to configure basic Internet access and Wi-Fi settings.
Web Configurator Layout
Screen Layout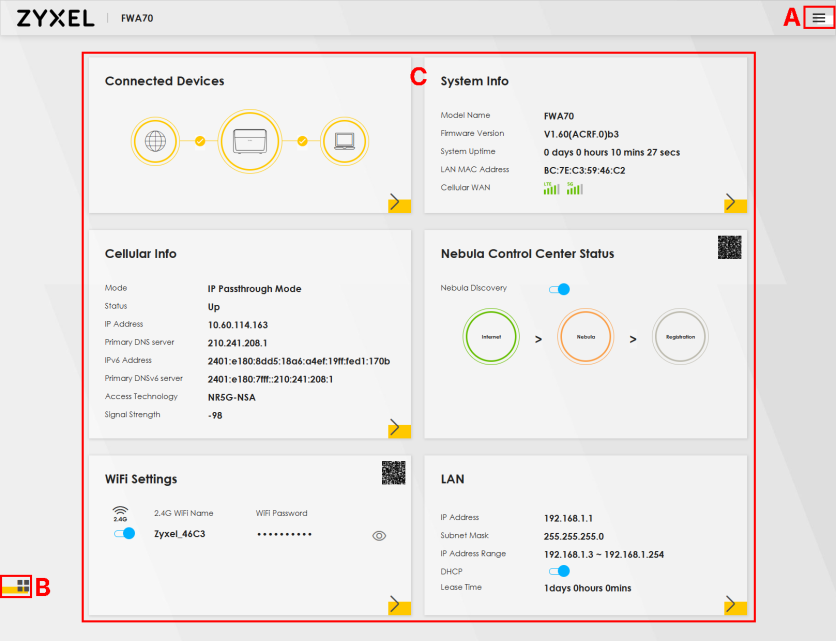
As illustrated above, the main screen is divided into these parts:
• A – Settings Icon (Navigation Panel and Side Bar)
• B – Layout Icon
• C – Main Window
Settings Icon
Click this icon ( ) to see the side bar and navigation panel.
) to see the side bar and navigation panel.Side Bar
The side bar provides some icons on the right hand side.
The icons provide the following functions.
Icon | Description |
|---|---|
 | Wizard: Click this icon to open screens where you can configure the Zyxel Device’s time zone and Wi-Fi settings. |
 | Theme: Click this icon to select a color that you prefer and apply it to the Web Configurator. 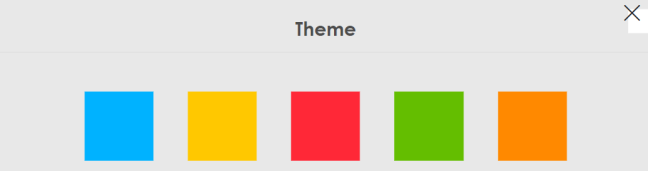 |
 | Restart: Click this icon to reboot the Zyxel Device without turning the power off. |
 | Language: Select the language you prefer. |
 | Logout: Click this icon to log out of the Web Configurator. |
Navigation Panel
Click the menu icon ( ) to display the navigation panel that contains configuration menus and icons (quick links). Click X to close the navigation panel.
) to display the navigation panel that contains configuration menus and icons (quick links). Click X to close the navigation panel.Use the menu items on the navigation panel to open screens to configure Zyxel Device features. The following tables describe each menu item.
Navigation Panel
Link | Tab | Function |
|---|---|---|
Home | Use this screen to configure basic Internet access and wireless settings. This screen also shows the network status of the Zyxel Device and computers/devices connected to it. | |
Network Setting | ||
Broadband | Broadband | Use this screen to view and configure ISP parameters, WAN IP address assignment, and other advanced properties. You can also add new WAN connections. |
Broadband | Ethernet WAN | Use this screen to convert the LAN port as WAN port, or restore the WAN port to LAN port. |
Broadband | Cellular WAN | Use this screen to configure a cellular WAN connection. |
Broadband | Cellular APN | Use this screen to configure the Access Point Name (APN) provided by your service provider. |
Broadband | Cellular SIM | Use this screen to enter a PIN for your SIM card to prevent others from using it. |
Broadband | Cellular Band | Use this screen to configure the cellular frequency bands that can be used for Internet access as provided by your service provider. |
Broadband | Cellular PLMN | Use this screen to view available PLMNs and select your preferred network. |
Broadband | Cellular IP Passthrough | Use this screen to enable IP Passthrough on the Zyxel Device. |
Broadband | Cellular Lock (LTE) | Use this screen to enable or disable PCI Lock for 4G LTE connections. |
Broadband | Cellular Lock (5G) | Use this screen to enable or disable PCI Lock for 5G NR connections. |
Broadband | Cellular SMS | Use this screen to enable SMS Inbox and receive SMS messages. |
Wireless | General | Use this screen to configure the Wi-Fi settings and Wi-Fi authentication or security settings. |
Wireless | More AP | Use this screen to configure multiple BSSs on the Zyxel Device. |
Wireless | MAC Authentication | Use this screen to block or allow wireless traffic from wireless devices of certain SSIDs and MAC addresses to the Zyxel Device. |
Wireless | WPS | Use this screen to configure and view your WPS (Wi-Fi Protected Setup) settings. |
Wireless | WMM | Use this screen to enable or disable Wi-Fi MultiMedia (WMM). |
Wireless | Others | Use this screen to configure advanced Wi-Fi settings. |
Wireless | WLAN Scheduler | Use this screen to create rules to schedule the times to permit Internet traffic from each wireless network interfaces. |
Wireless | Channel Status | Use this screen to scan Wi-Fi channel noises and view the results. |
Home Networking | LAN Setup | Use this screen to configure LAN TCP or IP settings, and other advanced properties. |
Home Networking | Static DHCP | Use this screen to assign specific IP addresses to individual MAC addresses. |
Home Networking | UPnP | Use this screen to turn UPnP and UPnP NAT-T on or off. |
Home Networking | Custom DHCP | Use this screen to configure additional DHCP options. |
Routing | Static Route | Use this screen to view and set up static routes on the Zyxel Device. |
Routing | DNS Route | Use this screen to forward DNS queries for certain domain names through a specific WAN interface to its DNS servers. |
Routing | Policy Route | Use this screen to configure policy routing on the Zyxel Device. |
Routing | RIP | Use this screen to configure Routing Information Protocol to exchange routing information with other routers. |
NAT | Port Forwarding | Use this screen to make your local servers visible to the outside world. |
NAT | Port Triggering | Use this screen to change your Zyxel Device’s port triggering settings. |
NAT | DMZ | Use this screen to configure a default server which receives packets from ports that are not specified in the Port Forwarding screen. |
NAT | ALG | Use this screen to enable the ALGs (Application Layer Gateways) in the Zyxel Device to allow applications to operate through NAT. |
DNS | DNS Entry | Use this screen to view and configure DNS routes. |
DNS | Dynamic DNS | Use this screen to allow a static hostname alias for a dynamic IP address. |
USB Service | USB Service | Use this screen to enable file sharing through the Zyxel Device. |
VLAN Group | VLAN Group | Use this screen to group and tag VLAN IDs to outgoing traffic from the specified interface. |
Interface Grouping | Interface Grouping | Use this screen to map a port to create multiple networks on the Zyxel Device. |
Nebula | Nebula | Use this screen to enable Nebula Discovery and configure proxy server settings. |
Security | ||
Firewall | General | Use this screen to configure the security level of your firewall. |
Firewall | Protocol | Use this screen to add Internet services and configure firewall rules. |
Firewall | Access Control | Use this screen to enable specific traffic directions for network services. |
Firewall | DoS | Use this screen to activate protection against Denial of Service (DoS) attacks. |
MAC Filter | MAC Filter | Use this screen to block or allow traffic from devices of certain MAC addresses to the Zyxel Device. |
Parental Control | Parental Control | Use this screen to define time periods and days during which the Zyxel Device performs parental control and/or block web sites with the specific URL. |
Certificates | Local Certificates | Use this screen to view a summary list of certificates and manage certificates and certification requests. |
Certificates | Trusted CA | Use this screen to view and manage the list of the trusted CAs. |
System Monitor | ||
Log | System Log | Use this screen to view the status of events that occurred to the Zyxel Device. You can export or email the logs. |
Log | Security Log | Use this screen to view all security related events. You can select the level and category of the security events in their proper drop-down list window. Levels include: • Emergency • Alert • Critical • Error • Warning • Notice • Informational • Debugging Categories include: • Account • Attack • Firewall • MAC Filter |
Traffic Status | WAN | Use this screen to view the status of all network traffic going through the WAN port of the Zyxel Device. |
Traffic Status | LAN | Use this screen to view the status of all network traffic going through the LAN ports of the Zyxel Device. |
ARP Table | ARP Table | Use this screen to view the ARP table. It displays the IP and MAC address of each DHCP connection. |
Routing Table | Routing Table | Use this screen to view the routing table on the Zyxel Device. |
WLAN Station Status | WLAN Station Status | Use this screen to view the wireless stations that are currently associated to the Zyxel Device’s Wi-Fi. |
Cellular WAN Status | Cellular WAN Status | Use this screen to look at the cellular Internet connection status. |
Maintenance | ||
System | System | Use this screen to set the Zyxel Device name and Domain name. |
User Account | User Account | Use this screen to change the user password on the Zyxel Device. |
Remote Management | MGMT Services | Use this screen to enable specific traffic directions for network services. |
Remote Management | Trust Domain | Use this screen to view a list of public IP addresses which are allowed to access the Zyxel Device through the services configured in the Maintenance > Remote Management screen. |
Remote Management | MGMT Services for IP Passthrough | Use this screen to enable various approaches to access this Zyxel Device remotely from a WAN and/or LAN connection. |
Remote Management | Trust Domain for IP Passthrough | Use this screen to enable public IP addresses to access this Zyxel Device remotely from a WAN and/or LAN connection. |
TR-069 Client | TR-069 Client | Use this screen to configure your Zyxel Device to be managed remotely by an Auto Configuration Server (ACS) using TR-069. |
TR-369 Local Agent | General | Use this screen to enable TR-369 and set the Zyxel Device as an agent. Select a cellular WAN, and configure the Message Transfer Protocol (MTP) to receive USP messages from USP (User Services Platform) controllers. |
TR-369 Local Agent | Controller | Use this screen to configure controller settings for topics the Zyxel Device agent should publish to this controller. |
TR-369 Local Agent | MQTT | Use this screen to manage the profile settings that the Zyxel Device will use to register with an MQTT broker. |
Time | Time | Use this screen to change your Zyxel Device’s time and date. |
E-mail Notification | E-mail Notification | Use this screen to configure up to two mail servers and sender addresses on the Zyxel Device. |
Log Setting | Log Setting | Use this screen to change your Zyxel Device’s log settings. |
Firmware Upgrade | Firmware Upgrade | Use this screen to upload firmware to your Zyxel Device. |
Firmware Upgrade | Module Upgrade | Use this screen to upload the module firmware to your Zyxel Device. |
Backup/Restore | Backup/Restore | Use this screen to backup and restore your Zyxel Device’s configuration (settings) or reset the factory default settings. |
Reboot | Reboot | Use this screen to reboot the Zyxel Device or Zyxel Mesh system without turning the power off. |
Diagnostic | Diagnostic | Use this screen to identify problems with the Zyxel Device. You can use Ping, TraceRoute, or Nslookup to help you identify problems. |
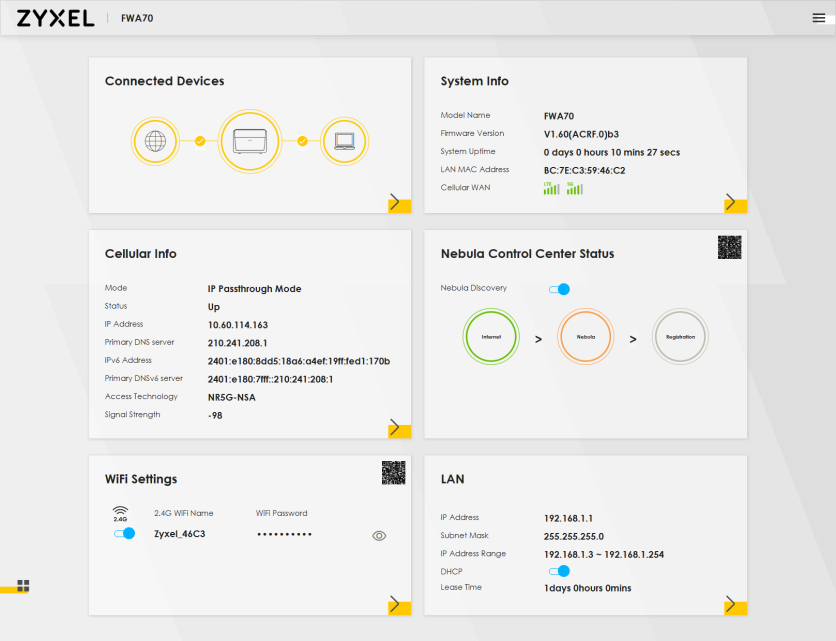
Dashboard
Use the menu items in the navigation panel on the right to open screens to configure the Zyxel Device’s features.
Widget Icon
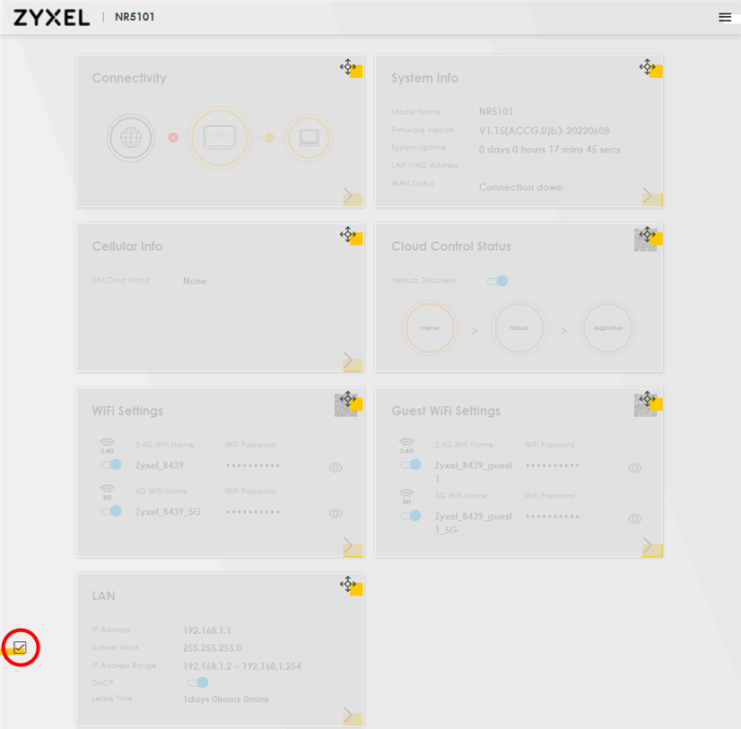
Click the Widget icon ( ) in the lower left corner to arrange the screen order.
) in the lower left corner to arrange the screen order.The following screen appears. Select a block and hold it to move around. Click the Check icon ( ) in the lower left corner to save the changes.
) in the lower left corner to save the changes.Check Icon