Port Setup
Port Setup
Use this screen to configure Switch port settings. Click PORT > Port Setup > Port Setup in the navigation panel to display the configuration screen.
PORT> Port Setup > Port Setup > Port Setup (Standalone Mode)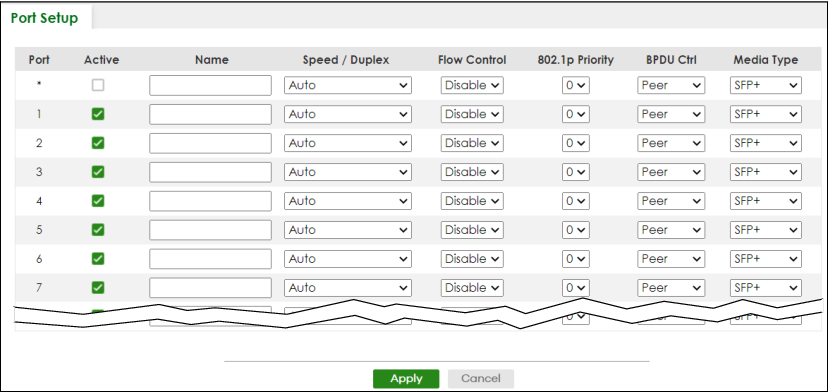
The following table describes the labels in this screen.
label | description |
|---|---|
Port | This is the port index number. |
* | Settings in this row apply to all ports. Use this row only if you want to make some settings the same for all ports. Use this row first to set the common settings and then make adjustments on a port-by-port basis.  Changes in this row are copied to all the ports as soon as you make them. Changes in this row are copied to all the ports as soon as you make them. |
Active | Select this checkbox to enable a port. The factory default for all ports is enabled. A port must be enabled for data transmission to occur. |
Name | Type a descriptive name that identifies this port. You can enter up to 128 printable ASCII characters except [ ? ], [ | ], [ ' ] or [ " ]. Due to space limitations, the port name may be truncated in some Web Configurator screens. |
Speed/Duplex | Select the speed and the duplex mode of the Ethernet connection on this port. For an Ethernet port, the choices are Auto, 10-an (10M/auto-negotiation), 10M / Full Duplex, 100-an (100M/auto-negotiation), 100M / Full Duplex, 1G / Full Duplex, and 2.5G / Full Duplex. For an SFP+ interface, the choices are Auto, Auto-1G, 1G / Full Duplex, and 10G / Full Duplex. Selecting Auto-1G or Auto (auto-negotiation) allows one port to negotiate with a peer port automatically to obtain the connection speed and duplex mode that both ends support. When auto-negotiation is turned on, a port on the Switch negotiates with the peer automatically to determine the connection speed and duplex mode. If the peer port does not support auto-negotiation or turns off this feature, the Switch determines the connection speed by detecting the signal on the cable and using half duplex mode. When the Switch’s auto-negotiation is turned off, a port uses the pre-configured speed and duplex mode when making a connection, therefore requiring you to make sure that the settings of the peer port are the same in order to connect. |
Flow Control | A concentration of traffic on a port decreases port bandwidth and overflows buffer memory causing packet discards and frame losses. Flow Control is used to regulate transmission of signals to match the bandwidth of the receiving port. The Switch uses IEEE 802.3x flow control in full duplex mode. IEEE 802.3x flow control is used in full duplex mode to send a pause signal to the sending port, causing it to temporarily stop sending signals when the receiving port memory buffers fill. Select Tx Rx to allow the Switch port to send pause signal to the connected device, and for the connected device to send a pause signal to the Switch. The Switch will temporarily stop sending signals after receiving pause signal. Select Tx to allow the Switch port to send pause signal to the connected device. Select Rx to allow the connected device to send a pause signal to the Switch. The Switch will temporarily stop sending signals. Otherwise, select Disable. |
802.1p Priority | This priority value is added to incoming frames without a (802.1p) tag. |
BPDU Ctrl | Configure the way to treat BPDUs received on this port. You must activate Bridging Control Protocol Transparency in the SYSTEM > Switch Setup > Switch Setup screen first. Select Peer to process any BPDU (Bridge Protocol Data Units) received on this port. Select Tunnel to forward BPDUs received on this port. Select Discard to drop any BPDU received on this port. Select Network to process a BPDU with no VLAN tag and forward a tagged BPDU. BPDU control is only available in Standalone mode. |
Media Type | You can insert either an SFP+ transceiver or an SFP+ Direct Attach Copper (DAC) cable into the 10 Gigabit interface of the Switch. Select the media type (Auto / SFP+ / DAC10G) of the SFP+ module that is attached to the 10 Gigabit interface. The default setting is Auto. When Auto is selected, the Switch chooses SFP+ or DAC10G mode based on the DDMI information. Auto is only available for Zyxel transceivers and the Speed/Duplex field is set at Auto or 10G / Full Duplex. |
Apply | Click Apply to save your changes to the Switch’s run-time memory. The Switch loses these changes if it is turned off or loses power, so use the Save link on the top navigation panel to save your changes to the non-volatile memory when you are done configuring. |
Cancel | Click Cancel to begin configuring this screen afresh. |