Nebula Management
Overview
This section shows you how to:
Register your Root (Plus) on the NCC Portal
Go to the NCC portal. Enter your existing Zyxel Account credentials, or log in using Google, Apple, Microsoft Entra ID, or Passkey. Then, click Sign in.
If this is your first time logging in to the NCC portal, see First-Time Login to the NCC Portal.
If this is not your first time logging in to the NCC portal, see Subsequent Login to the NCC Portal.
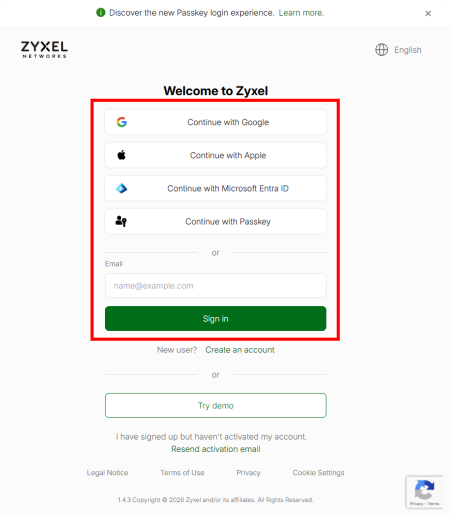
First-Time Login to the NCC Portal
1 Follow the Nebula setup wizard to create an organization and site.
• The setup wizard helps you create an organization and site, add Nebula Devices, upgrade your Nebula Device firmware, and set up WiFi networks quickly.
• The wizard appears automatically after you log in the first time or if there is no organization created under your account.
• The wizard also starts when you click Create organization from the Organization drop-down list in the title bar.
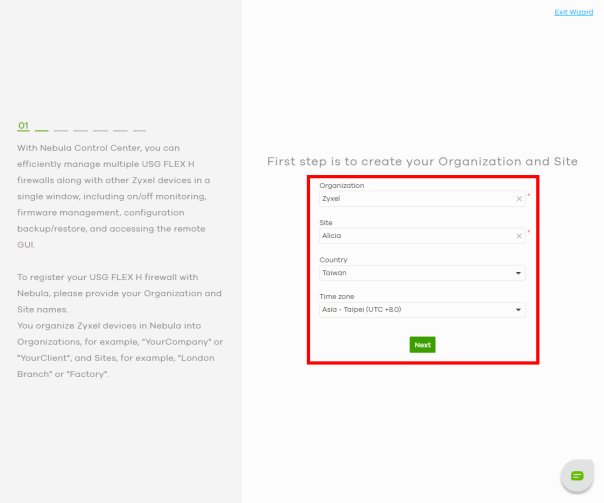
2 Enter the Organization and Site names. Select your Country and Time zone. Click Next.
3 Enter the MAC address, Serial number, and Name of the Root (Plus). Click the Add icon  , then click Next.
, then click Next.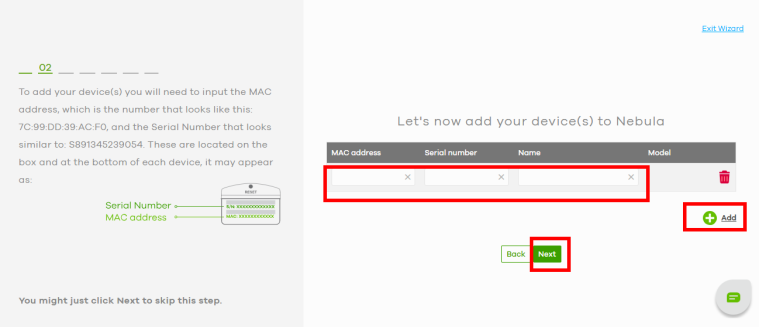
4 Select the trial license applicable to your Root (Plus). You can also click Activate All to use all trial licenses. When finished, click Next.
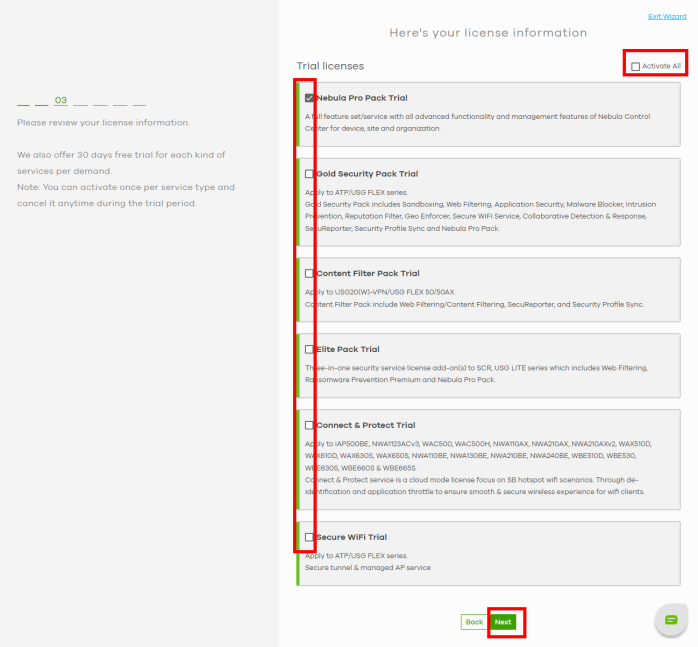
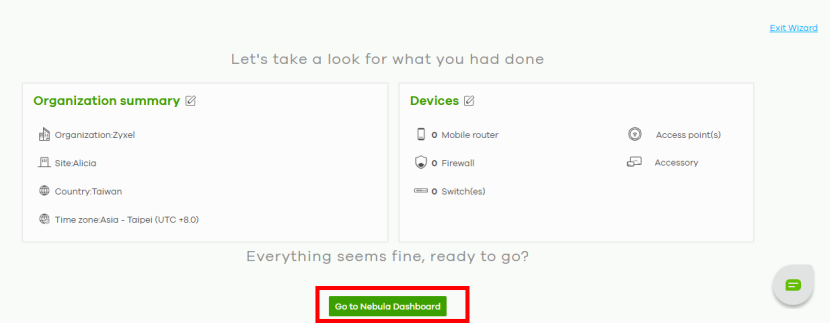
5 Check if the Organization summary and Devices information are correct. Once finished, click Go to Nebula Dashboard. Your Root (Plus) is now registered on the NCC portal.
Subsequent Login to the NCC Portal
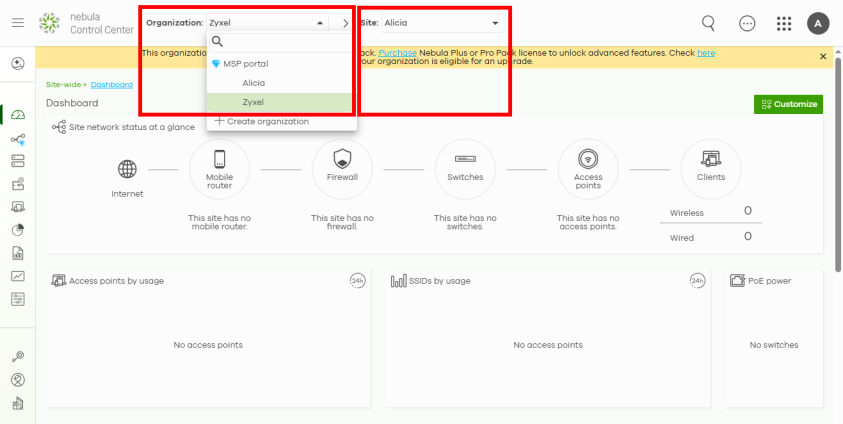
1 Select the Organization and Site where you want to register the Root (Plus) from the drop-down list at the top of the Dashboard screen.
2 Click the Devices icon on the left-hand bar of the Dashboard screen. Click the Add icon  to register the Root (Plus).
to register the Root (Plus).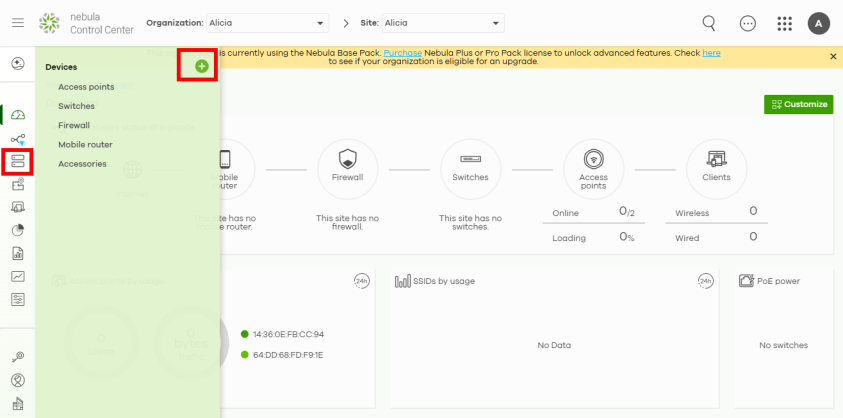
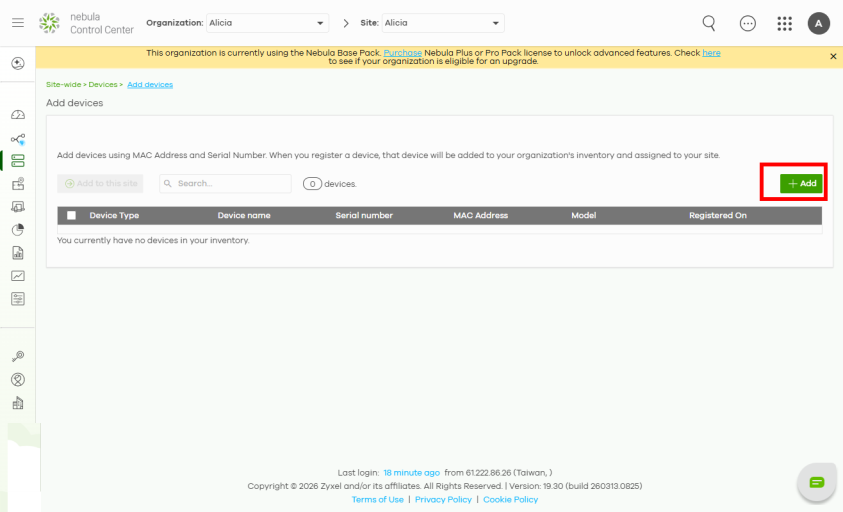
3 Click the +Add button on the right in the Add devices screen.
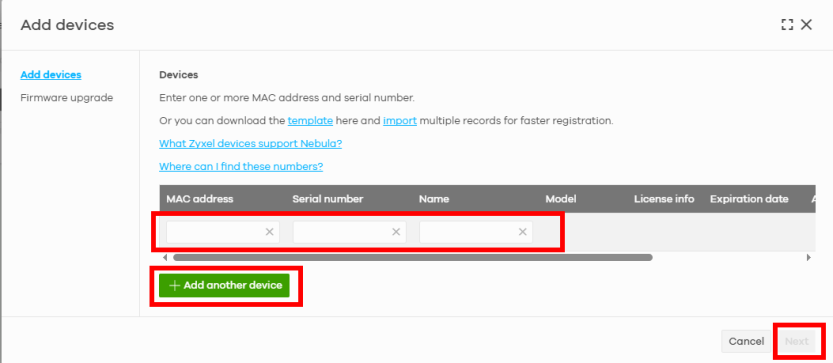
4 Enter the MAC address, Serial number, and Name of the Root (Plus). The Serial number and MAC address can be found on the Dashboard screen or on the device back label on the Root (Plus). Click the Add another device button to add more devices if needed. When finished, click Next.
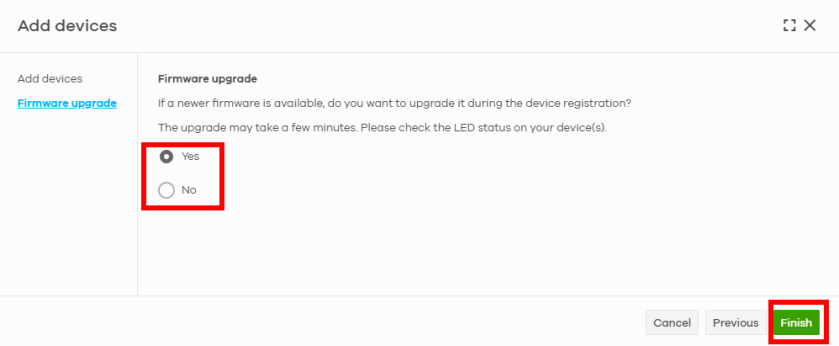
5 Select Yes to upgrade the Root (Plus) to the latest firmware. Click Finish to complete the registration.
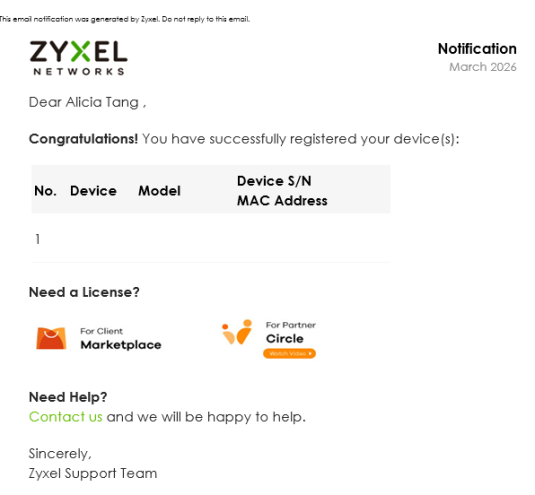
6 An email will be sent to inform you that the Root (Plus) has been successfully registered on the NCC portal.
NCC Dashboard
The following figure is an example of the Root (Plus) application when it’s managed by NCC.
NCC Managed Application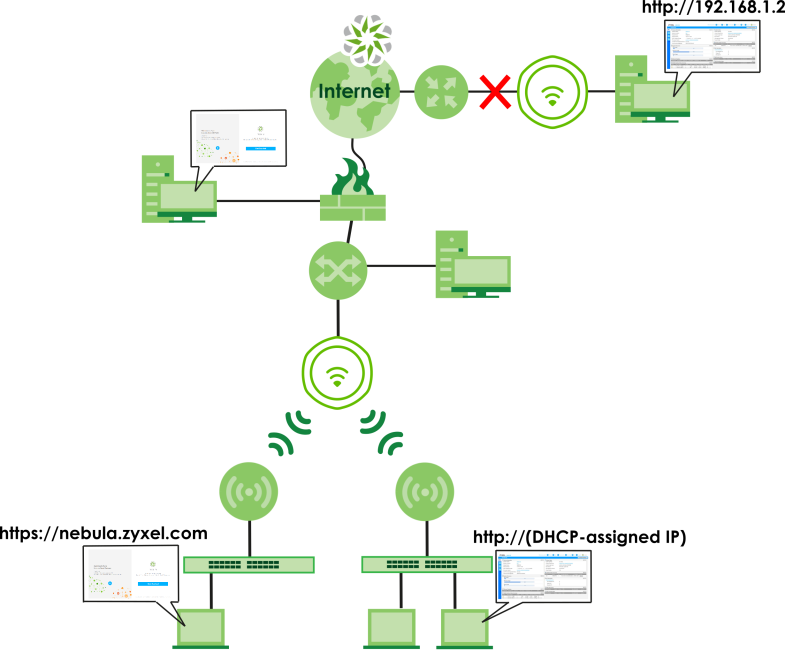
In this mode, you can manage and monitor the Root (Plus) through the Zyxel Nebula cloud-based network management system. This means you can manage devices remotely without the need of connecting to each device directly. It offers many features to better manage and monitor not just the Root (Plus), but your network as a whole, including supported switches and gateways. Your network can also be managed through your smartphone using the Nebula Mobile app.
NCC Dashboard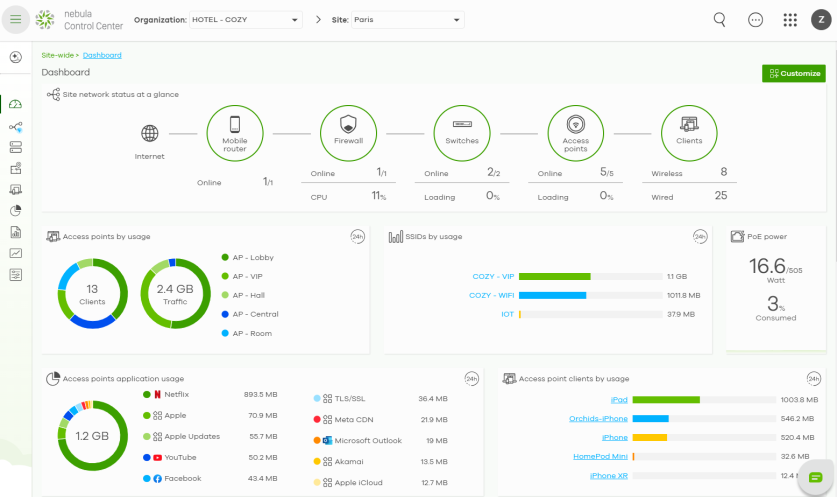
Each Root (Plus) must belong to a site which must be in an organization. You can configure each Root (Plus) on its own or configure a set of Root (Plus)s together in a site. You can also monitor groups of sites in organizations.
Organization | Organization | Organization | Organization |
Site A | Site A | Site B | Site B |
Device A-1 | Device A-2 | Device B-1 | Device B-2 |
You can use the Topology in NCC which graphically presents your device and network statistics. It shows an overview of your network topology, as shown in the following figure. See the NCC User’s Guide for how to configure Nebula managed devices.
NCC Topology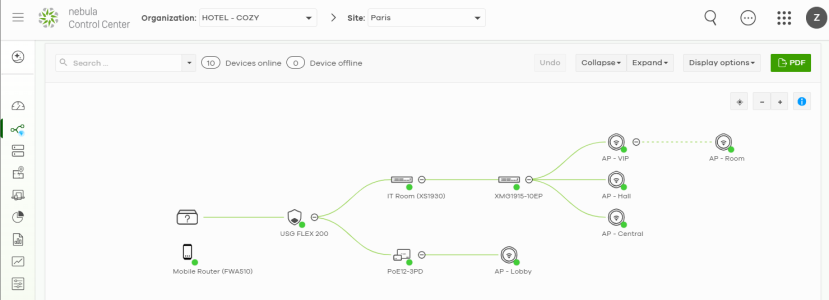
 Make sure your network firewall allows TCP ports 443, 4335, and 6667 as well as UDP port 123 so the Root (Plus) can connect to and sync with the NCC.
If you cannot access the Root (Plus) from the NCC, you need to access the local GUI by connecting directly to the LAN port of the PoE injector of the Root (Plus), and check if the Root (Plus)'s VLAN setting or IP address has changed.
To find the Root (Plus)'s current LAN IP address, go to Site-wide > Devices > Access points screen or the gateway to which the AP is connected. Alternatively, disconnect the gateway or disable its DHCP server function and use the Root (Plus)'s default static LAN IP address (192.168.1.2).Once you register your device with NCC, the local GUI login password will change to an NCC assigned password. To view or change the NCC assigned password, log in to NCC and go to Site-wide > Configure > Site settings > Local credentials.Accessing the Local GUI
This section shows how to access the local GUI for the first time.
1 Ensure your Root (Plus) hardware is properly connected. See the Quick Start Guide.
2 Access the local GUI login screen through a WiFi or wired connection.
2a WiFi connection
From a WiFi-enabled device, search for the Root (Plus)'s initial SSID (Zyxel-xxxx, where xxxx is the last four characters of the MAC address on the device label.) and connect to it. The local GUI appears once your computer connects to the initial SSID. If the local GUI does not appear automatically, open your web browser and enter "https://1.1.1.1" or "https://setup.zyxel.com".
If the Root (Plus) cannot connect to the Internet, use the Root (Plus)’s DHCP-assigned IP address to access its local GUI. Check the connected router or DHCP server for the IP address of the Root (Plus).The default security mode for the Root (Plus)'s initial SSID is enhanced-open. Client devices without enhanced-open support cannot connect to the initial SSID. Alternatively, you can use a wired connection to access the local GUI.2b Wired connection
Use Cat 5e or higher Ethernet cables to connect the Root (Plus) to the PoE port of a PoE injector that supports IEEE 802.3at or IEEE 802.3af, and connect your computer to the LAN port. Open your web browser and enter the Root (Plus)’s DHCP-assigned IP address or http://192.168.1.2. If the Root (Plus) and your computer are not connected to a DHCP server, ensure your computer’s IP address is between "192.168.1.3" and "192.168.1.254".
3 Enter the user name (default: “admin”) and default password. The default password is unique to each Root (Plus) and shown on the label.
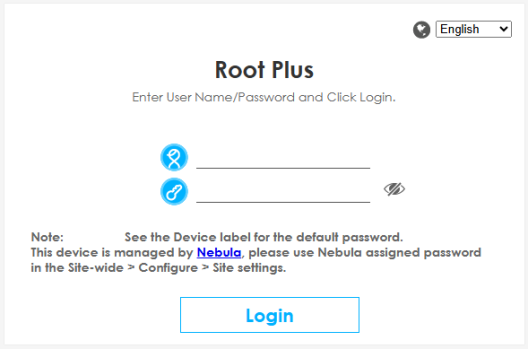
4 Select the language you prefer for the local GUI. Click Login.