Certificates
Overview
The Zyxel Device can use certificates (also called digital IDs) to authenticate users. Certificates are based on public-private key pairs. A certificate contains the certificate owner’s identity and public key. Certificates provide a way to exchange public keys for use in authentication.
What You Can Do in this Chapter
• The My Certificates screens (My Certificates) generate and export self-signed certificates or certification requests and import the Zyxel Device’s CA-signed certificates.
• The Trusted Certificates screens (Trusted Certificates) save CA certificates and trusted remote host certificates to the Zyxel Device. The Zyxel Device trusts any valid certificate that you have imported as a trusted certificate. It also trusts any valid certificate signed by any of the certificates that you have imported as a trusted certificate.
What You Need to Know
The following terms and concepts may help as you read this chapter.
When using public-key cryptology for authentication, each host has two keys. One key is public and can be made openly available. The other key is private and must be kept secure.
These keys work like a handwritten signature (in fact, certificates are often referred to as “digital signatures”). Only you can write your signature exactly as it should look. When people know what your signature looks like, they can verify whether something was signed by you, or by someone else. In the same way, your private key “writes” your digital signature and your public key allows people to verify whether data was signed by you, or by someone else.
This process works as follows:
1 Tim wants to send a message to Jenny. He needs her to be sure that it comes from him, and that the message content has not been altered by anyone else along the way. Tim generates a public key pair (one public key and one private key).
2 Tim keeps the private key and makes the public key openly available. This means that anyone who receives a message seeming to come from Tim can read it and verify whether it is really from him or not.
3 Tim uses his private key to sign the message and sends it to Jenny.
4 Jenny receives the message and uses Tim’s public key to verify it. Jenny knows that the message is from Tim, and that although other people may have been able to read the message, no-one can have altered it (because they cannot re-sign the message with Tim’s private key).
5 Additionally, Jenny uses her own private key to sign a message and Tim uses Jenny’s public key to verify the message.
The Zyxel Device uses certificates based on public-key cryptology to authenticate users attempting to establish a connection, not to encrypt the data that you send after establishing a connection. The method used to secure the data that you send through an established connection depends on the type of connection.
The certification authority uses its private key to sign certificates. Anyone can then use the certification authority’s public key to verify the certificates.
A certification path is the hierarchy of certification authority certificates that validate a certificate. The Zyxel Device does not trust a certificate if any certificate on its path has expired or been revoked.
Certification authorities maintain directory servers with databases of valid and revoked certificates. A directory of certificates that have been revoked before the scheduled expiration is called a CRL (Certificate Revocation List). The Zyxel Device can check a peer’s certificate against a directory server’s list of revoked certificates. The framework of servers, software, procedures and policies that handles keys is called PKI (public-key infrastructure).
Advantages of Certificates
Certificates offer the following benefits.
• The Zyxel Device only has to store the certificates of the certification authorities that you decide to trust, no matter how many devices you need to authenticate.
• Key distribution is simple and very secure since you can freely distribute public keys and you never need to transmit private keys.
Self-signed Certificates
You can have the Zyxel Device act as a certification authority and sign its own certificates.
Factory Default Certificate
The Zyxel Device generates its own unique self-signed certificate when you first turn it on. This certificate is referred to in the GUI as the factory default certificate.
Certificate File Formats
Any certificate that you want to import has to be in one of these file formats:
• Binary X.509: This is an ITU-T recommendation that defines the formats for X.509 certificates.
• PEM (Base-64) encoded X.509: This Privacy Enhanced Mail format uses lowercase letters, uppercase letters and numerals to convert a binary X.509 certificate into a printable form.
• Binary PKCS#7: This is a standard that defines the general syntax for data (including digital signatures) that may be encrypted. A PKCS #7 file is used to transfer a public key certificate. The private key is not included. The Zyxel Device currently allows the importation of a PKS#7 file that contains a single certificate.
• PEM (Base-64) encoded PKCS#7: This Privacy Enhanced Mail (PEM) format uses lowercase letters, uppercase letters and numerals to convert a binary PKCS#7 certificate into a printable form.
• Binary PKCS#12: This is a format for transferring public key and private key certificates.The private key in a PKCS #12 file is within a password-encrypted envelope. The file’s password is not connected to your certificate’s public or private passwords. Exporting a PKCS #12 file creates this and you must provide it to decrypt the contents when you import the file into the Zyxel Device.
Verifying a Certificate
Before you import a trusted certificate into the Zyxel Device, you should verify that you have the correct certificate. You can do this using the certificate’s fingerprint. A certificate’s fingerprint is a message digest calculated using the MD5 or SHA1 algorithm. The following procedure describes how to check a certificate’s fingerprint to verify that you have the actual certificate.
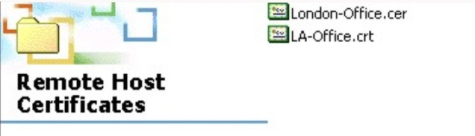
1 Browse to where you have the certificate saved on your computer.
2 Make sure that the certificate has a “.cer” or “.crt” file name extension.
3 Double-click the certificate’s icon to open the Certificate window. Click the Details tab and scroll down to the Thumbprint Algorithm and Thumbprint fields.
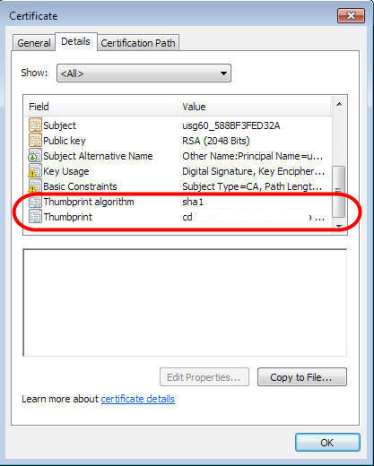
4 Use a secure method to verify that the certificate owner has the same information in the Thumbprint Algorithm and Thumbprint fields. The secure method may vary based on your situation. Possible examples would be over the telephone or through an HTTPS connection.
My Certificates
Click Configuration > Object > Certificate > My Certificates to open this screen. This is the Zyxel Device’s summary list of certificates and certification requests.
Configuration > Object > Certificate > My Certificates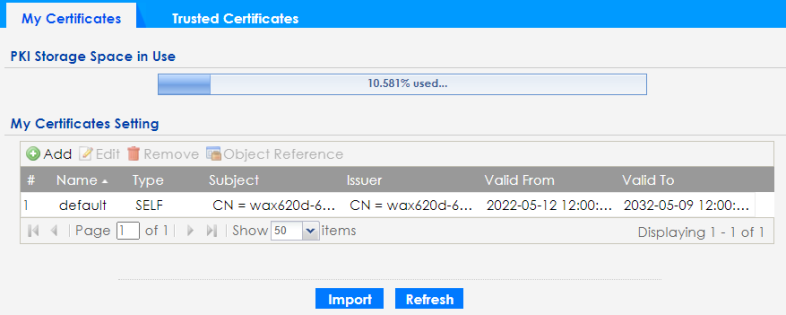
The following table describes the labels in this screen.
Label | Description |
|---|---|
PKI Storage Space in Use | This bar displays the percentage of the Zyxel Device’s PKI storage space that is currently in use. When the storage space is almost full, you should consider deleting expired or unnecessary certificates before adding more certificates. |
My Certificates Settings | |
Add | Click this to go to the screen where you can have the Zyxel Device generate a certificate or a certification request. |
Edit | Double-click an entry or select it and click Edit to open a screen with an in-depth list of information about the certificate. |
Remove | The Zyxel Device keeps all of your certificates unless you specifically delete them. Uploading a new firmware or default configuration file does not delete your certificates. To remove an entry, select it and click Remove. The Zyxel Device confirms you want to remove it before doing so. Subsequent certificates move up by one when you take this action. |
Object Reference | You cannot delete certificates that any of the Zyxel Device’s features are configured to use. Select an entry and click Object Reference to open a screen that shows which settings use the entry. |
# | This field displays the certificate index number. The certificates are listed in alphabetical order. |
Name | This field displays the name used to identify this certificate. It is recommended that you give each certificate a unique name. |
Type | This field displays what kind of certificate this is. REQ represents a certification request and is not yet a valid certificate. Send a certification request to a certification authority, which then issues a certificate. Use the My Certificate Import screen to import the certificate and replace the request. SELF represents a self-signed certificate. CERT represents a certificate issued by a certification authority. |
Subject | This field displays identifying information about the certificate’s owner, such as CN (Common Name), OU (Organizational Unit or department), O (Organization or company) and C (Country). It is recommended that each certificate have unique subject information. |
Issuer | This field displays identifying information about the certificate’s issuing certification authority, such as a common name, organizational unit or department, organization or company and country. With self-signed certificates, this is the same information as in the Subject field. |
Valid From | This field displays the date that the certificate becomes applicable. |
Valid To | This field displays the date that the certificate expires. The text displays in red and includes an Expired! message if the certificate has expired. |
Import | Click Import to open a screen where you can save a certificate to the Zyxel Device. |
Refresh | Click Refresh to display the current validity status of the certificates. |
Add My Certificates
Click Configuration > Object > Certificate > My Certificates and then the Add icon to open the Add My Certificates screen. Use this screen to have the Zyxel Device create a self-signed certificate, enroll a certificate with a certification authority or generate a certification request.
Configuration > Object > Certificate > My Certificates > Add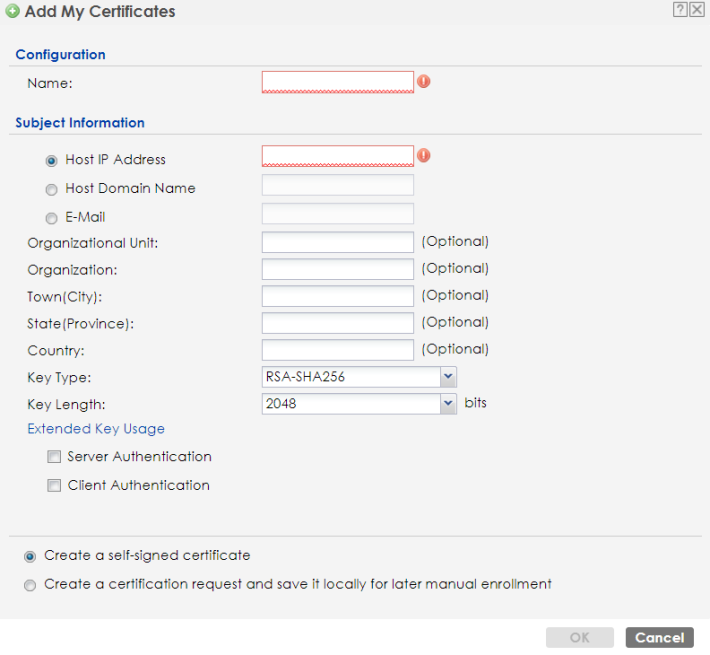
The following table describes the labels in this screen.
Label | Description |
|---|---|
Name | Type a name to identify this certificate. You can use up to 31 alphanumeric and ;‘~!@#$%^&()_+[]{}’,.=- characters. |
Subject Information | Use these fields to record information that identifies the owner of the certificate. You do not have to fill in every field, although you must specify a Host IP Address, Host Domain Name, or E-Mail. The certification authority may add fields (such as a serial number) to the subject information when it issues a certificate. It is recommended that each certificate have unique subject information. Select a radio button to identify the certificate’s owner by IP address, domain name or email address. Type the IP address (in dotted decimal notation), domain name or email address in the field provided. The domain name or email address is for identification purposes only and can be any string. A domain name can be up to 255 characters. You can use alphanumeric characters, the hyphen and periods. An email address can be up to 63 characters. You can use alphanumeric characters, the hyphen, the @ symbol, periods and the underscore. |
Organizational Unit | Identify the organizational unit or department to which the certificate owner belongs. You can use up to 31 characters. You can use alphanumeric characters, the hyphen and the underscore. |
Organization | Identify the company or group to which the certificate owner belongs. You can use up to 31 characters. You can use alphanumeric characters, the hyphen and the underscore. |
Town (City) | Identify the town or city where the certificate owner is located. You can use up to 31 characters. You can use alphanumeric characters, the hyphen and the underscore. |
State (Province) | Identify the state or province where the certificate owner is located. You can use up to 31 characters. You can use alphanumeric characters, the hyphen and the underscore. |
Country | Identify the nation where the certificate owner is located. You can use up to 31 characters. You can use alphanumeric characters, the hyphen and the underscore. |
Key Type | The Zyxel Device uses the RSA (Rivest, Shamir and Adleman) public-key encryption algorithm. SHA1 (Secure Hash Algorithm) and SHA2 are hash algorithms used to authenticate packet data. SHA2-256 or SHA2-512 are part of the SHA2 set of cryptographic functions and they are considered even more secure than SHA1. Select a key type from RSA-SHA256 and RSA-SHA512. |
Key Length | Select a number from the drop-down list box to determine how many bits the key should use (1024 to 2048). The longer the key, the more secure it is. A longer key also uses more PKI storage space. |
Extended Key Usage | Select Server Authentication to allow a web server to send clients the certificate to authenticate itself. Select Client Authentication to use the certificate’s key to authenticate clients to the secure gateway. |
Use the below radio buttons to set how and when the certificate is to be generated. | |
Create a self-signed certificate | Select this to have the Zyxel Device generate the certificate and act as the Certification Authority (CA) itself. This way you do not need to apply to a certification authority for certificates. |
Create a certification request and save it locally for later manual enrollment | Select this to have the Zyxel Device generate and store a request for a certificate. Use the My Certificate Edit screen to view the certification request and copy it to send to the certification authority. Copy the certification request from the My Certificate Edit screen and then send it to the certification authority. |
OK | Click OK to begin certificate or certification request generation. |
Cancel | Click Cancel to quit and return to the My Certificates screen. |
If you configured the Add My Certificates screen to have the Zyxel Device enroll a certificate and the certificate enrollment is not successful, you see a screen with a Return button that takes you back to the Add My Certificates screen. Click Return and check your information in the Add My Certificates screen. Make sure that the certification authority information is correct and that your Internet connection is working properly if you want the Zyxel Device to enroll a certificate online.
Edit My Certificates
Click Configuration > Object > Certificate > My Certificates and then the Edit icon to open the My Certificate Edit screen. You can use this screen to view in-depth certificate information and change the certificate’s name.
Configuration > Object > Certificate > My Certificates > Edit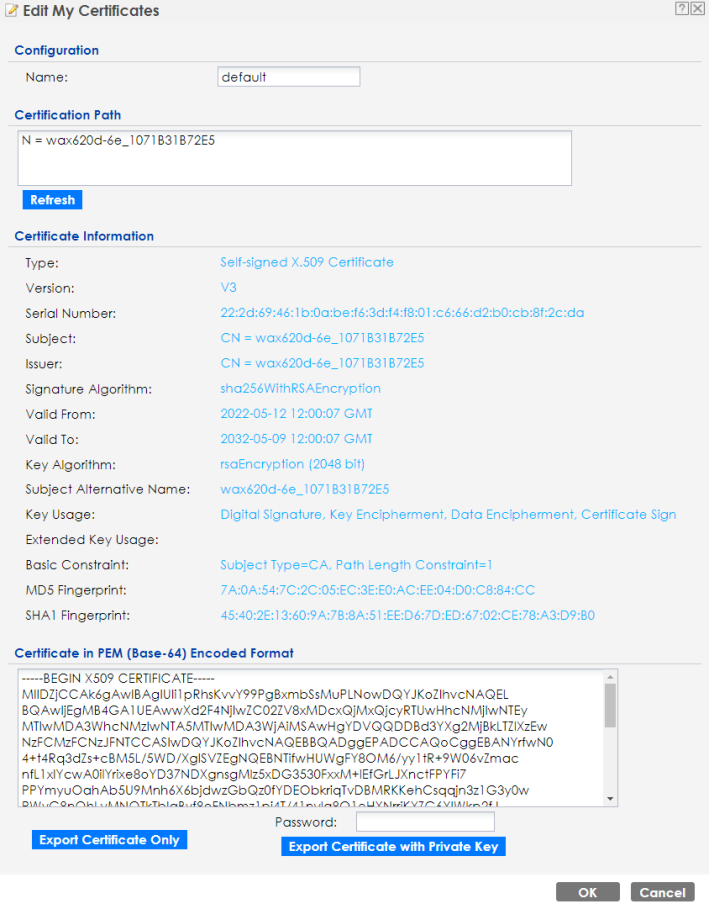
The following table describes the labels in this screen.
Label | Description |
|---|---|
Name | This field displays the identifying name of this certificate. You can use up to 31 alphanumeric and ;‘~!@#$%^&()_+[]{}’,.=- characters. |
Certification Path This field displays for a certificate, not a certification request. Click the Refresh button to have this read-only text box display the hierarchy of certification authorities that validate the certificate (and the certificate itself). If the issuing certification authority is one that you have imported as a trusted certification authority, it may be the only certification authority in the list (along with the certificate itself). If the certificate is a self-signed certificate, the certificate itself is the only one in the list. The Zyxel Device does not trust the certificate and displays “Not trusted” in this field if any certificate on the path has expired or been revoked. | |
Refresh | Click Refresh to display the certification path. |
Certificate Information These read-only fields display detailed information about the certificate. | |
Type | This field displays general information about the certificate. CA-signed means that a Certification Authority signed the certificate. Self-signed means that the certificate’s owner signed the certificate (not a certification authority). “X.509” means that this certificate was created and signed according to the ITU-T X.509 recommendation that defines the formats for public-key certificates. |
Version | This field displays the X.509 version number. |
Serial Number | This field displays the certificate’s identification number given by the certification authority or generated by the Zyxel Device. |
Subject | This field displays information that identifies the owner of the certificate, such as Common Name (CN), Organizational Unit (OU), Organization (O), State (ST), and Country (C). |
Issuer | This field displays identifying information about the certificate’s issuing certification authority, such as Common Name, Organizational Unit, Organization and Country. With self-signed certificates, this is the same as the Subject Name field. “none” displays for a certification request. |
Signature Algorithm | This field displays the type of algorithm that was used to sign the certificate. |
Valid From | This field displays the date that the certificate becomes applicable. “none” displays for a certification request. |
Valid To | This field displays the date that the certificate expires. The text displays in red and includes an Expired! message if the certificate has expired. “none” displays for a certification request. |
Key Algorithm | This field displays the type of algorithm that was used to generate the certificate’s key pair (the Zyxel Device uses RSA encryption) and the length of the key set in bits (1024 bits for example). |
Subject Alternative Name | This field displays the certificate owner‘s IP address (IP), domain name (DNS) or email address (EMAIL). |
Key Usage | This field displays for what functions the certificate’s key can be used. For example, “DigitalSignature” means that the key can be used to sign certificates and “KeyEncipherment” means that the key can be used to encrypt text. |
Extended Key Usage | This field displays for what EKU (Extended Key Usage) functions the certificate’s key can be used. |
Basic Constraint | This field displays general information about the certificate. For example, Subject Type=CA means that this is a certification authority’s certificate and “Path Length Constraint=1” means that there can only be one certification authority in the certificate’s path. This field does not display for a certification request. |
MD5 Fingerprint | This is the certificate’s message digest that the Zyxel Device calculated using the MD5 algorithm. |
SHA1 Fingerprint | This is the certificate’s message digest that the Zyxel Device calculated using the SHA1 algorithm. |
SHA256 Fingerprint | This is the certificate’s message digest that the Zyxel Device calculated using the SHA256 algorithm. |
Certificate in PEM (Base-64) Encoded Format | This read-only text box displays the certificate or certification request in Privacy Enhanced Mail (PEM) format. PEM uses lowercase letters, uppercase letters and numerals to convert a binary certificate into a printable form. You can copy and paste a certification request into a certification authority’s web page, an email that you send to the certification authority or a text editor and save the file on a management computer for later manual enrollment. You can copy and paste a certificate into an email to send to friends or colleagues or you can copy and paste a certificate into a text editor and save the file on a management computer for later distribution (through floppy disk for example). |
Export Certificate Only | Use this button to save a copy of the certificate without its private key. Click this button and then Save in the File Download screen. The Save As screen opens, browse to the location that you want to use and click Save. |
Password | If you want to export the certificate with its private key, create a password and type it here. Make sure you keep this password in a safe place. You will need to use it if you import the certificate to another device. |
Export Certificate with Private Key | Use this button to save a copy of the certificate with its private key. Type the certificate’s password and click this button. Click Save in the File Download screen. The Save As screen opens, browse to the location that you want to use and click Save. |
OK | Click OK to save your changes back to the Zyxel Device. You can only change the name. |
Cancel | Click Cancel to quit and return to the My Certificates screen. |
Import Certificates
Click Configuration > Object > Certificate > My Certificates > Import to open the My Certificate Import screen. Follow the instructions in this screen to save an existing certificate to the Zyxel Device.
The certificate you import replaces the corresponding request in the My Certificates screen.
You must remove any spaces in the certificate’s filename before you can import it.
Configuration > Object > Certificate > My Certificates > Import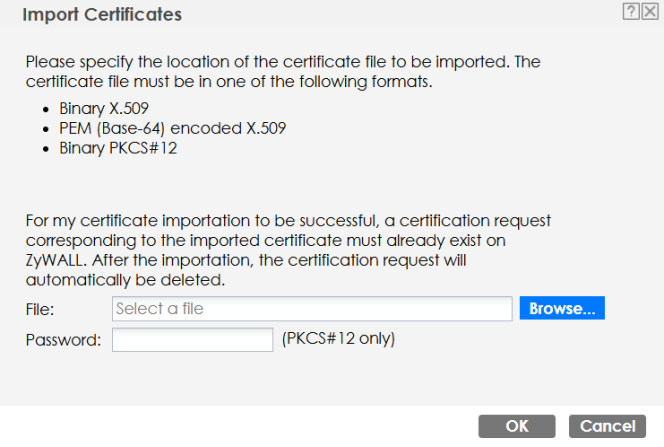
The following table describes the labels in this screen.
Label | Description |
|---|---|
File | Type in the location of the file you want to upload in this field or click Browse to find it. You cannot import a certificate with the same name as a certificate that is already in the Zyxel Device. |
Browse | Click Browse to find the certificate file you want to upload. |
Password | This field only applies when you import a binary PKCS#12 format file. Type the file’s password that was created when the PKCS #12 file was exported. |
OK | Click OK to save the certificate on the Zyxel Device. |
Cancel | Click Cancel to quit and return to the My Certificates screen. |
Trusted Certificates
Click Configuration > Object > Certificate > Trusted Certificates to open the Trusted Certificates screen. This screen displays a summary list of certificates that you have set the Zyxel Device to accept as trusted. The Zyxel Device also accepts any valid certificate signed by a certificate on this list as being trustworthy; thus you do not need to import any certificate that is signed by one of these certificates.
Configuration > Object > Certificate > Trusted Certificates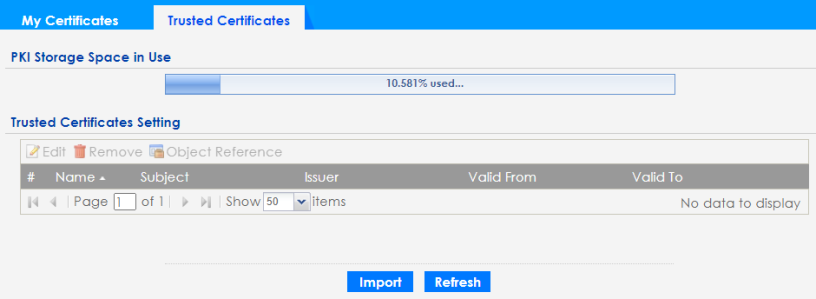
The following table describes the labels in this screen.
Label | Description |
|---|---|
PKI Storage Space in Use | This bar displays the percentage of the Zyxel Device’s PKI storage space that is currently in use. When the storage space is almost full, you should consider deleting expired or unnecessary certificates before adding more certificates. |
Trusted Certificates Setting | |
Edit | Double-click an entry or select it and click Edit to open a screen with an in-depth list of information about the certificate. |
Remove | The Zyxel Device keeps all of your certificates unless you specifically delete them. Uploading a new firmware or default configuration file does not delete your certificates. To remove an entry, select it and click Remove. The Zyxel Device confirms you want to remove it before doing so. Subsequent certificates move up by one when you take this action. |
Object Reference | You cannot delete certificates that any of the Zyxel Device’s features are configured to use. Select an entry and click Object Reference to open a screen that shows which settings use the entry. |
# | This field displays the certificate index number. The certificates are listed in alphabetical order. |
Name | This field displays the name used to identify this certificate. |
Subject | This field displays identifying information about the certificate’s owner, such as CN (Common Name), OU (Organizational Unit or department), O (Organization or company) and C (Country). It is recommended that each certificate have unique subject information. |
Issuer | This field displays identifying information about the certificate’s issuing certification authority, such as a common name, organizational unit or department, organization or company and country. With self-signed certificates, this is the same information as in the Subject field. |
Valid From | This field displays the date that the certificate becomes applicable. |
Valid To | This field displays the date that the certificate expires. The text displays in red and includes an Expired! message if the certificate has expired. |
Import | Click Import to open a screen where you can save the certificate of a certification authority that you trust, from your computer to the Zyxel Device. |
Refresh | Click this button to display the current validity status of the certificates. |
Edit Trusted Certificates
Click Configuration > Object > Certificate > Trusted Certificates and then a certificate’s Edit icon to open the Trusted Certificates Edit screen. Use this screen to view in-depth information about the certificate, change the certificate’s name and set whether or not you want the Zyxel Device to check a certification authority’s list of revoked certificates before trusting a certificate issued by the certification authority.
Configuration > Object > Certificate > Trusted Certificates > Edit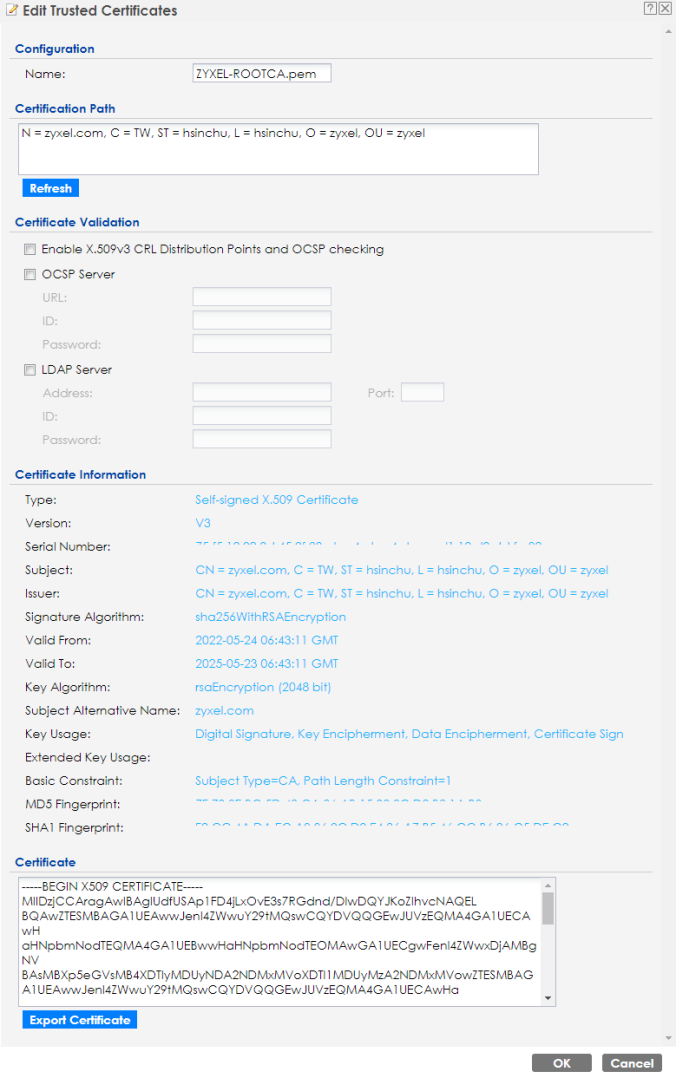
The following table describes the labels in this screen.
Label | Description |
|---|---|
Configuration | |
Name | This field displays the identifying name of this certificate. You can change the name. You can use up to 31 alphanumeric and ;‘~!@#$%^&()_+[]{}’,.=- characters. |
Certification Path Click the Refresh button to have this read-only text box display the end entity’s certificate and a list of certification authority certificates that shows the hierarchy of certification authorities that validate the end entity’s certificate. If the issuing certification authority is one that you have imported as a trusted certificate, it may be the only certification authority in the list (along with the end entity’s own certificate). The Zyxel Device does not trust the end entity’s certificate and displays “Not trusted” in this field if any certificate on the path has expired or been revoked. | |
Refresh | Click Refresh to display the certification path. |
Certificate Validation | |
Enable X.509v3 CRL Distribution Points and OCSP checking | Select this checkbox to have the Zyxel Device check incoming certificates that are signed by this certificate against a Certificate Revocation List (CRL) or an OCSP server. You also need to configure the OSCP or LDAP server details. |
OCSP Server | Select this checkbox if the directory server uses OCSP (Online Certificate Status Protocol). |
URL | Type the protocol, IP address and pathname of the OCSP server. |
ID | The Zyxel Device may need to authenticate itself in order to assess the OCSP server. Type the login name (up to 31 ASCII characters) from the entity maintaining the server (usually a certification authority). |
Password | Type the password (up to 31 ASCII characters) from the entity maintaining the OCSP server (usually a certification authority). |
LDAP Server | Select this checkbox if the directory server uses LDAP (Lightweight Directory Access Protocol). LDAP is a protocol over TCP that specifies how clients access directories of certificates and lists of revoked certificates. |
Address | Type the IP address (in dotted decimal notation) of the directory server. |
Port | Use this field to specify the LDAP server port number. You must use the same server port number that the directory server uses. 389 is the default server port number for LDAP. |
ID | The Zyxel Device may need to authenticate itself in order to assess the CRL directory server. Type the login name (up to 31 ASCII characters) from the entity maintaining the server (usually a certification authority). |
Password | Type the password (up to 31 ASCII characters) from the entity maintaining the CRL directory server (usually a certification authority). |
Certificate Information These read-only fields display detailed information about the certificate. | |
Type | This field displays general information about the certificate. CA-signed means that a Certification Authority signed the certificate. Self-signed means that the certificate’s owner signed the certificate (not a certification authority). X.509 means that this certificate was created and signed according to the ITU-T X.509 recommendation that defines the formats for public-key certificates. |
Version | This field displays the X.509 version number. |
Serial Number | This field displays the certificate’s identification number given by the certification authority. |
Subject | This field displays information that identifies the owner of the certificate, such as Common Name (CN), Organizational Unit (OU), Organization (O) and Country (C). |
Issuer | This field displays identifying information about the certificate’s issuing certification authority, such as Common Name, Organizational Unit, Organization and Country. With self-signed certificates, this is the same information as in the Subject Name field. |
Signature Algorithm | This field displays the type of algorithm that was used to sign the certificate. Some certification authorities use rsa-pkcs1-sha1 (RSA public-private key encryption algorithm and the SHA1 hash algorithm). Other certification authorities may use rsa-pkcs1-md5 (RSA public-private key encryption algorithm and the MD5 hash algorithm). |
Valid From | This field displays the date that the certificate becomes applicable. The text displays in red and includes a Not Yet Valid! message if the certificate has not yet become applicable. |
Valid To | This field displays the date that the certificate expires. The text displays in red and includes an Expiring! or Expired! message if the certificate is about to expire or has already expired. |
Key Algorithm | This field displays the type of algorithm that was used to generate the certificate’s key pair (the Zyxel Device uses RSA encryption) and the length of the key set in bits (1024 bits for example). |
Subject Alternative Name | This field displays the certificate’s owner‘s IP address (IP), domain name (DNS) or email address (EMAIL). |
Key Usage | This field displays for what functions the certificate’s key can be used. For example, “DigitalSignature” means that the key can be used to sign certificates and “KeyEncipherment” means that the key can be used to encrypt text. |
Basic Constraint | This field displays general information about the certificate. For example, Subject Type=CA means that this is a certification authority’s certificate and “Path Length Constraint=1” means that there can only be one certification authority in the certificate’s path. |
MD5 Fingerprint | This is the certificate’s message digest that the Zyxel Device calculated using the MD5 algorithm. You can use this value to verify with the certification authority (over the phone for example) that this is actually their certificate. |
SHA1 Fingerprint | This is the certificate’s message digest that the Zyxel Device calculated using the SHA1 algorithm. You can use this value to verify with the certification authority (over the phone for example) that this is actually their certificate. |
Certificate | This read-only text box displays the certificate or certification request in Privacy Enhanced Mail (PEM) format. PEM uses lowercase letters, uppercase letters and numerals to convert a binary certificate into a printable form. You can copy and paste the certificate into an email to send to friends or colleagues or you can copy and paste the certificate into a text editor and save the file on a management computer for later distribution (through floppy disk for example). |
Export Certificate | Click this button and then Save in the File Download screen. The Save As screen opens, browse to the location that you want to use and click Save. |
OK | Click OK to save your changes back to the Zyxel Device. You can only change the name. |
Cancel | Click Cancel to quit and return to the Trusted Certificates screen. |
Import Trusted Certificates
Click Configuration > Object > Certificate > Trusted Certificates > Import to open the Import Trusted Certificates screen. Follow the instructions in this screen to save a trusted certificate to the Zyxel Device.
Configuration > Object > Certificate > Trusted Certificates > Import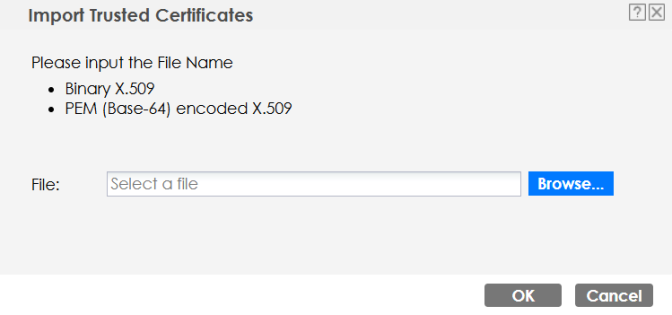
The following table describes the labels in this screen.
Label | Description |
|---|---|
File | Type in the location of the file you want to upload in this field or click Browse to find it. You cannot import a certificate with the same name as a certificate that is already in the Zyxel Device. |
Browse | Click Browse to find the certificate file you want to upload. |
OK | Click OK to save the certificate on the Zyxel Device. |
Cancel | Click Cancel to quit and return to the previous screen. |
Technical Reference
The following section contains additional technical information about the features described in this chapter.
OCSP
OCSP (Online Certificate Status Protocol) allows an application or device to check whether a certificate is valid. With OCSP the Zyxel Device checks the status of individual certificates instead of downloading a Certificate Revocation List (CRL). OCSP has two main advantages over a CRL. The first is real-time status information. The second is a reduction in network traffic since the Zyxel Device only gets information on the certificates that it needs to verify, not a huge list. When the Zyxel Device requests certificate status information, the OCSP server returns a “expired”, “current” or “unknown” response.