System
Overview
Use the system screens to configure general Zyxel Device settings.
Host Name
A host name is the unique name by which a device is known on a network.
The following table describes the labels in this screen.
Label | Description |
|---|---|
General Settings | |
System Name | Choose a descriptive name to identify your Zyxel Device device. This name can be up to 64 alphanumeric characters long. Spaces are not allowed, but dashes (-) underscores (_) and periods (.) are accepted. |
System Location | Specify the name of the place where the Zyxel Device is located. You can enter up to 60 alphanumeric and '()’ ,:;?! +-*/= #$%@ characters. Spaces and underscores are allowed. The name should start with a letter. |
Domain Name | Enter the domain name (if you know it) here. This name is propagated to DHCP clients connected to interfaces with the DHCP server enabled. This name can be up to 254 alphanumeric characters long. Spaces are not allowed, but dashes “-” are accepted. |
Apply | Click Apply to save your changes back to the Zyxel Device. |
Reset | Click Reset to return the screen to its last-saved settings. |
Power Mode
Use this screen to configure the Zyxel Device’s power settings. Click Configuration > System > Power Mode to open this screen.
The following table describes the labels in this screen.
Label | Description |
|---|---|
Force override the power mode to full power | Select this checkbox if you are using a PoE injector that does not support PoE negotiation. Otherwise, the Zyxel Device cannot draw full power from the power sourcing equipment. Enable this power mode to improve the Zyxel Device’s performance in this situation. |
Apply | Click Apply to save your changes back to the Zyxel Device. |
Reset | Click Reset to return the screen to its last-saved settings. |
Date and Time
For effective scheduling and logging, the Zyxel Device system time must be accurate. The Zyxel Device has a software mechanism to set the time manually or get the current time and date from an external server.
You can manually set the Zyxel Device’s time and date or have the Zyxel Device get the date and time from a time server.
The following table describes the labels in this screen.
Label | Description |
|---|---|
Current Time and Date | |
Current Time | This field displays the present time of your Zyxel Device. |
Current Date | This field displays the present date of your Zyxel Device. |
Time and Date Setup | |
Manual | Select this radio button to enter the time and date manually. If you configure a new time and date, time zone and daylight saving at the same time, the time zone and daylight saving will affect the new time and date you entered. When you enter the time settings manually, the Zyxel Device uses the new setting once you click Apply. |
New Time (hh:mm:ss) | This field displays the last updated time from the time server or the last time configured manually. When you set Time and Date Setup to Manual, enter the new time in this field and then click Apply. |
New Date (yyyy-mm-dd) | This field displays the last updated date from the time server or the last date configured manually. When you set Time and Date Setup to Manual, enter the new date in this field and then click Apply. |
Get from Time Server | Select this radio button to have the Zyxel Device get the time and date from the time server you specify below. The Zyxel Device requests time and date settings from the time server under the following circumstances. • When the Zyxel Device starts up. • When you click Apply or Sync. Now in this screen. • 24-hour intervals after starting up. |
Time Server Address | Enter the IP address or URL of your time server. Check with your ISP/network administrator if you are unsure of this information. |
Sync. Now | Click this button to have the Zyxel Device get the time and date from a time server (see the Time Server Address field). This also saves your changes (except the daylight saving settings). |
Time Zone Setup | |
Time Zone | Choose the time zone of your location. This will set the time difference between your time zone and Greenwich Mean Time (GMT). |
Enable Daylight Saving | Daylight saving is a period from late spring to fall when many countries set their clocks ahead of normal local time by one hour to give more daytime light in the evening. Select this option if you use Daylight Saving Time. |
Start Date | Configure the day and time when Daylight Saving Time starts if you selected Enable Daylight Saving. The at field uses the 24 hour format. Here are a couple of examples: Daylight Saving Time starts in most parts of the United States on the second Sunday of March. Each time zone in the United States starts using Daylight Saving Time at 2 A.M. local time. So in the United States you would select Second, Sunday, March and type 2 in the at field. Daylight Saving Time starts in the European Union on the last Sunday of March. All of the time zones in the European Union start using Daylight Saving Time at the same moment (1 A.M. GMT or UTC). So in the European Union you would select Last, Sunday, March. The time you type in the at field depends on your time zone. In Germany for instance, you would type 2 because Germany's time zone is one hour ahead of GMT or UTC (GMT+1). |
End Date | Configure the day and time when Daylight Saving Time ends if you selected Enable Daylight Saving. The at field uses the 24 hour format. Here are a couple of examples: Daylight Saving Time ends in the United States on the first Sunday of November. Each time zone in the United States stops using Daylight Saving Time at 2 A.M. local time. So in the United States you would select First, Sunday, November and type 2 in the at field. Daylight Saving Time ends in the European Union on the last Sunday of October. All of the time zones in the European Union stop using Daylight Saving Time at the same moment (1 A.M. GMT or UTC). So in the European Union you would select Last, Sunday, October. The time you type in the at field depends on your time zone. In Germany for instance, you would type 2 because Germany's time zone is one hour ahead of GMT or UTC (GMT+1). |
Offset | Specify how much the clock changes when daylight saving begins and ends. Enter a number from 1 to 5.5 (by 0.5 increments). For example, if you set this field to 3.5, a log occurred at 6 P.M. in local official time will appear as if it had occurred at 10:30 P.M. |
Apply | Click Apply to save your changes back to the Zyxel Device. |
Reset | Click Reset to return the screen to its last-saved settings. |
Pre-defined NTP Time Servers List
When you turn on the Zyxel Device for the first time, the date and time start at 2003-01-01 00:00:00. The Zyxel Device then attempts to synchronize with one of the following pre-defined list of Network Time Protocol (NTP) time servers in order from the first one until it is successful.
time.windows.com |
time.apple.com |
time.cloudflare.com |
The Zyxel Device continues to use the pre-defined list of NTP time servers if you do not specify a time server or it cannot synchronize with the time server you specified.
Time Server Synchronization
Click the Sync. Now button to get the time and date from the time server you specified in the Time Server Address field.
The Current Time and Current Date fields will display the appropriate settings if the synchronization is successful.
If the synchronization was not successful, a log displays in the View Log screen. Try re-configuring the Date/Time screen.
To manually set the Zyxel Device date and time:
1 Click System > Date/Time.
2 Select Manual under Time and Date Setup.
3 Enter the Zyxel Device’s time in the New Time field.
4 Enter the Zyxel Device’s date in the New Date field.
5 Under Time Zone Setup, select your Time Zone from the list.
6 As an option you can select the Enable Daylight Saving checkbox to adjust the Zyxel Device clock for daylight savings.
7 Click Apply.
To get the Zyxel Device date and time from a time server:
1 Click System > Date/Time.
2 Select Get from Time Server under Time and Date Setup.
3 Under Time Zone Setup, select your Time Zone from the list.
4 Under Time and Date Setup, enter a Time Server Address.
5 Click Apply.
WWW
The following figure shows secure and insecure management of the Zyxel Device coming in from the WAN. HTTPS and SSH access are secure. HTTP and FTP management access are not secure.
Secure and Insecure Service Access From the WAN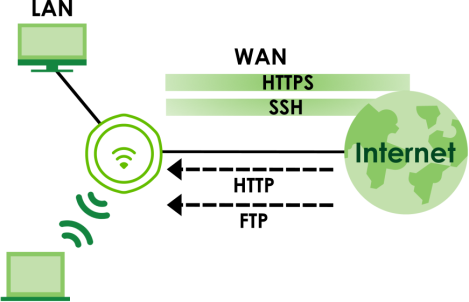
Configuring WWW Service Control
Use this screen to specify HTTP or HTTPS settings.
The following table describes the labels in this screen.
Label | Description |
|---|---|
HTTPS | |
Enable | Select the checkbox to allow or disallow the computer with the IP address that matches the IP address(es) in the Service Control table to access the Zyxel Device Web Configurator using secure HTTPs connections. |
Server Port | The HTTPS server listens on port 443 by default. If you change the HTTPS server port to a different number on the Zyxel Device, for example 8443, then you must notify people who need to access the Zyxel Device Web Configurator to use “https://Zyxel Device IP Address:8443” as the URL. |
Authenticate Client Certificates | Select Authenticate Client Certificates (optional) to require the SSL client to authenticate itself to the Zyxel Device by sending the Zyxel Device a certificate. To do that the SSL client must have a CA-signed certificate from a CA that has been imported as a trusted CA on the Zyxel Device. Click Trusted CAs to go to the Configuration > Object > Certificate > Trusted Certificates screen and check for the trusted certificates settings. |
Server Certificate | Select a certificate the HTTPS server (the Zyxel Device) uses to authenticate itself to the HTTPS client. You must have certificates already configured in the My Certificates screen. |
Redirect HTTP to HTTPS | To allow only secure Web Configurator access, select this to redirect all HTTP connection requests to the HTTPS server. |
HTTP | |
Enable | Select the checkbox to allow or disallow the computer with the IP address that matches the IP address(es) in the Service Control table to access the Zyxel Device Web Configurator using HTTP connections. |
Server Port | You may change the server port number for a service if needed, however you must use the same port number in order to use that service to access the Zyxel Device. |
Apply | Click Apply to save your changes back to the Zyxel Device. |
Reset | Click Reset to return the screen to its last-saved settings. |
SSH
You can use SSH (Secure SHell) to securely access the Zyxel Device’s command line interface.
SSH is a secure communication protocol that combines authentication and data encryption to provide secure encrypted communication between two hosts over an unsecured network. In the following figure, the computer on the Internet uses SSH to securely connect (SC) to the Zyxel Device for a management session.
SSH Communication Over the WAN Example
How SSH Works
The following figure is an example of how a secure connection is established between two remote hosts using SSH v1.
How SSH v1 Works Example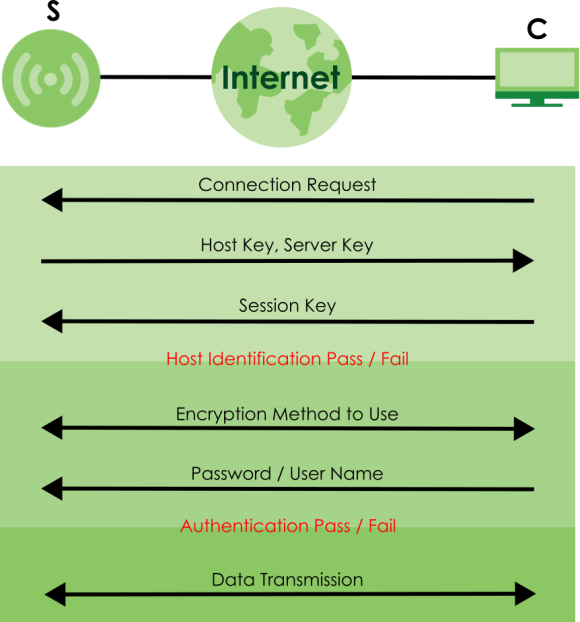
1 Host Identification
The SSH client (C) sends a connection request to the SSH server (S). The server identifies itself with a host key. The client encrypts a randomly generated session key with the host key and server key and sends the result back to the server.
The client automatically saves any new server public keys. In subsequent connections, the server public key is checked against the saved version on the client computer.
2 Encryption Method
Once the identification is verified, both the client and server must agree on the type of encryption method to use.
3 Authentication and Data Transmission
After the identification is verified and data encryption activated, a secure tunnel is established between the client and the server. The client then sends its authentication information (user name and password) to the server to log in to the server.
SSH Implementation on the Zyxel Device
Your Zyxel Device supports SSH versions 1 and 2 using RSA authentication and four encryption methods (AES, 3DES, Archfour, and Blowfish). The SSH server is implemented on the Zyxel Device for management using port 22 (by default).
Requirements for Using SSH
You must install an SSH client program on a client computer (Windows or Linux operating system) that is used to connect to the Zyxel Device over SSH.
Configuring SSH
Use this screen to configure your Zyxel Device’s Secure Shell settings.
The following table describes the labels in this screen.
Label | Description |
|---|---|
Enable | Select the checkbox to allow or disallow the computer with the IP address that matches the IP address(es) in the Service Control table to access the Zyxel Device CLI using this service. |
Server Port | You may change the server port number for a service if needed, however you must use the same port number in order to use that service for remote management. |
Server Certificate | Select the certificate whose corresponding private key is to be used to identify the Zyxel Device for SSH connections. You must have certificates already configured in the My Certificates screen. |
Apply | Click Apply to save your changes back to the Zyxel Device. |
Reset | Click Reset to return the screen to its last-saved settings. |
FTP
You can upload and download the Zyxel Device’s firmware and configuration files using FTP. To use this feature, your computer must have an FTP client. Use this screen to specify FTP settings.
The following table describes the labels in this screen.
Label | Description |
|---|---|
Enable | Select the checkbox to allow or disallow the computer with the IP address that matches the IP address(es) in the Service Control table to access the Zyxel Device using this service. |
TLS required | Select the checkbox to use FTP over TLS (Transport Layer Security) to encrypt communication. This implements TLS as a security mechanism to secure FTP clients and/or servers. |
Server Port | You may change the server port number for a service if needed, however you must use the same port number in order to use that service for remote management. |
Server Certificate | Select the certificate whose corresponding private key is to be used to identify the Zyxel Device for FTP connections. You must have certificates already configured in the My Certificates screen |
Apply | Click Apply to save your changes back to the Zyxel Device. |
Reset | Click Reset to return the screen to its last-saved settings. |
SNMP
Simple Network Management Protocol is a protocol used for exchanging management information between network devices. Your Zyxel Device supports SNMP agent functionality, which allows a manager station to manage and monitor the Zyxel Device through the network. The Zyxel Device supports SNMP version one (SNMPv1), version two (SNMPv2c), and version three (SNMPv3). The next figure illustrates an SNMP management operation.
SNMP Management Model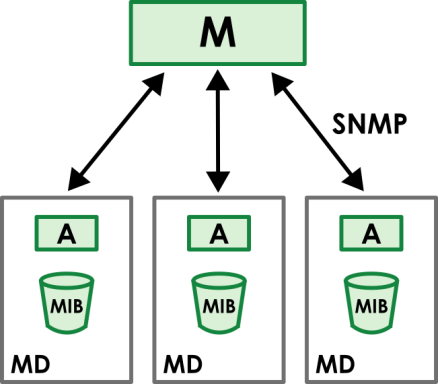
An SNMP managed network consists of two main types of component: agents(A) and a manager (M).
An agent is a management software module that resides in a managed device (MD, the Zyxel Device). An agent translates the local management information from the managed device into a form compatible with SNMP. The manager is the console through which network administrators perform network management functions. It executes applications that control and monitor managed devices.
The managed devices contain object variables/managed objects that define each piece of information to be collected about a device. Examples of variables include such as number of packets received, node port status etc. A Management Information Base (MIB) is a collection of managed objects. SNMP allows a manager and agents to communicate for the purpose of accessing these objects.
SNMP itself is a simple request/response protocol based on the manager/agent model. The manager issues a request and the agent returns responses using the following protocol operations:
• Get - Allows the manager to retrieve an object variable from the agent.
• GetNext - Allows the manager to retrieve the next object variable from a table or list within an agent. In SNMPv1, when a manager wants to retrieve all elements of a table from an agent, it initiates a Get operation, followed by a series of GetNext operations.
• Set - Allows the manager to set values for object variables within an agent.
• Trap - Used by the agent to inform the manager of some events.
Supported MIBs
The Zyxel Device supports MIB II that is defined in RFC-1213 and RFC-1215. The Zyxel Device also supports private MIBs (ZYXEL-ES-CAPWAP.MIB, ZYXEL-ES-COMMON.MIB, ZYXEL-ES-ZyXELAPMgmt.MIB, ZYXEL-ES-PROWLAN.MIB, ZYXEL-ES-RFMGMT.MIB, ZYXEL-ES-SMI.MIB, and ZYXEL-ES-WIRELESS.MIB) to collect information about CPU and memory usage and VPN total throughput. The focus of the MIBs is to let administrators collect statistical data and monitor status and performance. You can download the Zyxel Device’s MIBs from www.zyxel.com.
SNMP Traps
The Zyxel Device will send traps to the SNMP manager when any one of the following events occurs.
OBJECT LABEL | OBJECT ID | description |
|---|---|---|
linkDown | 1.3.6.1.6.3.1.1.5.3 | This trap is sent when the Ethernet link is down. |
linkUp | 1.3.6.1.6.3.1.1.5.4 | This trap is sent when the Ethernet link is up. |
authenticationFailure | 1.3.6.1.6.3.1.1.5.5 | This trap is sent when an SNMP request comes from non-authenticated hosts. |
Configuring SNMP
Use this screen to configure your SNMP settings. You can also configure user profiles that define allowed SNMPv3 access.
The following table describes the labels in this screen.
Label | Description |
|---|---|
Enable | Select the checkbox to allow or disallow users to access the Zyxel Device using SNMP. |
Server Port | You may change the server port number for a service if needed, however you must use the same port number in order to use that service for remote management. |
Trap | |
Community | Type the trap community, which is the password sent with each trap to the SNMP manager. The default is public and allows all requests. You can use up to 63 alphanumeric(0-9, a-z, A-Z) characters, underscores ( _ ), dots (· ). The first character cannot be a dot. |
Destination | Type the IP address of the station to send your SNMP traps to. |
Trap Wireless Event | Select this to have the Zyxel Device send a trap to the SNMP manager when a WiFi client is connected to or disconnected from the Zyxel Device. |
SNMPv2c | Select this to allow SNMP managers using SNMPv2c to access the Zyxel Device. |
Get Community | Enter the Get Community, which is the password for the incoming Get and GetNext requests from the management station. The default is public and allows all requests. You can use up to 63 alphanumeric(0-9, a-z, A-Z) characters, underscores ( _ ), dots (· ). The first character cannot be a dot. |
Set Community | Enter the Set community, which is the password for incoming Set requests from the management station. The default is private and allows all requests. You can use up to 63 alphanumeric(0-9, a-z, A-Z) characters, underscores ( _ ), dots (· ). The first character cannot be a dot. |
SNMPv3 | Select this to allow SNMP managers using SNMPv3 to access the Zyxel Device. |
Add | Click this to create a new entry. Select an entry and click Add to create a new entry after the selected entry. |
Edit | Double-click an entry or select it and click Edit to be able to modify the entry’s settings. |
Remove | To remove an entry, select it and click Remove. The Zyxel Device confirms you want to remove it before doing so. Note that subsequent entries move up by one when you take this action. |
# | This the index number of an SNMPv3 user profile. |
User Name | This is the name of the user for which this SNMPv3 user profile is configured. |
Authentication | This field displays the type of authentication the SNMPv3 user must use to connect to the Zyxel Device using this SNMPv3 user profile. |
Privacy | This field displays the type of encryption the SNMPv3 user must use to connect to the Zyxel Device using this SNMPv3 user profile. |
Privilege | This field displays whether the SNMPv3 user can have read-only or read and write access to the Zyxel Device using this SNMPv3 user profile. |
Apply | Click Apply to save your changes back to the Zyxel Device. |
Reset | Click Reset to return the screen to its last-saved settings. |
Adding or Editing an SNMPv3 User Profile
This screen allows you to add or edit an SNMPv3 user profile.
The following table describes the labels in this screen.
Label | Description |
|---|---|
User Name | Select the user name of the user account for which this SNMPv3 user profile is configured. |
Authentication | Select the type of authentication the SNMPv3 user must use to connect to the Zyxel Device using this SNMPv3 user profile. Select MD5 to require the SNMPv3 user’s password be encrypted by MD5 for authentication. Select SHA to require the SNMPv3 user’s password be encrypted by SHA for authentication. |
Privacy | Select the type of encryption the SNMPv3 user must use to connect to the Zyxel Device using this SNMPv3 user profile. Select NONE to not encrypt the SNMPv3 communications. Select DES to use DES to encrypt the SNMPv3 communications. Select AES to use AES to encrypt the SNMPv3 communications. |
Privilege | Select whether the SNMPv3 user can have read-only or read and write access to the Zyxel Device using this SNMPv3 user profile. |
OK | Click OK to save your changes back to the Zyxel Device. |
Cancel | Click Cancel to exit this screen without saving your changes. |