TR-369 Local Agent
TR-369 Local Agent
TR-369 or USP (User Services Platform) is a standardized protocol for managing, monitoring, upgrading, and controlling connected network devices. It can manage Wi-Fi, mesh networks, or IoT devices in smart homes. The TR-369 agent collects and analyzes data from network devices to identify potential problems and generate reports and alerts and sends them to a controller.
A service element refers to the set of objects, commands, events, and parameters that represent a specific set of functionality that can be modified by a controller on an agent. An agent, the Zyxel Device, ZD in the following example figure, exposes service elements to one or more controllers (CA, CB, CC in the example figure below). A controller manipulates service elements through one or more agents. The Instantiated Data Model (IDM) of an agent represents the current status of service elements that are exposed to one or more controllers. The Supported Data Model (SDM) of an agent represents the complete set of service elements it is capable of exposing to a controller.
A message refers to the contents of a TR-369 communication. A Message Transfer Protocol (MTP) is the protocol that carries a message. The endpoint must be identified by a locally or globally unique endpoint identifier depending on the scheme used for assignment.
Example TR-369 Topology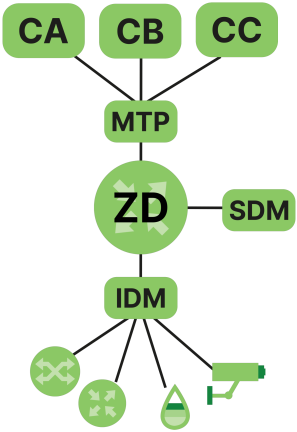
MQTT
The Zyxel Device supports MQ Telemetry Transport (MQTT) to send messages for always-on, direct communications between an agent (A, the Zyxel Device, ZD), controller (C), the MQTT broker (MQTT) and other clients. The MQTT broker (MQTT) routes and delivers messages between the controller and agent. Messages can be encrypted with TLS (Transport Layer Security) for end-to-end message security and integrity.
MQTT Broker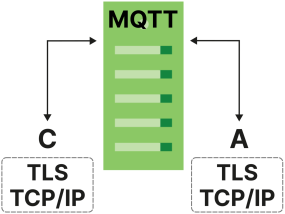
Topics
An agent exposes a service element to a controller by publishing a topic. Controllers use topic filters to subscribe to specific published topics that they can manage.
A topic uses a hierarchical structure with forward slash "/" characters for organizing topics and to identify the exact location of a service element. For example, “myhome/livingroom/temperature”, “myhome/bedroom/temperature”, “myoffice/meetingroom/temperature”.
Topic Filter Wildcards
Wildcard characters can be used in topic filters, but not in topic names. [MQTT-4.7.1-1].
The number sign (‘#’ U+0023) is a wildcard character that matches any number of levels within a topic. The multi-level wildcard represents the parent and any number of child levels. The multi-level wildcard character must be specified either on its own or following a topic level separator. In either case it must be the last character specified in the topic filter [MQTT-4.7.1-2]
For example, if a client subscribes to “sport/tennis/player1/#”, it would receive messages published using these topic names:
• “sport/tennis/player1”
• “sport/tennis/player1/ranking”
• “sport/tennis/player1/score/wimbledon”
• “sport/#” also matches the singular “sport”, since # includes the parent level.
• “#” is valid and will receive every Application Message
• “sport/tennis/#” is valid
• “sport/tennis#” is not valid
• “sport/tennis/#/ranking” is not valid
The plus sign (‘+’ U+002B) is a wildcard character that matches only one topic level. The single-level wildcard can be used at any level in the topic filter, including first and last levels. Where it is used it must occupy an entire level of the filter [MQTT-4.7.1-3]. It can be used at more than one level in the topic filter and can be used in conjunction with the multilevel wildcard.
For example, “sport/tennis/+” matches “sport/tennis/player1” and “sport/tennis/player2”, but not “sport/tennis/player1/ranking”. Also, because the single-level wildcard matches only a single level, “sport/+” does not match “sport” but it does match “sport/”.
• “+” is valid
• “+/tennis/#” is valid
• “sport+” is not valid
• “sport/+/player1” is valid
• “/finance” matches “+/+” and “/+”, but not “+”
Rules for Topic Names and Topic Filters
• All topic names and topic filters must be at least one character long.
• Topic names and topic filters are case sensitive.
• Topic names and topic filters can include the space character.
• A topic name or topic filter can have just the ‘/’ character, but you should make the topic as clear as possible.
• Topic names and topic filters must not include the null character (Unicode U+0000).
• Topic names and topic filters are UTF-8 encoded strings, and must not encode to more than 65,535 bytes.
• There is no limit to the number of levels in a topic name but the total length must be under 65,535 bytes.
Configuration Overview
Make sure the below prerequisites are done before configuring TR-369 on the Zyxel Device.
Prerequisites
Register with an MQTT broker. You may need to configure the following items.
Item | description |
|---|---|
Username | If this is required, note it and enter the same on the Zyxel Device. |
Password | If this is required, note it and enter the same on the Zyxel Device. |
Port | The default port is 1883. If the broker uses a different port, you must enter that different port number on the Zyxel Device. |
TLS | If this is configured on the broker, you must also configure it on the Zyxel Device. |
Protocol Version | Note whether the broker uses version 3.11 or 5.0, then select the same on the Zyxel Device. |
Configuring TR-369 on the Zyxel Device
1 First, configure the General screen. This Endpoint ID should identify the Zyxel Device acting as an agent.
2 Then, configure the Controller screen. This Endpoint ID should identify the controller. The Alias is a friendly name for the controller.
3 Configure the MQTT screen in Maintenance > TR-369 Local Agent. Each client connecting to the same MQTT broker must have a unique Client ID. Select the Reference to be the MQTT client you configured in the MQTT screen. For example, Device.MQTT.Client.1.
4 Finally, set the Topic as the topic name for the Zyxel Device to publish USP messages to the controller. For example, /usp/controller/Zyxel. Set the Response Topic as the topic name for the Zyxel Device to receive USP messages from controllers.
General
To enable TR-369, click Maintenance > TR-369 Local Agent > General to open the following screen.
Maintenance > TR-369 Local Agent > General
The following table describes the fields in this screen.
Label | Description |
|---|---|
Enable | Slide this to the right to enable the Zyxel Device as a TR-369 agent. |
Endpoint ID | This identifies the Zyxel Device acting as an agent. The Endpoint Identifier (ID) is used in the USP Record and various Parameters in a USP Message to uniquely identify agent endpoints. It can be globally or locally unique, either among all endpoints or among all controllers or all agents, depending on the scheme used for assignment. It has two mandatory and one optional components: authority-scheme, authority-id, and instance-id. These three components are combined as: authority-scheme ":" [authority-id] ":" instance-id. The format of the authority-id is dictated by the authority-scheme. The format of the instance-id is dictated either by the authority-scheme or by the entity identified by the authority-id. When used in a certificate, an Endpoint ID is expressed as a urn in the bbf namespace as: "urn:bbf:usp:id:" authority-scheme ":" [authority-id] ":" instance-id When used anywhere else (for example, in the to_id and from_id of a USP Record), the namespace information is omitted, and the Endpoint ID is expressed as: authority-scheme ":" [authority-id] ":" instance-id. |
WAN Interface Used by TR-369 Agent | Select a WAN interface through which the TR-369 traffic passes. If you select Any_WAN, the Zyxel Device automatically passes the TR-369 traffic when any WAN connection is up. If you select Multi_WAN, you also need to select two or more pre-configured WAN interfaces. The Zyxel Device automatically passes the TR-369 traffic when one of the selected WAN connections is up. |
Local Certificate | Select the USP server certificate for the Zyxel Device used by TR-369. To import the local certificate, go to Security > Certificates > Local Certificates. |
Controller
Click Maintenance > TR-369 Local Agent > Controller to open the following screen. Use this screen to configure controller settings for topics the Zyxel Device agent should publish to this controller.
Maintenance > TR-369 Local Agent > Controller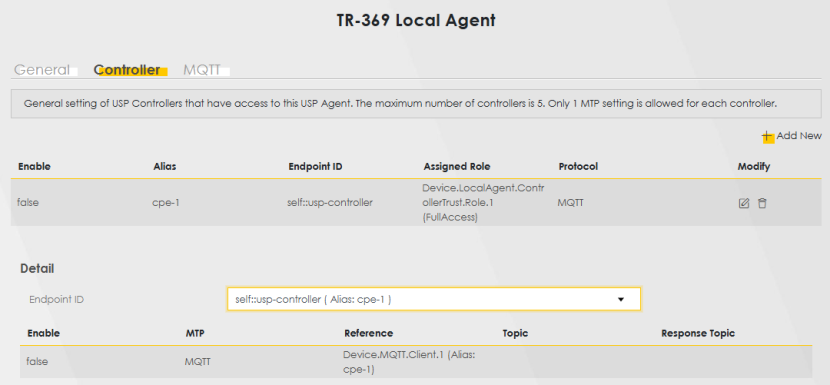
The following table describes the fields in this screen.
Label | Description |
|---|---|
Add New | Click this button to add a new controller entry. See Add or Edit Controller for details on configuring the required information for a controller. |
Enable | This displays if the controller is enabled. |
Alias | This displays a friendly name for the controller. |
Endpoint ID | This identifies the controller. |
Assigned Role | |
Modify | Click the Edit icon to configure an entry. Click the Delete icon to remove an entry. |
Detail | |
Enable | This displays if the configuration for the controller is enabled (true). Otherwise, it is false. |
Reference | This displays the MQTT client / STOMP server / WebSocket client you configured in the TR-369 Local Agent > Controller: Add or Edit screen. For example, Device.MQTT.Client.1. |
Topic | This displays the topic name for the Zyxel Device to publish USP messages to the controller. For example, /usp/controller. |
Response Topic | This displays the topic name for the Zyxel Device to receive USP messages from controllers. For example, /usp/endpoint. |
Add or Edit Controller
Click Add New in the Controller screen or click the Edit icon next to a controller. Use this screen to configure the required information for a controller.
Maintenance > TR-369 Local Agent > Controller: Add or Edit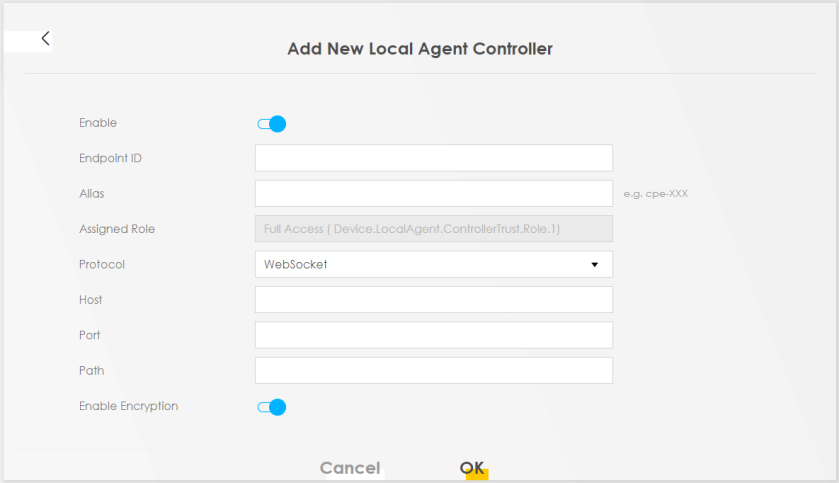
The following table describes the fields in this screen.
Label | Description |
|---|---|
Enable | Slide this to the right to enable the controller. |
Endpoint ID | This identifies the device acting as a controller. The Endpoint Identifier (ID) is used in the USP Record and various parameters in a USP Message to uniquely identify Controller Endpoints. It can be globally or locally unique, either among all Endpoints or among all controllers or all agents, depending on the scheme used for assignment. It has two mandatory and one optional components: authority-scheme, authority-id, and instance-id. These three components are combined as: authority-scheme ":" [authority-id] ":" instance-id. The format of the authority-id is dictated by the authority-scheme. The format of the instance-id is dictated either by the authority-scheme or by the entity identified by the authority-id. When used in a certificate, an Endpoint ID is expressed as a urn in the bbf namespace as: "urn:bbf:usp:id:" authority-scheme ":" [authority-id] ":" instance-id When used anywhere else (for example, in the to_id and from_id of a USP Record), the namespace information is omitted, and the Endpoint ID is expressed as: authority-scheme ":" [authority-id] ":"instance-id. |
Alias | Enter a unique name to identify the device acting as the controller. Please note the following: • The value must not be empty. • The value must start with a letter. • If the value is not assigned by the controller at creation time, you must assign a value with a "cpe-" prefix. If the value is not assigned by the controller on creation, you must choose an initial value that does not conflict with any existing entries. |
Assigned Role | |
Topic | Set this as the topic name for the Zyxel Device to publish USP messages to the controller. It must not contain wildcards. See Rules for Topic Names and Topic Filters. For example, /usp/controller/Zyxel. |
Response Topic | Set this as the topic name for the Zyxel Device to receive USP messages from controllers.You can subscribe to multiple topics at once using wildcards. See Topic Filter Wildcards. |
Host | Enter the hostname or IPv4 address of the destination of the WebSocket connection. Make sure the network client is reachable from the Zyxel Device. |
Port | This is the port used for the WebSocket connection. The default port is shown here. If the connection uses a different port, enter that port number here. |
Path | Enter the URL of the of the destination of the WebSocket connection. |
Enable Encryption | Slide this switch to the right to enable data encryption for this WebSocket connection. |
OK | Click OK to save your changes. |
Cancel | Click Cancel to restore the screen’s last saved settings. |
MQTT
Use this screen to manage the profile settings that the Zyxel Device will use to register with an MQTT broker. Click Maintenance > TR-369 Local Agent > MQTT to open the following screen.
Maintenance > TR-369 Local Agent > MQTT 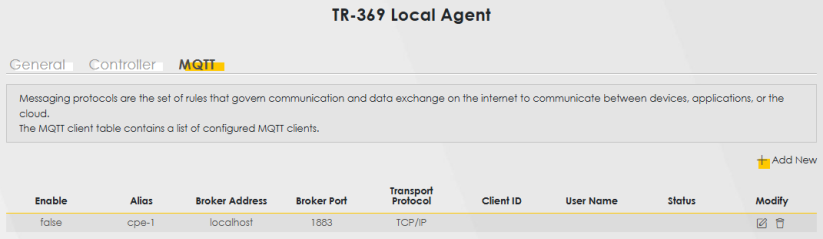
The following table describes the fields in this screen.
Label | Description |
|---|---|
+ Add New | Click this button to add a new MQTT client. |
Enable | This displays if the MQTT client is enabled. |
Alias | This displays a friendly name to identify the MQTT client. |
Broker Address | This displays the URL of the MQTT broker. |
Broker Port | This displays the port used for registration with the broker. |
Transport Protocol | This displays the transport protocol (TCP/IP or TLS) for the Zyxel Device to send messages to the broker. |
Client ID | This displays the unique Client ID of the client connecting to the MQTT broker. |
User Name | This displays the user name if the MQTT broker requires it for login. |
Modify | Click the Edit icon to configure an entry. Click the Delete icon to remove an entry. |
Add or Edit MQTT
Click Add New in the MQTT screen or click the Edit icon next to a controller. Use this screen to configure the required information for the MQTT broker.
Maintenance > TR-369 Local Agent > MQTT Client: Add or Edit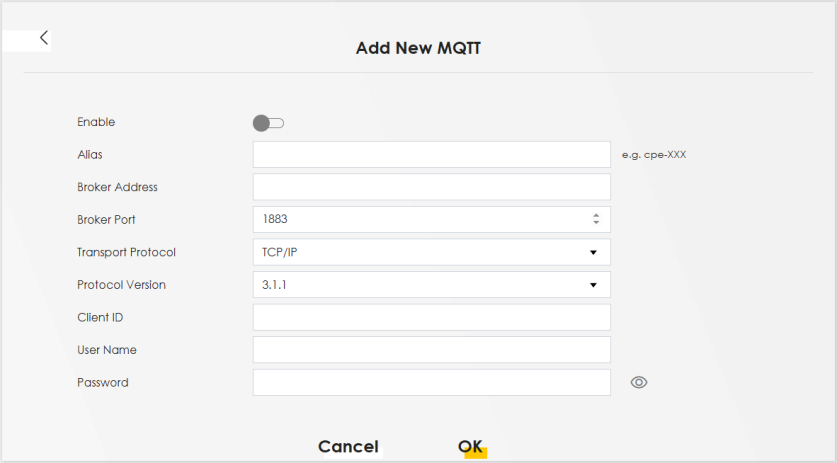
The following table describes the fields in this screen.
Label | Description |
|---|---|
Enable | Slide this to the right to enable this MQTT client. |
Alias | Enter a friendly name to identify the MQTT client. Enter 0 – 255 printable characters including special characters and spaces. |
Broker Address | Enter the URL of the MQTT broker. Make sure the broker is reachable from the Zyxel Device. |
Broker Port | Enter the port used for registration with the broker. The default port is shown here. If the broker is using a different port, enter that port number here. |
Transport Protocol | Select the transport protocol (TCP/IP or TLS) for the Zyxel Device to send messages. Select TLS is you want MTP message encryption using a certificate in TLS. Make sure the broker also supports TLS. |
Protocol Version | Select the version which the MQTT broker is using. |
Client ID | Enter the unique Client ID of the MQTT client connecting to the MQTT broker if required. Enter between 1 and 23 UTF-8 encoded case-sensitive alpha-numeric characters. The MQTT broker determines the characters allowed for the Client ID. |
User Name | Enter the user name if the MQTT broker requires it for login. Enter 0 – 255 printable characters including special characters and spaces. |
Password | Enter the password if the MQTT broker requires it for login. Enter 0 – 255 printable characters including special characters and spaces. |
OK | Click OK to save your changes. |
Cancel | Click Cancel to discard your changes and return to the previous screen. |