Wireless
Wireless Overview
This chapter describes the Zyxel Device’s Network Setting > Wireless screens. Use these screens to set up your Zyxel Device’s Wi-Fi network and security settings.
What You Can Do in this Chapter
This section describes the Zyxel Device’s Wireless screens. Use these screens to set up your Zyxel Device’s Wi-Fi connection.
• Use the General screen to enable the Wireless LAN, enter the SSID and select the Wi-Fi security mode (Wireless General Settings)
• Use the Guest/More AP screen to set up multiple Wi-Fi networks on your Zyxel Device (Guest/More AP Screen).
• Use the MAC Authentication screen to allow or deny Wi-Fi clients based on their MAC addresses from connecting to the Zyxel Device (MAC Authentication).
• Use the WPS screen to enable or disable WPS, view or generate a security PIN (Personal Identification Number) (WPS).
• Use the WMM screen to enable Wi-Fi MultiMedia (WMM) to ensure quality of service in Wi-Fi networks for multimedia applications (WMM).
• Use the Others screen to configure Wi-Fi advanced features, such as the RTS/CTS Threshold (Others).
• Use the Channel Status screen to scan the number of accessing points and view the results (Channel Status).
• Use the WLAN Scheduler screen to create rules to schedule the times to permit Internet traffic from each wireless network interfaces (WLAN Scheduler).
What You Need to Know
Wi-Fi Standard / IEEE 802.11
IEEE 802.11 is a set of standards developed by the Institute of Electrical and Electronics Engineers (IEEE) for wireless local area networks (WLANs). These standards define how devices like laptops, smartphones, and routers communicate wirelessly using radio waves.
The following table displays the comparison of the different Wi-Fi standards.
Wi-Fi Standard | Maximum Link Rate * | Band | Simultaneous Connections |
|---|---|---|---|
802.11b | 11 Mbps | 2.4 GHz | 1 |
802.11a/g | 54 Mbps | 2.4 GHz and 5 GHz | 1 |
802.11n | 600 Mbps | 2.4 GHz and 5 GHz | 1 |
802.11ac | 6.93 Gbps | 5 GHz | 4 |
802.11ax | 2.4 Gbps | 2.4 GHz | 128 |
802.11ax | 9.61 Gbps | 5 GHz and 6 GHz | 128 |
Wi-Fi 6 / IEEE 802.11ax
Wi-Fi 6 is backwards compatible with IEEE 802.11a/b/g/n/ac and is most suitable in areas with a high concentration of users. Wi-Fi 6 devices support Target Wakeup Time (TWT) allowing them to automatically power down when they are inactive.
Finding Out More
See Technical Reference for advanced technical information on Wi-Fi networks.
Wireless General Settings
Use this screen to enable the Wi-Fi, enter the SSID and select the Wi-Fi security mode. We recommend that you select More Secure to enable WPA3-SAE data encryption.
Click Network Setting > Wireless to open the General screen.
Network Setting > Wireless > General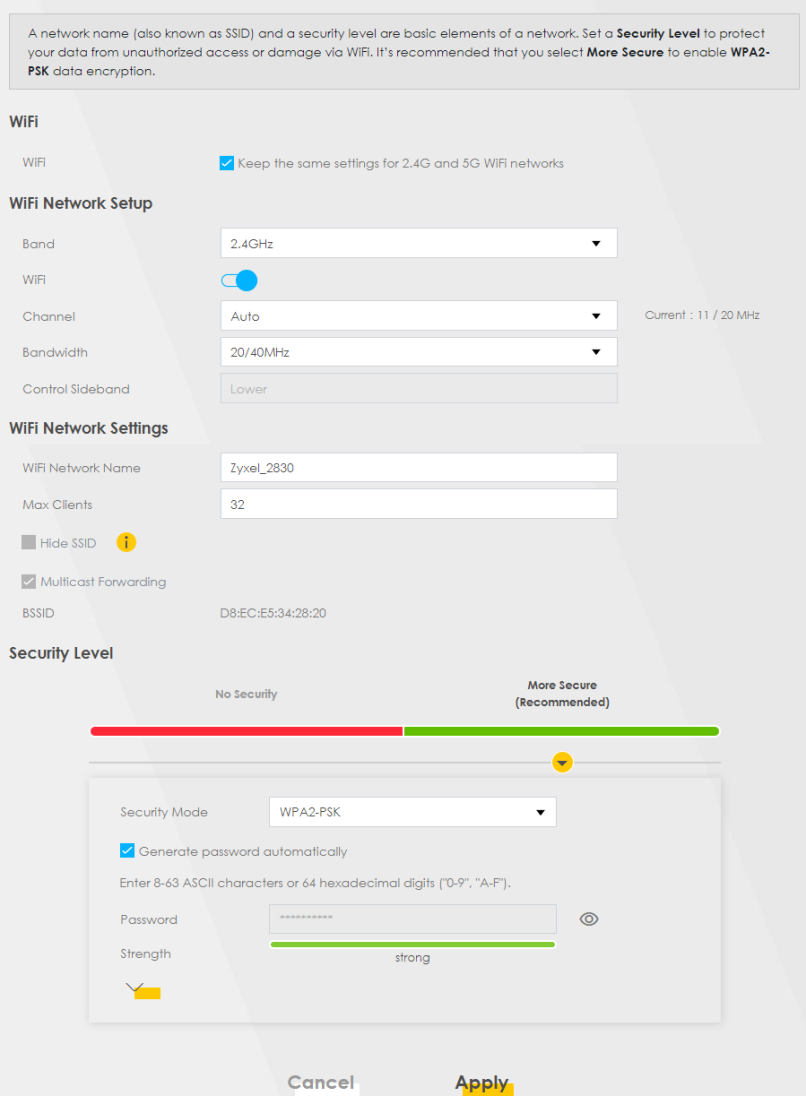
The following table describes the general Wi-Fi labels in this screen.
LABEL | description |
|---|---|
Wireless | |
Wi-Fi | Select Keep the same settings for 2.4G and 5G Wi-Fi networks and the 2.4 GHz / 5 GHz Wi-Fi networks will use the same SSID and Wi-Fi security settings. |
Wireless or Wi-Fi Network Setup | |
Band | This shows the Wi-Fi band which this radio profile is using. 2.4GHz is the frequency used by IEEE 802.11b/g/n/ax Wi-Fi clients, 5GHz is used by IEEE 802.11a/n/ac/ax Wi-Fi clients. |
Wireless or Wi-Fi | Click this switch to enable or disable Wi-Fi network in this field. When the switch turns blue, the function is enabled. Otherwise, it is not. This label displays Wireless or Wi-Fi, depending on the Zyxel Device model. |
Channel | Select a channel from the drop-down list box. The options vary depending on the frequency band and the country you are in. Use Auto to have the Zyxel Device automatically determine a channel to use. |
Bandwidth | A standard 20 MHz channel offers transfer speeds of up to 150 Mbps whereas a 40 MHz channel uses two standard channels and offers speeds of up to 300 Mbps. 40 MHz (channel bonding or dual channel) bonds two adjacent radio channels to increase throughput. The Wi-Fi clients must also support 40 MHz. It is often better to use the 20 MHz setting in a location where the environment hinders the Wi-Fi signal. An 80 MHz channel groups adjacent 40 MHz channels into pairs to increase bandwidth even higher. Select 20MHz if you want to lessen radio interference with other wireless devices in your neighborhood or the Wi-Fi clients do not support channel bonding. Not all Zyxel Devices support all channels. The Zyxel Device will choose the best bandwidth available automatically depending on the radio you chose and network conditions. |
Control Sideband | This is available for some regions when you select a specific channel and set the Bandwidth field to 40MHz or 20/40MHz. Set whether the control channel (set in the Channel field) should be in the Lower or Upper range of channel bands. |
Wireless or Wi-Fi Network Settings | |
Wireless or Wi-Fi Network Name | The SSID (Service Set IDentity) identifies the service set with which a wireless device is associated. Wireless devices associating to the access point (AP) must have the same SSID. Enter a descriptive name for this Wi-Fi network. You can use up to 32 printable characters, including spaces. |
Max Clients | Specify the maximum number of clients that can connect to this network at the same time. |
Hide SSID | Select this checkbox to hide the SSID in the outgoing beacon frame so a station cannot obtain the SSID through scanning using a site survey tool. This checkbox is grayed out if the WPS function is enabled in the Network Setting > Wireless > WPS screen. |
Multicast Forwarding | Select this checkbox to allow the Zyxel Device to convert wireless Multicast traffic into wireless unicast traffic. |
Max. Upstream Bandwidth | Max. Upstream Bandwidth allows you to specify the maximum rate for upstream wireless traffic to the WAN from this wireless LAN in kilobits per second (Kbps). |
Max. Downstream Bandwidth | Max. Downstream Bandwidth allows you to specify the maximum rate for downstream wireless traffic to this wireless LAN from the WAN in kilobits per second (Kbps). |
BSSID | This shows the MAC address of the wireless interface on the Zyxel Device when Wi-Fi is enabled. |
Security Level | |
Security Mode | Select More Secure (Recommended) to add security on this Wi-Fi network. The Wi-Fi clients that want to associate to this network must have the same Wi-Fi security settings as the Zyxel Device. When you select a security option, additional settings appear in this screen. Or you can select No Security to allow any client to associate with this network without any data encryption or authentication. See the following sections for more details about this field. |
Cancel | Click Cancel to restore your previously saved settings. |
Apply | Click Apply to save your changes. |
No Security
Select No Security to allow wireless stations to communicate with the access points without any data encryption or authentication.
Wireless > General: No Security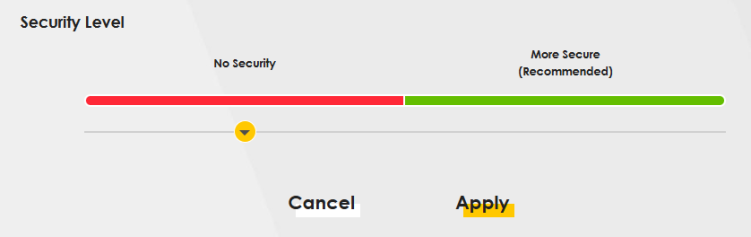
The following table describes the labels in this screen.
LABEL | description |
|---|---|
Security Level | Choose No Security to allow all Wi-Fi connections without data encryption or authentication. |
More Secure (Recommended)
The WPA-PSK (Wi-Fi Protected Access-Pre-Shared Key) security mode provides both improved data encryption and user authentication over WEP. Using a pre-shared key, both the Zyxel Device and the connecting client share a common password in order to validate the connection. This type of encryption, while robust, is not as strong as WPA, WPA2 or even WPA2-PSK. The WPA2-PSK security mode is a more robust version of the WPA encryption standard. It offers better security, although the use of PSK makes it less robust than it could be.
The WPA3-SAE (Simultaneous Authentication of Equals handshake) security mode protects against dictionary attacks (password guessing attempts). It improves security by requiring a new encryption key every time a WPA3 connection is made. A handshake is the communication between the Zyxel Device and a connecting client at the beginning of a Wi-Fi session.
Click Network Setting > Wireless to display the General screen. Select More Secure as the security level. WPA2-PSK is the default Security Mode.
Wireless > General: More Secure: WPA2-PSK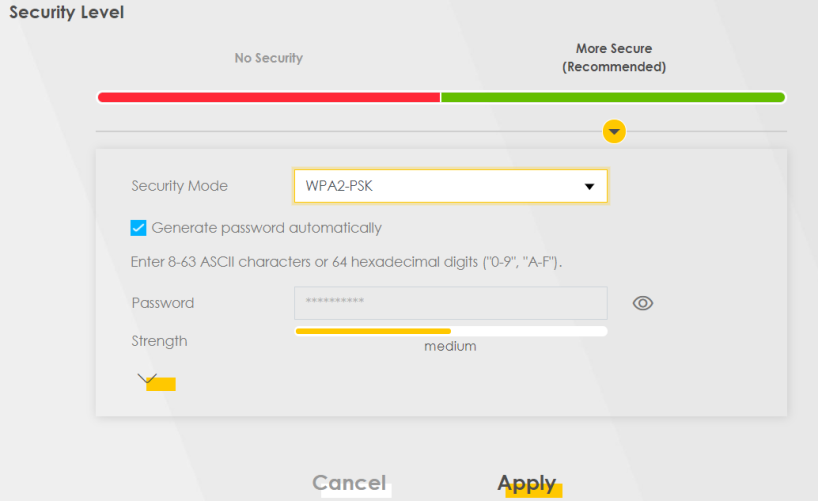
The following table describes the labels in this screen.
Label | description |
|---|---|
Security Level | Select More Secure to enable data encryption. |
Security Mode | Select a security mode from the drop-down list box. |
Generate password automatically | Select this option to have the Zyxel Device automatically generate a password. The password field will not be configurable when you select this option. |
Password | Select Generate password automatically or enter a Password. The password has two uses. 1. Manual. Manually enter the same password on the Zyxel Device and the client. You can use 8 – 63 alphanumeric (0-9, a-z, A-Z) and special characters, including spaces. 2. WPS. When using WPS, the Zyxel Device sends this password to the client. Click the Eye icon to show or hide the password for your wireless network. When the Eye icon is slashed  , you’ll see the password in plain text. Otherwise, it is hidden. , you’ll see the password in plain text. Otherwise, it is hidden. |
Click this  to show more fields in this section. Click this to show more fields in this section. Click this  to hide them. to hide them. | |
Encryption | AES is the default data encryption type, which uses a 128-bit key. |
Timer | This is the rate at which the RADIUS server sends a new group key out to all clients. The valid range is 0 to 2,147,483,647 seconds. When the timer is set to “0”, it means the same encryption key will be used indefinitely until the session ends. |
Guest/More AP Screen
Use this screen to configure a guest Wi-Fi network that allows access to the Internet through the Zyxel Device. You can use one access point to provide several BSSs simultaneously. You can then assign varying security types to different SSIDs. Wi-Fi clients can use different SSIDs to associate with the same access point.
A Home Guest (H) can access the Internet and other Home Guest (H) Wi-Fi clients on the same Wi-Fi network. They cannot communicate with wired devices connected to the Zyxel Device’s LAN.
An External Guest (E) can access the Internet only. They cannot access other clients on the same Wi-Fi network nor any wired connections from the Zyxel Device.
Click Network Setting > Wireless to display the General screen. Select More Secure as the security level. WPA2-PSK is the default Security Mode.
Click Network Setting > Wireless > Guest/More AP.
The following table introduces the supported Wi-Fi networks.
Wi-Fi networks | where TO CONFIGURE |
|---|---|
Main/1 | Network Setting > Wireless > General screen |
Guest/3 | Network Setting > Wireless > More AP screen |
The following screen displays.
Network Setting > Wireless > Guest/More AP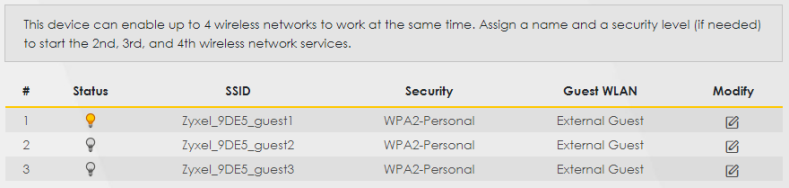
The following table describes the labels in this screen.
Label | Description |
|---|---|
# | This is the index number of the entry. |
Status | This field indicates whether this SSID is active. A yellow bulb signifies that this SSID is active, while a gray bulb signifies that this SSID is not active. |
SSID | An SSID profile is the set of parameters relating to one of the Zyxel Device’s BSSs. The SSID (Service Set IDentifier) identifies the Service Set with which a wireless device is associated. This field displays the name of the Wi-Fi profile on the network. When a Wi-Fi client scans for an AP to associate with, this is the name that is broadcast and seen in the Wi-Fi client utility. |
Security | This field indicates the security mode of the SSID profile. |
Guest WLAN | This displays if the guest WLAN function has been enabled for this WLAN. A Home Guest can access the Internet and other Home Guest Wi-Fi clients on the same Wi-Fi network. They cannot communicate with wired devices connected to the Zyxel Device’s LAN. An External Guest can access the Internet only. They cannot access other clients on the same Wi-Fi network nor any wired connections from the Zyxel Device. N/A displays if guest WLAN is disabled. |
Modify | Click the Edit icon of an SSID profile to configure the SSID profile. |
The Edit More AP Screen
Use this screen to create Guest and additional Wi-Fi networks with different security settings.
Click the Edit icon next to an SSID in the Guest/More AP screen. The following screen displays.
Network Setting > Wireless > More AP > Edit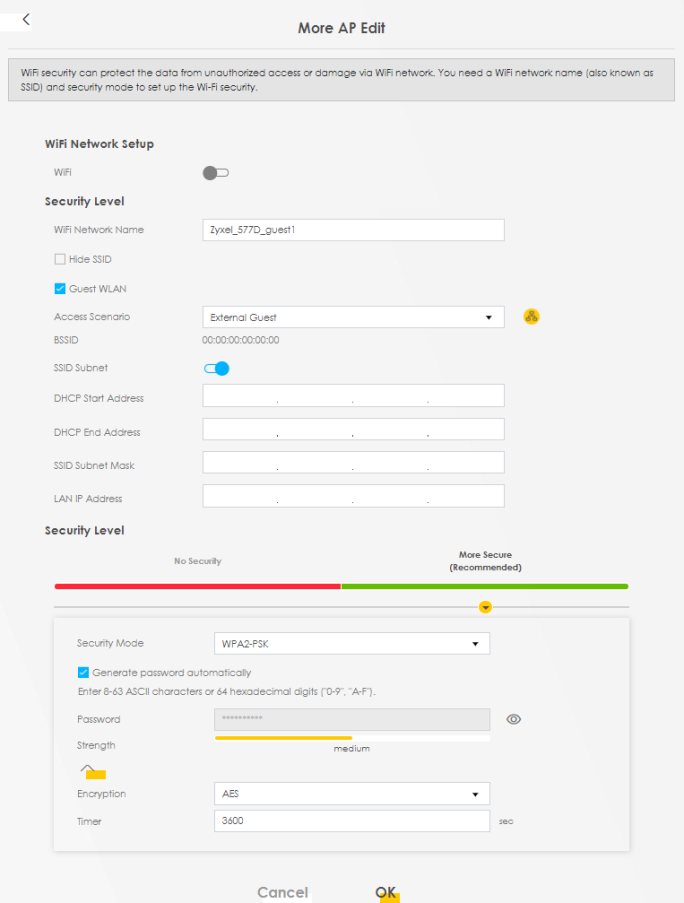
The following table describes the fields in this screen.
Label | Description |
|---|---|
Wi-Fi or Wireless Network Setup | |
Wi-Fi or Wireless | Click this switch to enable or disable the Wi-Fi in this field. When the switch turns blue  , the function is enabled; otherwise, it is not. , the function is enabled; otherwise, it is not. |
Wi-Fi or Wireless Network Settings | |
Wi-Fi or Wireless Network Name | The SSID (Service Set Identifier) identifies the service set with which a wireless device is associated. Wireless devices associating to the access point (AP) must have the same SSID. Enter a descriptive name for the Wi-Fi. You can use up to 32 printable characters, including spaces. |
Hide SSID | Select this checkbox to hide the SSID in the outgoing beacon frame so a station cannot obtain the SSID through scanning using a site survey tool. |
Guest WLAN | Select this to create Guest WLANs for home and external clients. Select the WLAN type in the Access Scenario field. |
Access Scenario | Select Home Guest or External Guest to provide different levels of access to the Zyxel Device and the other Wi-Fi clients. A Home Guest can access the Internet and other Home Guest Wi-Fi clients on the same Wi-Fi network. They cannot communicate with wired devices connected to the Zyxel Device’s LAN. An External Guest can access the Internet only. They cannot access other clients on the same Wi-Fi network nor any wired connections from the Zyxel Device. |
Max. Upstream Bandwidth | Specify the maximum rate for upstream wireless traffic to the WAN from this WLAN in kilobits per second (Kbps). |
Max. Downstream Bandwidth | Specify the maximum rate for downstream wireless traffic to this WLAN from the WAN in kilobits per second (Kbps). |
BSSID | This shows the MAC address of the Wi-Fi interface on the Zyxel Device when Wi-Fi is enabled. |
SSID Subnet | Click on this switch to Enable this function if you want the wireless network interface to assign DHCP IP addresses to the associated Wi-Fi clients. This option cannot be used if Keep 2.4G and 5G wireless network name the same is enabled in Network > Wireless > General. |
DHCP Start Address | Specify the first of the contiguous addresses in the DHCP IP address pool. The Zyxel Device assigns IP addresses from this DHCP pool to Wi-Fi clients connecting to the SSID. |
DHCP End Address | Specify the last of the contiguous addresses in the DHCP IP address pool. |
SSID Subnet Mask | Specify the subnet mask of the Zyxel Device for the SSID subnet. |
LAN IP Address | Specify the IP address of the Zyxel Device for the SSID subnet. |
Security Level | |
Security Mode | Select More Secure (Recommended) to add security on this Wi-Fi network. The Wi-Fi clients which want to associate to this network must have the same Wi-Fi security settings as the Zyxel Device. After you select to use a security, additional options appears in this screen. Or you can select No Security to allow any client to associate this network without any data encryption or authentication. See No Security for more details about this field. |
Protected Management Frames | This option is only available when using WPA2-PSK as the Security Mode and AES Encryption in Network Setting > Wireless > General. Management frame protection (MFP) helps prevent Wi-Fi DoS (Denial of Service) attacks. Select Disable if you do not want to use MFP. Select Capable to encrypt management frames of Wi-Fi clients that support MFP. Clients that do not support MFP will still be allowed to join the Wi-Fi network, but remain unprotected. Select Required to allow only clients that support MFP to join the Wi-Fi network. When Mesh is enabled, the settings of Protected Management Frames of 5G will follow 2.4G. |
Generate password automatically | Select this option to have the Zyxel Device automatically generate a password. The password field will not be configurable when you select this option. |
Password | WPA2-PSK uses a simple common password, instead of user-specific credentials. 1. If you did not select Generate password automatically, you can manually enter a pre-shared key at least 8 characters long, including one uppercase letter, one lowercase letter, one number, and one special character. Click the Eye icon to show or hide the password of your Wi-Fi network. When the Eye icon is slashed  , you will see the password in plain text. Otherwise, it is hidden. , you will see the password in plain text. Otherwise, it is hidden. |
Strength | This displays the current password strength – weak, medium, strong. |
Strength | Click this  to show more fields in this section. Click again to hide them. to show more fields in this section. Click again to hide them. |
Encryption | AES is the default data encryption type, which uses a 128-bit key. |
Timer | The Timer is the rate at which the RADIUS server sends a new group key out to all clients. The valid range is 0 to 2,147,483,647 seconds. When the timer is set to “0”, it means the same encryption key will be used indefinitely until the session ends. |
Cancel | Click Cancel to exit this screen without saving. |
OK | Click OK to save your changes. |
MAC Authentication
Use this screen to give exclusive access to specific connected devices (Allow) or exclude specific devices from accessing the Zyxel Device (Deny), based on the MAC address of each connected device. Every Ethernet device has a unique factory-assigned MAC (Media Access Control) address, which consists of six pairs of hexadecimal characters, for example: 00:A0:C5:00:00:02. You need to know the MAC addresses of the connected device you want to allow/deny to configure this screen.
Note: You can have up to 25 MAC authentication rules.
Use this screen to view your Zyxel Device’s MAC filter settings and add new MAC filter rules. Click Network Setting > Wireless > MAC Authentication. The screen appears as shown.
Network Setting > Wireless > MAC Authentication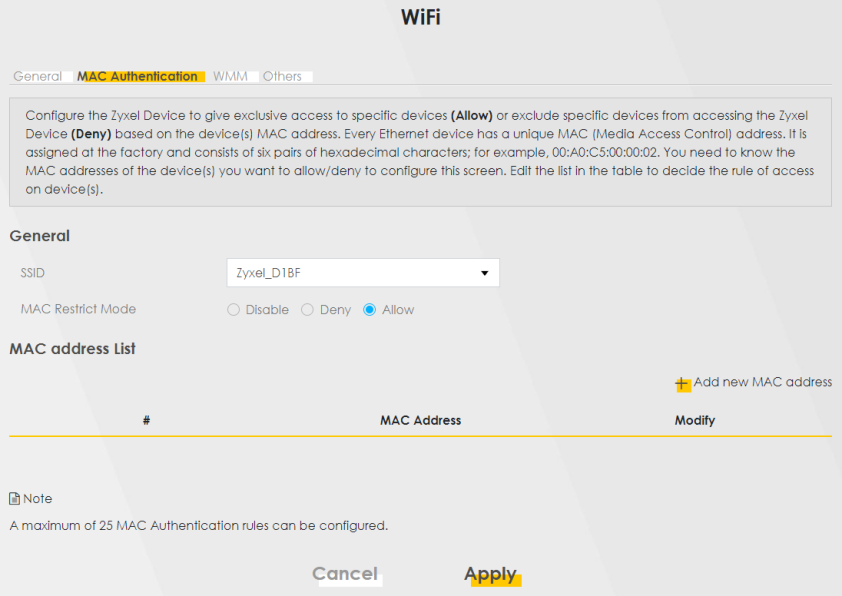
The following table describes the labels in this screen.
LABEL | Description |
|---|---|
General | |
SSID | Select the SSID for which you want to configure MAC filter settings. |
MAC Restrict Mode | Define the filter action for the list of MAC addresses in the MAC Address table. Select Disable to turn off MAC filtering. Select Deny to block access to the Zyxel Device. MAC addresses not listed will be allowed to access the Zyxel Device. Select Allow to permit access to the Zyxel Device. MAC addresses not listed will be denied access to the Zyxel Device. |
MAC address List | |
Add new MAC address | This field is available when you select Deny or Allow in the MAC Restrict Mode field. Click this if you want to add a new MAC address entry to the MAC filter list below. Enter the MAC addresses of the Wi-Fi devices that are allowed or denied access to the Zyxel Device in these address fields. Enter the MAC addresses in a valid MAC address format, that is, six hexadecimal character pairs, for example, 12:34:56:78:9a:bc. Add New MAC Address 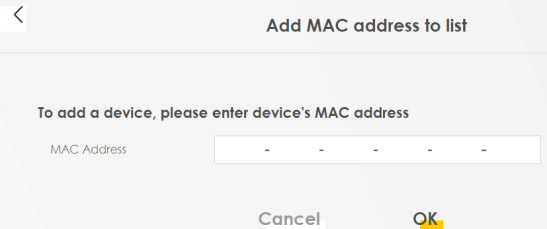 |
# | This is the index number of the entry. |
MAC Address | This is the MAC addresses of the devices that are allowed or denied access to the Zyxel Device. |
Modify | Click the Edit icon and type the MAC address of the peer device in a valid MAC address format (six hexadecimal character pairs, for example 12:34:56:78:9a:bc). Click the Delete icon to delete the entry. |
Cancel | Click Cancel to exit this screen without saving. |
Apply | Click Apply to save your changes. |
WPS
Use this screen to configure Wi-Fi Protected Setup (WPS) on your Zyxel Device.
W-iFi Protected Setup (WPS) allows you to quickly set up a Wi-Fi network with strong security, without having to configure security settings manually. Select one of the WPS methods and follow the instructions to establish a WPS connection.Your Wi-Fi devices must support WPS to use this feature. We recommend using Push Button Configuration (PBC) if your Wi-Fi device supports it.
If WPS is enabled, UPnP will automatically be turned on.
Click Network Setting > Wireless > WPS. The following screen displays. Click this switch and it will turn blue. Click Apply to activate the WPS function. Then you can configure the WPS settings in this screen.
Network Setting > Wireless > WPS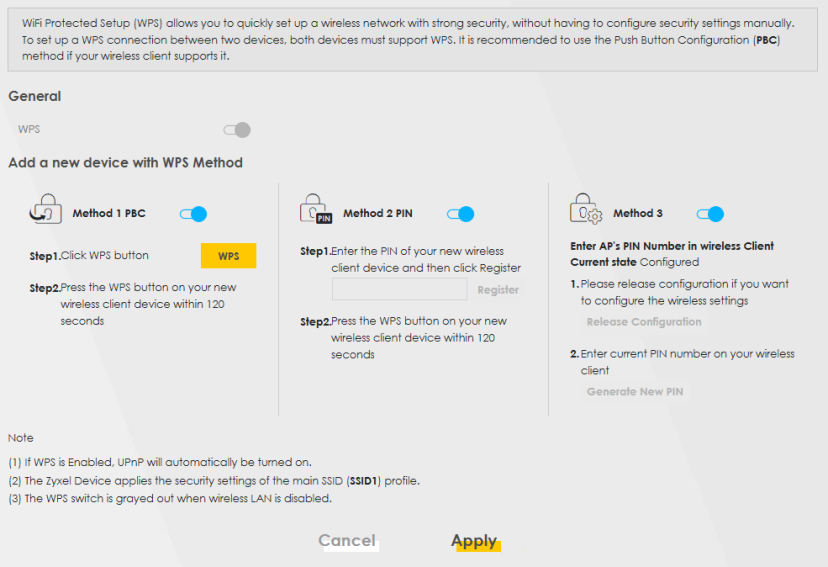
The following table describes the labels in this screen.
Label | Description |
|---|---|
General | |
WPS | Slide this to the right to enable and have the Zyxel Device activate WPS. Otherwise, it is disabled. |
Add a new device with WPS Method | |
Method 1 PBC | Use this section to set up a WPS or Wi-Fi network using Push Button Configuration (PBC). Click this switch to make it turn blue. Click Apply to activate WPS method 1 on the Zyxel Device. |
WPS | Click this button to add another WPS-enabled Wi-Fi device (within Wi-Fi range of the Zyxel Device) to your Wi-Fi network. This button may either be a physical button on the outside of a Wi-Fi device, or a menu button similar to the WPS button on this screen. |
Cancel | Click Cancel to restore your previously saved settings. |
Apply | Click Apply to save your changes. |
WMM
Use this screen to enable Wi-Fi MultiMedia (WMM) and WMM Automatic Power Save Delivery (APSD) in Wi-Fi networks for multimedia applications. WMM enhances data transmission quality, while APSD improves power management of Wi-Fi clients. This allows time-sensitive applications, such as voice and videos, to run more smoothly.
Click Network Setting > Wireless > WMM to display the following screen.
Network Setting > Wireless > WMM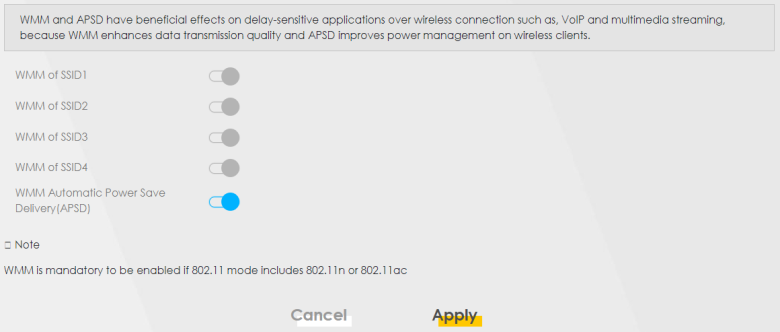
The following table describes the labels in this screen.
Label | Description |
|---|---|
WMM of SSID | Select On to have the Zyxel Device automatically give the Wi-Fi network (SSIDx) a priority level according to the ToS value in the IP header of packets it sends. WMM QoS (Wi-Fi MultiMedia Quality of Service) gives high priority to video, which makes them run more smoothly. SSID1 is the General Wi-Fi SSID; SSID2 to SSID4 are the Guest Wi-Fi SSIDs. If the 802.11 Mode in Network Setting > Wireless > Others is set to include 802.11n or 802.11ac, WMM cannot be disabled. |
WMM Automatic Power Save Delivery (APSD) | Select this option to extend the battery life of your mobile devices (especially useful for small devices that are running multimedia applications). The Zyxel Device goes to sleep mode to save power when it is not transmitting data. The AP buffers the packets sent to the Zyxel Device until the Zyxel Device "wakes up." The Zyxel Device wakes up periodically to check for incoming data. |
Cancel | Click Cancel to restore your previously saved settings. |
Apply | Click Apply to save your changes. |
Others
Use this screen to configure advanced Wi-Fi settings, such as additional security settings, power saving, and data transmission settings. Click Network Setting > Wireless > Others. The screen appears as shown.
See Additional Wi-Fi Terms for detailed definitions of the terms listed here.
Network Setting > Wireless > Others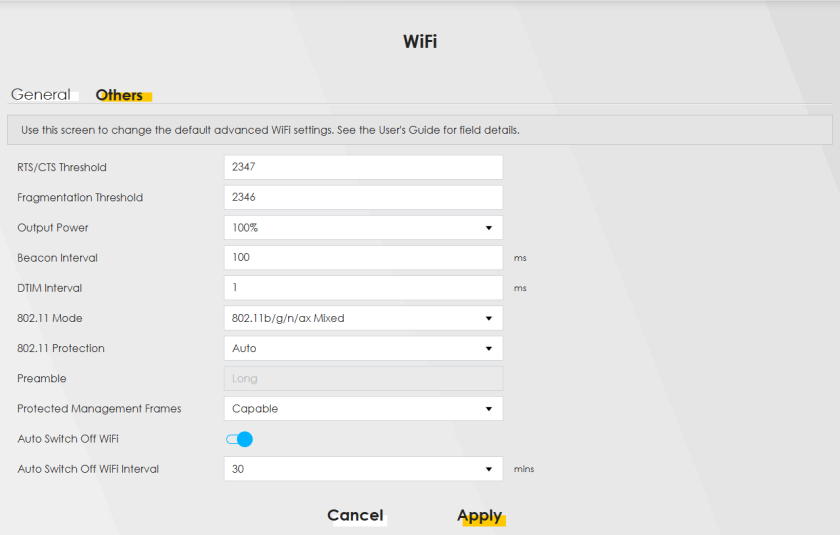
The following table describes the labels in this screen.
LABEL | description |
|---|---|
RTS/CTS Threshold | Data with its frame size larger than this value will perform the RTS (Request To Send)/CTS (Clear To Send) handshake. Enter a value between 0 and 2347. |
Fragmentation Threshold | This is the maximum data fragment size that can be sent. Enter a value between 256 and 2346. |
Output Power | Set the output power of the Zyxel Device. If there is a high density of APs in an area, decrease the output power to reduce interference with other APs. Select one of the following: 20%, 40%, 60%, 80% or 100%. |
Beacon Interval | When a wirelessly networked device sends a beacon, it includes with it a beacon interval. This specifies the time period before the device sends the beacon again. The interval tells receiving devices on the network how long they can wait in low power mode before waking up to handle the beacon. This value can be set from 50 ms to 1000 ms. A high value helps save current consumption of the access point. |
DTIM Interval | Delivery Traffic Indication Message (DTIM) is the time period after which broadcast and Multicast packets are transmitted to mobile clients in the Power Saving mode. A high DTIM value can cause clients to lose connectivity with the network. This value can be set from 1 to 255. |
802.11 Mode | For 2.4 GHz frequency Wi-Fi devices: • Select 802.11b Only to allow only IEEE 802.11b compliant Wi-Fi devices to associate with the Zyxel Device. • Select 802.11g Only to allow only IEEE 802.11g compliant Wi-Fi devices to associate with the Zyxel Device. • Select 802.11n Only to allow only IEEE 802.11n compliant Wi-Fi devices to associate with the Zyxel Device. • Select 802.11b/g Mixed to allow either IEEE 802.11b or IEEE 802.11g compliant Wi-Fi devices to associate with the Zyxel Device. The transmission rate of your Zyxel Device might be reduced. • Select 802.11b/g/n Mixed to allow IEEE 802.11b, IEEE 802.11g or IEEE 802.11n compliant Wi-Fi devices to associate with the Zyxel Device. The transmission rate of your Zyxel Device might be reduced. • Select 802.11b/g/n/ax Mixed to allow IEEE 802.11b, IEEE 802.11g, IEEE 802.11n or IEEE 802.11ax compliant Wi-Fi devices to associate with the Zyxel Device. The transmission rate of your Zyxel Device might be reduced. For 5 GHz frequency Wi-Fi devices: • Select 802.11a Only to allow only IEEE 802.11a compliant Wi-Fi devices to associate with the Zyxel Device. • Select 802.11n Only to allow only IEEE 802.11n compliant Wi-Fi devices to associate with the Zyxel Device. • Select 802.11ac Only to allow only IEEE 802.11ac compliant Wi-Fi devices to associate with the Zyxel Device. • Select 802.11a/n Mixed to allow either IEEE 802.11a or IEEE 802.11n compliant Wi-Fi devices to associate with the Zyxel Device. The transmission rate of your Zyxel Device might be reduced. • Select 802.11n/ac Mixed to allow either IEEE 802.11n or IEEE 802.11ac compliant Wi-Fi devices to associate with the Zyxel Device. The transmission rate of your Zyxel Device might be reduced. • Select 802.11a/n/ac Mixed to allow IEEE 802.11a, IEEE 802.11n or IEEE 802.11ac compliant Wi-Fi devices to associate with the Zyxel Device. The transmission rate of your Zyxel Device might be reduced. • Select 802.11a/n/ac/ax Mixed to allow IEEE 802.11a, IEEE 802.11n, IEEE 802.11ac or IEEE 802.11ax compliant Wi-Fi devices to associate with the Zyxel Device. The transmission rate of your Zyxel Device might be reduced. |
802.11 Protection | Enabling this feature can help prevent collisions in mixed-mode networks (networks with both IEEE 802.11b and IEEE 802.11g traffic). Select Auto to have the wireless devices transmit data after a RTS/CTS handshake. This helps improve IEEE 802.11g performance. Select Off to disable 802.11 protection. The transmission rate of your Zyxel Device might be reduced in a mixed-mode network. This field displays Off and is not configurable when you set 802.11 Mode to 802.11b Only. |
Preamble | Select a preamble type from the drop-down list box. Choices are Long or Short. See Preamble Type for more information. This field is configurable only when you set 802.11 Mode to 802.11b. |
Protected Management Frames | Wi-Fi with Protected Management Frames (PMF) provides protection for unicast and Multicast management action frames. Unicast management action frames are protected from both eavesdropping and forging, and Multicast management action frames are protected from forging. Select Capable if the Wi-Fi client supports PMF, then the management frames will be encrypted. Select Required to force the Wi-Fi client to support PMF; otherwise the authentication cannot be performed by the Zyxel Device. Otherwise, select Disabled. |
Auto Switch Off WiFi | Click this to enable Auto Switch Off WiFi and configure the next field. |
Auto Switch Off WiFi Interval | Select 0,15, 30, 45 or 60 minutes from the drop down menu. The default setting is 30 minutes. Select 0 minute to disable the Auto Switch Off WiFi Interval. |
Cancel | Click Cancel to restore your previously saved settings. |
Apply | Click Apply to save your changes. |
Channel Status
Use this screen to scan for Wi-Fi channel noise and view the results. Click Scan to start, and then view the results in the Channel Scan Result section. The value on each channel number indicates the number of Access Points (AP) using that channel. The Auto-channel-selection algorithm does not always directly follow the AP count; other factors about the channels are also considered. Click Network Setting > Wireless > Channel Status. The screen appears as shown.
Network Setting > Wireless > Channel Status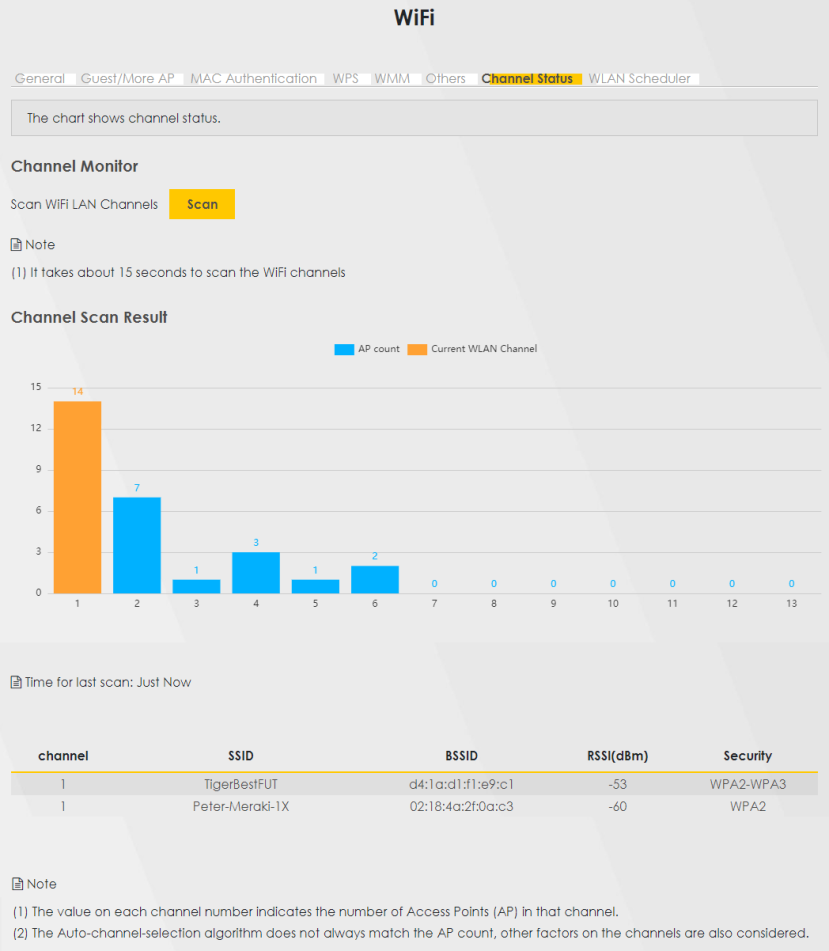
The following table describes the labels in this screen.
Label | description |
|---|---|
Channel Monitor | |
Scan wireless LAN Channels | Click the Scan button to scan Wi-Fi channels. |
Channel Scan Result | This displays the results of the channel scan. The blue bar displays the number of access points (AP count) in the Wi-Fi channel. The orange bar displays the Wi-Fi channel that the Zyxel Device is now using. |
WLAN Scheduler
Use the WLAN Scheduler screen to create rules to schedule the times to permit Internet traffic from each Wi-Fi network interfaces. Select a specific time and day of a week for scheduling. You can also create a rule to automatically switch off all the WLAN together.
Click Network Setting > Wireless > WLAN Scheduler.
Network Setting > Wireless > WLAN Scheduler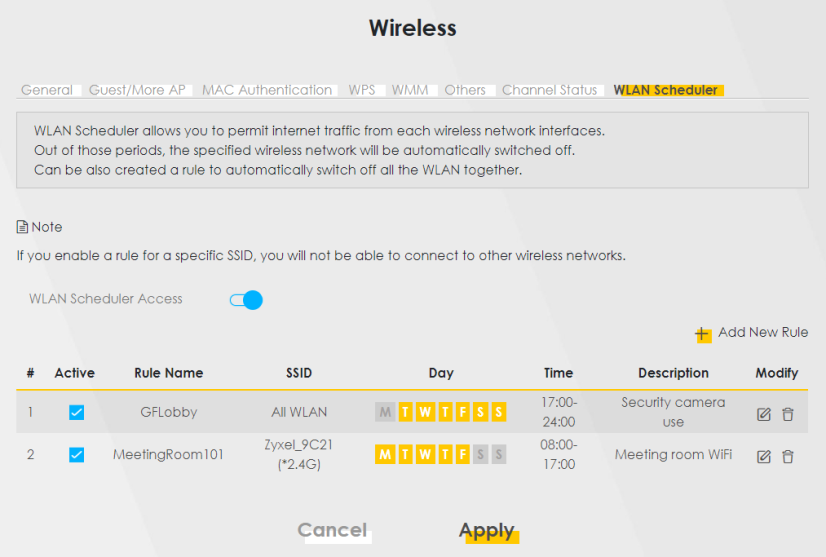
The following table describes the labels in this screen.
Label | Description |
|---|---|
WLAN Scheduler Access | Click this switch to enable the WLAN scheduler function. This serves as the main switch to allow the individual rules to function. |
Add New Rule | Click this to configure a new WLAN scheduler rule. |
# | This is the index number of the entry. |
Active | Click the checkbox to enable individual rules. |
Rule Name | This field displays the name of the rule. |
SSID | This is the descriptive name used to identify the wireless network interface that this rule applies to. It will show ALL WLAN if you select All wireless networks in the Add New Rule screen. |
Day | This field displays the days of the week that you wish to apply this rule. |
Time | This field displays the time of the day that you wish to apply this rule. |
Description | This field shows a description of the rule, usually to help identify it. |
Modify | Click the Edit icon to configure the rule. Click the Delete icon to remove the rule. |
Add or Edit Rules
Click Add New Rule in the WLAN Scheduler screen, or click the Edit icon next to a scheduling rule, and the following screen displays.
Use this screen to create a scheduling rule to permit Internet traffic from each wireless network interface.
Network Setting > Wireless > WLAN Scheduler > Add New Rule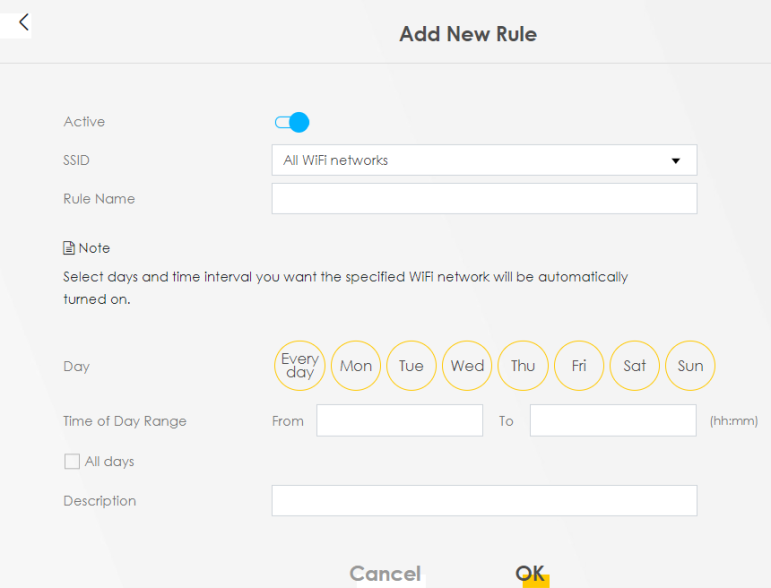
The following table describes the labels in this screen.
Label | Description |
|---|---|
Active | Click this switch to enable this WLAN scheduler rule. |
SSID | Select All wireless networks if you want the rule to apply to all Wi-Fi network interfaces or select a Wi-Fi network interface to apply the rule to. |
Rule Name | Enter a descriptive name for the rule. |
Day | Select the days of the week that you wish to apply this rule. |
Time of Day Range | Specify the time of the day that you wish to apply to this rule (format hh:mm). |
Description | Enter a description of the rule, usually to help identify it (its purpose). |
OK | Click OK to save the changes back to the Zyxel Device. |
Cancel | Click Cancel to close the window with changes unsaved. |
Technical Reference
This section discusses Wi-Fi in depth.
Wi-Fi Network Overview
Wi-Fi networks consist of Wi-Fi clients, access points and bridges.
• A Wi-Fi client is a radio connected to a user’s computer.
• An access point is a radio with a wired connection to a network, which can connect with numerous Wi-Fi clients and let them access the network.
• A bridge is a radio that relays communications between access points and Wi-Fi clients, extending a network’s range.
Normally, a Wi-Fi network operates in an “infrastructure” type of network. An “infrastructure” type of network has one or more access points and one or more Wi-Fi clients. The Wi-Fi clients connect to the access points.
The following figure provides an example of a Wi-Fi network.
Example of a Wi-Fi Network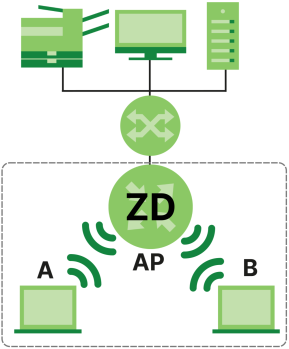
The Wi-Fi network is the part in the blue circle. In this Wi-Fi network, devices A and B use the access point (AP) to interact with the other devices (such as the printer) or with the Internet. Your Zyxel Device is the AP.
Every Wi-Fi network must follow these basic guidelines.
• Every Wi-Fi device in the same Wi-Fi network must use the same SSID.
The SSID is the name of the Wi-Fi network. It stands for Service Set IDentifier.
• If two Wi-Fi networks overlap, they should use a different channel.
Like radio stations or television channels, each Wi-Fi network uses a specific channel, or frequency, to send and receive information.
• Every Wi-Fi device in the same Wi-Fi network must use security compatible with the AP.
Security stops unauthorized devices from using the Wi-Fi network. It can also protect the information that is sent in the Wi-Fi network.
Additional Wi-Fi Terms
The following table describes some Wi-Fi network terms and acronyms used in the Zyxel Device’s Web Configurator.
Term | Description |
|---|---|
RTS/CTS Threshold | In a Wi-Fi network which covers a large area, Wi-Fi devices are sometimes not aware of each other’s presence. This may cause them to send information to the AP at the same time and result in information colliding and not getting through. By setting this value lower than the default value, the Wi-Fi devices must sometimes get permission to send information to the Zyxel Device. The lower the value, the more often the devices must get permission. If this value is greater than the fragmentation threshold value (see below), then Wi-Fi devices never have to get permission to send information to the Zyxel Device. |
Preamble | A preamble affects the timing in your Wi-Fi network. There are two preamble modes: long and short. If a Wi-Fi device uses a different preamble mode than the Zyxel Device does, it cannot communicate with the Zyxel Device. |
Authentication | The process of verifying whether a Wi-Fi device is allowed to use the Wi-Fi network. |
Fragmentation Threshold | A small fragmentation threshold is recommended for busy networks, while a larger threshold provides faster performance if the network is not very busy. |
Wi-Fi Security Overview
By their nature, radio communications are simple to intercept. For Wi-Fi data networks, this means that anyone within range of a Wi-Fi network without security can not only read the data passing over the airwaves, but also join the network. Once an unauthorized person has access to the network, he or she can steal information or introduce malware (malicious software) intended to compromise the network. For these reasons, a variety of security systems have been developed to ensure that only authorized people can use a Wi-Fi data network, or understand the data carried on it.
These security standards do two things. First, they authenticate. This means that only people presenting the right credentials (often a username and password, or a “key” phrase) can access the network. Second, they encrypt. This means that the information sent over the air is encoded. Only people with the code key can understand the information, and only people who have been authenticated are given the code key.
These security standards vary in effectiveness. Some can be broken, such as the old Wired Equivalent Protocol (WEP). Using WEP is better than using no security at all, but it will not keep a determined attacker out. Other security standards are secure in themselves but can be broken if a user does not use them properly. For example, the WPA-PSK security standard is very secure if you use a long key which is difficult for an attacker’s software to guess – for example, a twenty-letter long string of apparently random numbers and letters – but it is not very secure if you use a short key which is very easy to guess – for example, a three-letter word from the dictionary.
Because of the damage that can be done by a malicious attacker, it is not just people who have sensitive information on their network who should use security. Everybody who uses any Wi-Fi network should ensure that effective security is in place.
A good way to come up with effective security keys, passwords and so on is to use obscure information that you personally will easily remember, and to enter it in a way that appears random and does not include real words. For example, if your mother owns a 1970 Dodge Challenger and her favorite movie is Vanishing Point (which you know was made in 1971) you could use “70dodchal71vanpoi” as your security key.
The following sections introduce different types of Wi-Fi security you can set up in the Wi-Fi network.
SSID
Normally, the Zyxel Device acts like a beacon and regularly broadcasts the SSID in the area. You can hide the SSID instead, in which case the Zyxel Device does not broadcast the SSID. In addition, you should change the default SSID to something that is difficult to guess.
This type of security is fairly weak, however, because there are ways for unauthorized Wi-Fi devices to get the SSID. In addition, unauthorized Wi-Fi devices can still see the information that is sent in the Wi-Fi network.
MAC Address Filter
Every device that can use a Wi-Fi network has a unique identification number, called a MAC address.1 A MAC address is usually written using twelve hexadecimal characters2; for example, 00A0C5000002 or 00:A0:C5:00:00:02. To get the MAC address for each Wi-Fi device in the Wi-Fi network, see the Wi-Fi device’s User’s Guide or other documentation.
You can use the MAC address filter to tell the Zyxel Device which devices are allowed or not allowed to use the Wi-Fi network. If a Wi-Fi device is allowed to use the Wi-Fi network, it still has to have the correct information (SSID, channel, and security). If a Wi-Fi device is not allowed to use the Wi-Fi network, it does not matter if it has the correct information.
This type of security does not protect the information that is sent in the Wi-Fi network. Furthermore, there are ways for unauthorized Wi-Fi devices to get the MAC address of an authorized Wi-Fi device. Then, they can use that MAC address to use the Wi-Fi network.
Encryption
Wi-Fi networks can use encryption to protect the information that is sent in the Wi-Fi network. Encryption is like a secret code. If you do not know the secret code, you cannot understand the message.
The types of encryption you can choose depend on the type of authentication. (See Encryption for information about this.)
Many types of encryption use a key to protect the information in the Wi-Fi network. The longer the key, the stronger the encryption. Every device in the Wi-Fi network must have the same key.
Signal Problems
Because Wi-Fi networks are radio networks, their signals are subject to limitations of distance, interference and absorption.
Problems with distance occur when the two radios are too far apart. Problems with interference occur when other radio waves interrupt the data signal. Interference may come from other radio transmissions, such as military or air traffic control communications, or from machines that are coincidental emitters such as electric motors or microwaves. Problems with absorption occur when physical objects (such as thick walls) are between the two radios, muffling the signal.
Preamble Type
Preamble is used to signal that data is coming to the receiver. Short and long refer to the length of the synchronization field in a packet.
Short preamble increases performance as less time sending preamble means more time for sending data. All IEEE 802.11 compliant Wi-Fi adapters support long preamble, but not all support short preamble.
Use long preamble if you are unsure what preamble mode other Wi-Fi devices on the network support, and to provide more reliable communications in busy Wi-Fi networks.
Use short preamble if you are sure all Wi-Fi devices on the network support it, and to provide more efficient communications.
Use the dynamic setting to automatically use short preamble when all Wi-Fi devices on the network support it, otherwise the Zyxel Device uses long preamble.
Wi-Fi Protected Setup (WPS)
Your Zyxel Device supports Wi-Fi Protected Setup (WPS), which is an easy way to set up a secure Wi-Fi network. WPS is an industry standard specification, defined by the Wi-Fi Alliance.
WPS allows you to quickly set up a Wi-Fi network with strong security, without having to configure security settings manually. Each WPS connection works between two devices. Both devices must support WPS (check each device’s documentation to make sure).
Depending on the devices you have, you can either press a button (on the device itself, or in its configuration utility) or enter a PIN (a unique Personal Identification Number that allows one device to authenticate the other) in each of the two devices. When WPS is activated on a device, it has 2 minutes to find another device that also has WPS activated. Then, the two devices connect and set up a secure network by themselves.
Push Button Configuration
WPS Push Button Configuration (PBC) is initiated by pressing a button on each WPS-enabled device, and allowing them to connect automatically. You do not need to enter any information.
Not every WPS-enabled device has a physical WPS button. Some may have a WPS PBC button in their configuration utilities instead of or in addition to the physical button.
Take the following steps to set up WPS using the button.
1 Ensure that the two devices you want to set up are within Wi-Fi range of one another.
2 Look for a WPS button on each device. If the device does not have one, log into its configuration utility and locate the button (see the device’s User’s Guide for how to do this – for the Zyxel Device).
3 Press the button on one of the devices (it does not matter which). For the Zyxel Device you must press the Wi-Fi button for more than 5 seconds.
4 Within 2 minutes, press the button on the other device. The registrar sends the network name (SSID) and security key through a secure connection to the enrollee.
If you need to make sure that WPS worked, check the list of associated Wi-Fi clients in the AP’s configuration utility. If you see the Wi-Fi client in the list, WPS was successful.
PIN Configuration
Each WPS-enabled device has its own PIN (Personal Identification Number). This may either be static (it cannot be changed) or dynamic (in some devices you can generate a new PIN by clicking on a button in the configuration interface).
Use the PIN method instead of the push-button configuration (PBC) method if you want to ensure that the connection is established between the devices you specify, not just the first two devices to activate WPS in range of each other. However, you need to log into the configuration interfaces of both devices to use the PIN method.
When you use the PIN method, you must enter the PIN from one device (usually the Wi-Fi client) into the second device (usually the Access Point or wireless router). Then, when WPS is activated on the first device, it presents its PIN to the second device. If the PIN matches, one device sends the network and security information to the other, allowing it to join the network.
Take the following steps to set up a WPS connection between an access point or wireless router (referred to here as the AP) and a client device using the PIN method.
1 Ensure WPS is enabled on both devices.
2 Access the WPS section of the AP’s configuration interface. See the device’s User’s Guide on how to do this.
3 Look for the client’s WPS PIN; it will be displayed either on the device, or in the WPS section of the client’s configuration interface (see the device’s User’s Guide on how to find the WPS PIN – for the Zyxel Device, see WPS).
4 Enter the client’s PIN in the AP’s configuration interface.
5 If the client device’s configuration interface has an area for entering another device’s PIN, you can either enter the client’s PIN in the AP, or enter the AP’s PIN in the client – it does not matter which.
6 Start WPS on both devices within two minutes.
7 Use the configuration utility to activate WPS, not the push-button on the device itself.
8 On a computer connected to the Wi-Fi client, try to connect to the Internet. If you can connect, WPS was successful.
If you cannot connect, check the list of associated Wi-Fi clients in the AP’s configuration utility. If you see the Wi-Fi client in the list, WPS was successful.
The following figure shows a WPS-enabled Wi-Fi client (installed in a notebook computer) connecting to the WPS-enabled AP through the PIN method.
Example WPS Process: PIN Method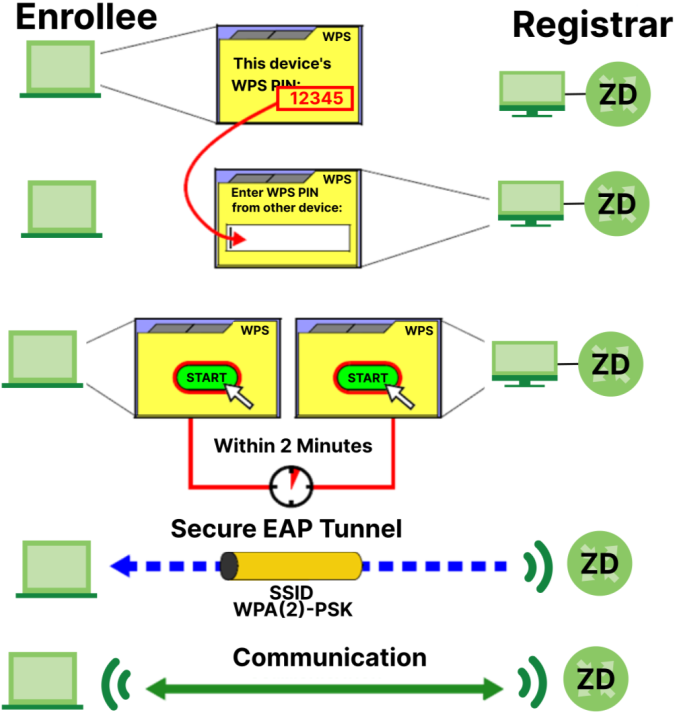
How WPS Works
When two WPS-enabled devices connect, each device must assume a specific role. One device acts as the registrar (the device that supplies network and security settings) and the other device acts as the enrollee (the device that receives network and security settings. The registrar creates a secure EAP (Extensible Authentication Protocol) tunnel and sends the network name (SSID) and the WPA-PSK or WPA2-PSK pre-shared key to the enrollee. Whether WPA-PSK or WPA2-PSK is used depends on the standards supported by the devices. If the registrar is already part of a network, it sends the existing information. If not, it generates the SSID and WPA2-PSK randomly.
The following figure shows a WPS-enabled client (installed in a notebook computer) connecting to a WPS-enabled access point.
How WPS Works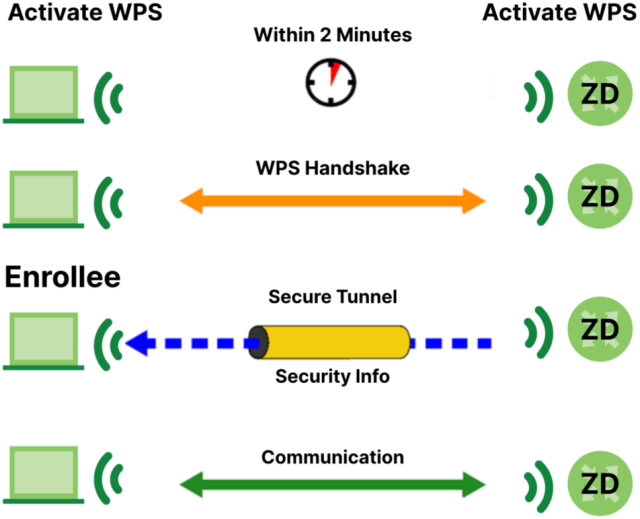
The roles of registrar and enrollee last only as long as the WPS setup process is active (2 minutes). The next time you use WPS, a different device can be the registrar if necessary.
The WPS connection process is like a handshake; only two devices participate in each WPS transaction. If you want to add more devices you should repeat the process with one of the existing networked devices and the new device.
Note that the access point (AP) is not always the registrar, and the Wi-Fi client is not always the enrollee. All WPS-certified APs can be a registrar, and so can some WPS-enabled Wi-Fi clients.
By default, a WPS device is ‘un-configured’. This means that it is not part of an existing network and can act as either enrollee or registrar (if it supports both functions). If the registrar is un-configured, the security settings it transmits to the enrollee are randomly-generated. Once a WPS-enabled device has connected to another device using WPS, it becomes ‘configured’. A configured Wi-Fi client can still act as enrollee or registrar in subsequent WPS connections, but a configured access point can no longer act as enrollee. It will be the registrar in all subsequent WPS connections in which it is involved. If you want a configured AP to act as an enrollee, you must reset it to its factory defaults.
Example WPS Network Setup
This section shows how security settings are distributed in a sample WPS setup.
The following figure shows a sample network. In step 1, both AP1 and Client 1 are un-configured. When WPS is activated on both, they perform the handshake. In this example, AP1 is the registrar, and Client 1 is the enrollee. The registrar randomly generates the security information to set up the network, since it is un-configured and has no existing information.
WPS: Example Network Step 1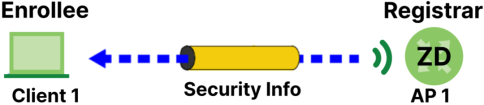
In step 2, you add another Wi-Fi client to the network. You know that Client 1 supports registrar mode, but it is better to use AP1 for the WPS handshake with the new client since you must connect to the access point anyway in order to use the network. In this case, AP1 must be the registrar, since it is configured (it already has security information for the network). AP1 supplies the existing security information to Client 2.
WPS: Example Network Step 2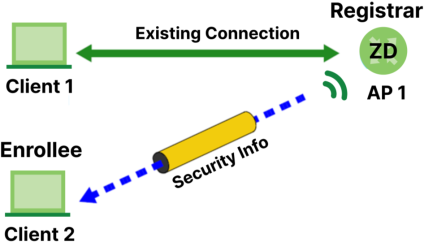
In step 3, you add another access point (AP2) to your network. AP2 is out of range of AP1, so you cannot use AP1 for the WPS handshake with the new access point. However, you know that Client 2 supports the registrar function, so you use it to perform the WPS handshake instead.
WPS: Example Network Step 3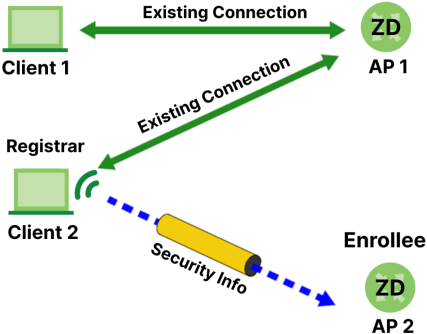
Limitations of WPS
WPS has some limitations of which you should be aware.
• When you use WPS, it works between two devices only. You cannot enroll multiple devices simultaneously, you must enroll one after the other.
For instance, if you have two enrollees and one registrar you must set up the first enrollee (by pressing the WPS button on the registrar and the first enrollee, for example), then check that it was successfully enrolled, then set up the second device in the same way.
• WPS works only with other WPS-enabled devices. However, you can still add non-WPS devices to a network you already set up using WPS.
WPS works by automatically issuing a randomly-generated WPA-PSK or WPA2-PSK pre-shared key from the registrar device to the enrollee devices. Whether the network uses WPA-PSK or WPA2-PSK depends on the device. You can check the configuration interface of the registrar device to discover the key the network is using (if the device supports this feature). Then, you can enter the key into the non-WPS device and join the network as normal (the non-WPS device must also support WPA-PSK or WPA2-PSK).
• When you use the PBC method, there is a short period (from the moment you press the button on one device to the moment you press the button on the other device) when any WPS-enabled device could join the network. This is because the registrar has no way of identifying the ‘correct’ enrollee, and cannot differentiate between your enrollee and a rogue device. This is a possible way for a hacker to gain access to a network.
You can easily check to see if this has happened. WPS only works simultaneously between two devices, so if another device has enrolled your device will be unable to enroll, and will not have access to the network. If this happens, open the access point’s configuration interface and look at the list of associated clients (usually displayed by MAC address). It does not matter if the access point is the WPS registrar, the enrollee, or was not involved in the WPS handshake; a rogue device must still associate with the access point to gain access to the network. Check the MAC addresses of your Wi-Fi clients (usually printed on a label on the bottom of the device). If there is an unknown MAC address you can remove it or reset the AP.
1 Some wireless devices, such as scanners, can detect Wi-Fi networks but cannot use Wi-Fi networks. These kinds of wireless devices might not have MAC addresses.
2 Hexadecimal characters are 0, 1, 2, 3, 4, 5, 6, 7, 8, 9, A, B, C, D, E, and F.