Flex Link
This chapter introduces how to set up a backup link for a primary link using Flex Links.
Flex Link Overview
A flex link pair consists of a primary link and a backup link on a layer-2 interface. A primary link runs on a Primary Port; a backup link runs on a Backup Port. The ports have two states: FORWARDING and BLOCKING. When one link is up and running (port state: FORWARDING), the other link is in down or in standby mode (port state: BLOCKING). Only one port is forwarding traffic (FORWARDING) at a time.
When the primary link goes down, the backup link automatically goes up and is able to forward traffic.
Preemption
Enable Preemption to have the Switch automatically return the primary port to FORWARDING state after the connection from the primary port resumes, and the backup port return to BLOCKING. The Switch will wait for the specified Preemption Delay Time before changing the primary port state to FORWARDING and backup port state to BLOCKING. See PORT > Flex Link > Flex Link Setup > Add/Edit for more information.
What You Can Do
• Use the Flex Link Setup screen (Flex Link Setup) to configure flex links for back up links on the Switch.
Flex Link Status
Click PORT > Flex Link > Flex Link Status to display this screen.
PORT > Flex Link > Flex Link Status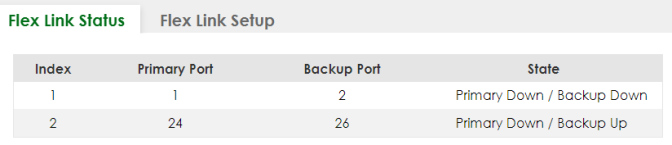
The following table describes the labels in this screen.
label | description |
|---|---|
Index | This displays the index number of a flex link pair. |
Primary Port | This displays the port number of the primary link. |
Backup Port | This displays the port number of the backup link. |
State | This displays the link status of the Primary port and Backup port. Down – The link is down. Up – The link is up and the port state is FORWARDING. Standby – The link is up and the port state is BLOCKING.  Only one port can be up in a flex link pair. Only one port can be up in a flex link pair. |
Flex Link Setup
Click PORT > Flex Link > Flex Link Setup to display this screen.
The Flex Link (PORT > Flex Link), STP (SWITCHING > Spanning Tree Protocol), Loop Guard (SWITCHING > Loop Guard) and Link Aggregation (PORT > Link Aggregation) features cannot be configured together on the same port. When one of the above functions is enabled, the Switch will not let you enable the others.You can configure up to five pairs of flex links.PORT > Flex Link > Flex Link Setup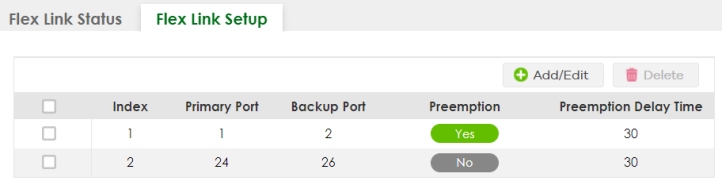
The following table describes the labels in this screen.
label | description |
|---|---|
Index | This displays the index number of an entry. |
Primary Port | This displays the port number of the primary link. |
Backup Port | This displays the port number of the backup link. |
Preemption | This displays if Preemption is enabled on the flex link pair. If Preemption is enabled, when the primary port comes back up, the backup port will go into BLOCKING state and the primary port will go into FORWARDING state after the Preemption Delay Time interval. |
Preemption Delay Time | This displays the preemption delay time configured for this flex link pair. |
Select an entry’s checkbox to select a specific entry. Otherwise, select the checkbox in the table heading row to select all entries. | |
Add/Edit | Click Add/Edit to add a new entry or edit a selected one. |
Delete | Click Delete to remove the selected entry. |
Add/Edit Flex Link
To access this screen, click the Add/Edit button or select an entry from the list and click the Add/Edit button.
A port can only be in one flex link pair. If a port has already been set as a flex link pair’s primary/backup port, the port can not be used by other flex links. Check the PORT > Flex Link > Flex Link Setup screen to see what ports are already in other flex link pairs.PORT > Flex Link > Flex Link Setup > Add/Edit (Standalone Mode)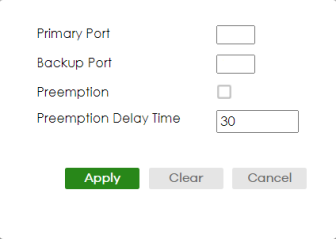
The following table describes the labels in this screen.
label | description |
|---|---|
Primary Port | Enter a port number to be the primary port. |
Backup Port | Enter a port number to be the backup port. |
Preemption | Select this to enable the Preemption mode on the flex link pair. If Preemption is disabled, if the primary port is down, then comes back up, it will remain in the BLOCKING state even after the Preemption Delay Time. |
Preemption Delay Time | Enter the delay time (in seconds) which you want the primary port to wait before changing back to FORWARDING state (when available). The range is 1 – 300 seconds. |
Apply | Click Apply to save your changes to the Switch’s run-time memory. The Switch loses these changes if it is turned off or loses power, so use the Save link on the top navigation panel to save your changes to the non-volatile memory when you are done configuring. |
Clear | Click Clear to clear the fields to the factory defaults. |
Cancel | Click Cancel to not save the configuration you make and return to the last screen. |