Anti-Arpscan
Anti-Arpscan Overview
Address Resolution Protocol (ARP), RFC 826, is a protocol used to convert a network-layer IP address to a link-layer MAC address. ARP scan is used to scan the network of a certain interface for alive hosts. It shows the IP address and MAC addresses of all hosts found. Hackers could use ARP scan to find targets in your network. Anti-arpscan is used to detect unusual ARP scan activity and block suspicious hosts or ports.
Unusual ARP scan activity is determined by port and host thresholds that you set. A port threshold is determined by the number of packets received per second on the port. If the received packet rate is over the threshold, then the port is put into an Err-Disable state. You can recover the normal state of the port manually if this happens and after you identify the cause of the problem.
A host threshold is determined by the number of ARP-request packets received per second. There is a global threshold rate for all hosts. If the rate of a host is over the threshold, then that host is blocked by using a MAC address filter. A blocked host is released automatically after the MAC aging time expires.
 A port-based threshold must be larger than the host-based threshold or the host-based threshold will not work.
What You Can Do
• Use the Anti-Arpscan Status screen (Anti-Arpscan Status) to see what ports are trusted and are forwarding traffic or are disabled.
• Use the Anti-Arpscan Host Status screen (Anti-Arpscan Host Status) to view blocked hosts and clear selected ones.
• Use this Anti-Arpscan Setup screen (Anti-Arpscan Setup) to enable anti-arpscan, set port and host thresholds as well as configure ports to be trusted or untrusted.
• Use the Anti-Arpscan Trust Host screen (Anti-Arpscan Trust Host) to create or remove trusted hosts identified by IP address and subnet mask. Anti-arpscan is not performed on trusted hosts.
What You Need to Know
• You should set an uplink port as a trusted port before enabling Anti-arpscan so as to prevent the port from being shutdown due to receiving too many ARP messages.
• When a port is configured as a trusted port, Anti-arpscan is not performed on the port. Both host and port thresholds are ignored for trusted ports. If the received ARP packet rate on a port or the received ARP-requests from a host exceed the thresholds, the trusted port will not be closed.
• If a port on the Switch is closed by Anti-arpscan, and you want to recover it, then do one of the following:
• Go to PORT > Port Setup. Clear Active and click Apply. Then select Active and click Apply again.
• Go to SECURITY > Errdisable > Errdisable Recovery and set the interval for anti-arpscan. After the interval expires, the closed ports will become active and start receiving packets again.
• Use the command port no inactive.
• Refer to the port logs to see when a port was closed.
Anti-Arpscan Status
Use this screen to see what ports are trusted and are forwarding traffic or are disabled. To open this screen, click SECURITY > Anti-Arpscan > Anti-Arpscan Status.
SECURITY > Anti-Arpscan > Anti-Arpscan Status (Standalone Mode)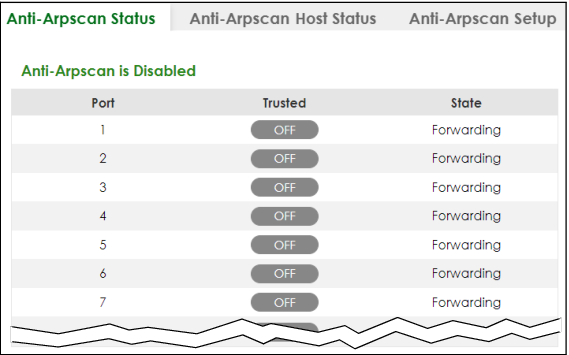
The following table describes the fields in this screen.
label | description |
|---|---|
Anti-Arpscan is.... | This shows whether Anti-arpscan is enabled or disabled on the Switch. |
Port | This field displays the port number of the Switch. |
Trusted | This field displays whether the port is trusted or untrusted. Anti-arpscan is not performed on a trusted port. |
State | This field displays whether the port can forward traffic normally (Forwarding) or is disabled (Err-Disable). |
Anti-Arpscan Host Status
Use this screen to view blocked hosts and unblock ones connected to certain ports. To open this screen, click SECURITY > Anti-Arpscan > Anti-Arpscan Host Status.
SECURITY > Anti-Arpscan > Anti-Arpscan Host Status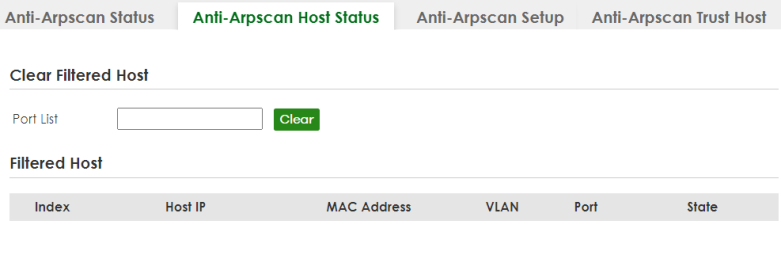
The following table describes the fields in the above screen.
label | description |
|---|---|
Clear Filtered host A filtered host is a blocked IP address. | |
Port List | Enter a port number or a series of port numbers separated by commas and spaces, and then click Clear to unblock all hosts connected to these ports. |
Filtered host This table lists information on blocked hosts. | |
Index | This displays the index number of an IP address (a host) that has been blocked. |
Host IP | This displays the IP address of the blocked host. |
MAC Address | This displays the MAC address of the blocked host. |
VLAN | This displays the VLAN ID that shows which VLAN the blocked host is in. |
Port | This displays the port number to which the blocked host is connected. |
State | This shows Err-Disable if the ARP-request rate from this host is over the threshold. Forwarding hosts are not displayed. |
Anti-Arpscan Setup
Use this screen to enable Anti-Arpscan, set port and host thresholds as well as configure ports to be trusted or untrusted. To open this screen, click SECURITY > Anti-Arpscan > Anti-Arpscan Setup.
SECURITY > Anti-Arpscan > Anti-Arpscan Setup (Standalone Mode)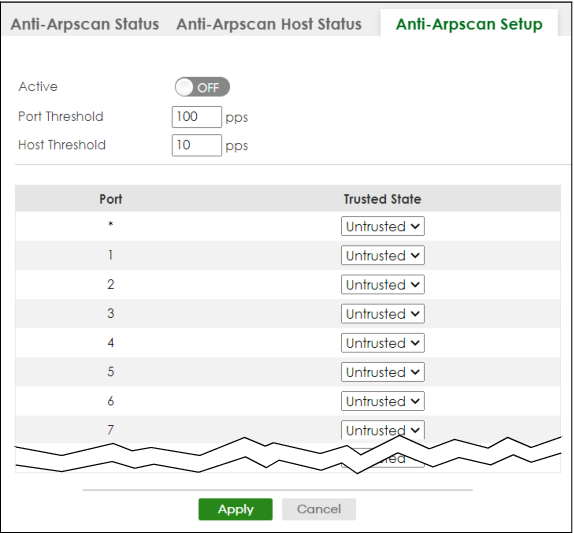
The following table describes the fields in the above screen.
label | description |
|---|---|
Active | Enable the switch button to enable Anti-arpscan on the Switch. |
Port Threshold | A port threshold is determined by the number of packets received per second on the port. If the received packet rate is over the threshold, then the port is put into an Err-Disable state. Type the maximum number of packets per second allowed on the port before it is blocked. The allowed range is 2 to 255 packets received per second. |
Host Threshold | A host threshold is determined by the number of ARP-request packets received per second. This is the global threshold rate for all hosts. If the rate of a host is over the threshold, then that host is blocked by using a MAC address filter. A blocked host is released automatically after the MAC aging time expires. Type the maximum number of ARP-request packets allowed by a host before it is blocked. The allowed range is 2 to 100 ARP-request packets per second.The port-based threshold must be larger than the host-based threshold or the host-based threshold will not be applied. |
Port | This field displays the port number. |
* | Settings in this row apply to all ports. Use this row only if you want to make some settings the same for all ports. Use this row first to set the common settings and then make adjustments on a port-by-port basis. Changes in this row are copied to all the ports as soon as you make them. |
Trusted State | Select Untrusted or Trusted for the associated port. Anti-arpscan is not performed on trusted hosts. |
Apply | Click Apply to save your changes to the Switch’s run-time memory. The Switch loses these changes if it is turned off or loses power, so use the Save link on the top navigation panel to save your changes to the non-volatile memory when you are done configuring. |
Cancel | Click this to reset the values in this screen to their last-saved values. |
Anti-Arpscan Trust Host
Use this screen to create or remove trusted hosts identified by IP address and subnet mask. Anti-arpscan is not performed on trusted hosts. To open this screen, click SECURITY > Anti-Arpscan > Anti-Arpscan Trust Host.
SECURITY > Anti-Arpscan > Anti-Arpscan Trust Host
The following table describes the fields in the above screen.
label | description |
|---|---|
Index | This field displays a sequential number for each trusted host. |
Name | This field displays the name of the trusted host. |
Host IP | This field displays the IP address of the trusted host. |
Mask | This field displays the subnet mask of the trusted host. |
Select an entry’s checkbox to select a specific entry. Otherwise, select the checkbox in the table heading row to select all entries. | |
Add/Edit | Click Add/Edit to add a new entry or edit a selected one. |
Delete | Click Delete to remove the selected entries. |
Add/Edit Anti-Arpscan Trust Hosts
Use this screen to add/edit trusted hosts identified by IP address and subnet mask. Click Add/Edit, or select an entry and click Add/Edit in the SECURITY > Anti-Arpscan > Anti-Arpscan Trust Host screen to view this screen.
SECURITY > Anti-Arpscan > Anti-Arpscan Trust Host > Add/Edit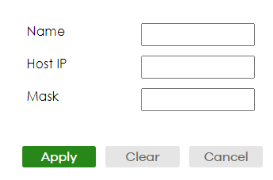
The following table describes the fields in the above screen.
label | description |
|---|---|
Name | Type a descriptive name of up to 32 printable ASCII (except [ ? ], [ | ], [ ' ], [ " ], or [ , ]) characters to identify this host. |
Host IP | Type the IP address of the host. |
Mask | A trusted host may consist of a subnet of IP addresses. Type a subnet mask to create a single host or a subnet of hosts. |
Apply | Click Apply to save your changes to the Switch’s run-time memory. The Switch loses these changes if it is turned off or loses power, so use the Save link on the top navigation panel to save your changes to the non-volatile memory when you are done configuring. |
Clear | Click Clear to clear the fields to the factory defaults. |
Cancel | Click Cancel to not save the configuration you make and return to the last screen. |