Priority Queue
Priority Queue Overview
IEEE 802.1p defines up to eight separate traffic types by inserting a tag into a MAC-layer frame that contains bits to define class of service. Frames without an explicit priority tag are given the default priority of the ingress port. Use this screen to configure the priority level-to-physical queue mapping. The Switch has eight physical queues that you can map to the eight priority levels.
On the Switch, traffic assigned to higher index queues gets through faster while traffic in lower index queues is dropped if the network is congested.
What You Can Do
Use the Priority Queue screen (Assign Priority Queue) to configure the priority level-to-physical queue mapping.
Assign Priority Queue
Use this screen to assign priority level to each queue.
Click SWITCHING > QoS > Priority Queue to open this screen.
SWITCHING > QoS > Priority Queue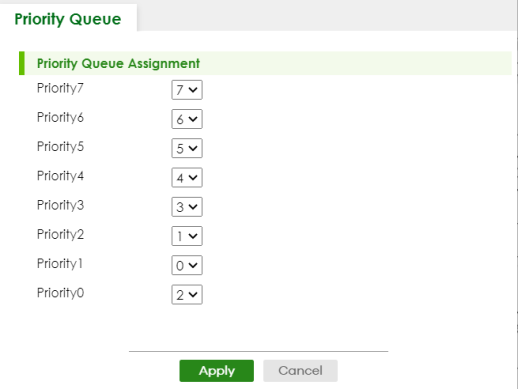
The following table describes the related labels in this screen.
label | description |
|---|---|
Priority Queue Assignment The following descriptions are based on the traffic types defined in the IEEE 802.1d standard (which incorporates the 802.1p). To map a priority level to a physical queue, select a physical queue from the drop-down menu on the right. | |
Priority 7 | Typically used for network control traffic such as router configuration messages. |
Priority 6 | Typically used for voice traffic that is especially sensitive to jitter (jitter is the variations in delay). |
Priority 5 | Typically used for video that consumes high bandwidth and is sensitive to jitter. |
Priority 4 | Typically used for controlled load, latency-sensitive traffic such as SNA (Systems Network Architecture) transactions. |
Priority 3 | Typically used for “excellent effort” or better than best effort and would include important business traffic that can tolerate some delay. |
Priority 2 | This is for “spare bandwidth”. |
Priority 1 | This is typically used for non-critical “background” traffic such as bulk transfers that are allowed but that should not affect other applications and users. |
Priority 0 | Typically used for best-effort traffic. |
Apply | Click Apply to save your changes to the Switch’s run-time memory. The Switch loses these changes if it is turned off or loses power, so use the Save link on the top navigation panel to save your changes to the non-volatile memory when you are done configuring. |
Cancel | Click Cancel to reset the fields. |