Parental Control
Parental Control Overview
Parental control allows you to limit the time a user can access the Internet and prevent users from viewing inappropriate content or participating in specified online activities.
Your parental control screens may be different depending on the model you are using. Some Zyxel Devices support scheduling, some support scheduling and URL filtering.
See Overview for more information.
Parental Control Schedule
Use this screen to enable parental control and view parental control rules and schedules. You can limit the time a user can access the Internet. These rules are defined in a Parental Control Profile (PCP).
Click Security > Parental Control to open the following screen.
Security > Parental Control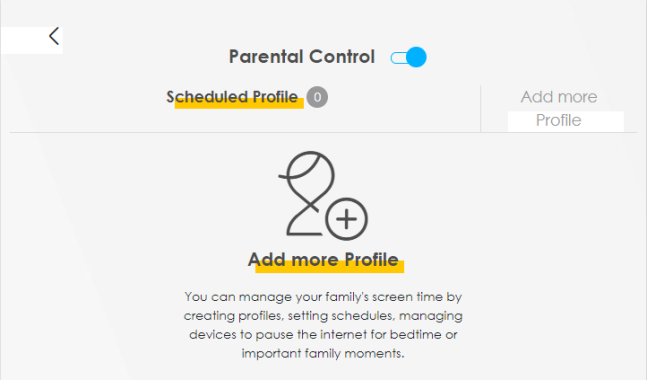
The following table describes the fields in this screen.
Label | Description |
|---|---|
Parental Control | Click this switch to enable or disable parental control. |
Scheduled Profile | This screen shows all the created profiles. |
Add more Profile | Click this button to create a new profile. |
Add or Edit a Parental Control Profile
Click Add more Profile in the Parental Control screen to add a new rule or click the Edit icon next to an existing rule to edit it. Use this screen to configure a restricted access schedule.
Security > Parental Control > Add more Profile: Select Device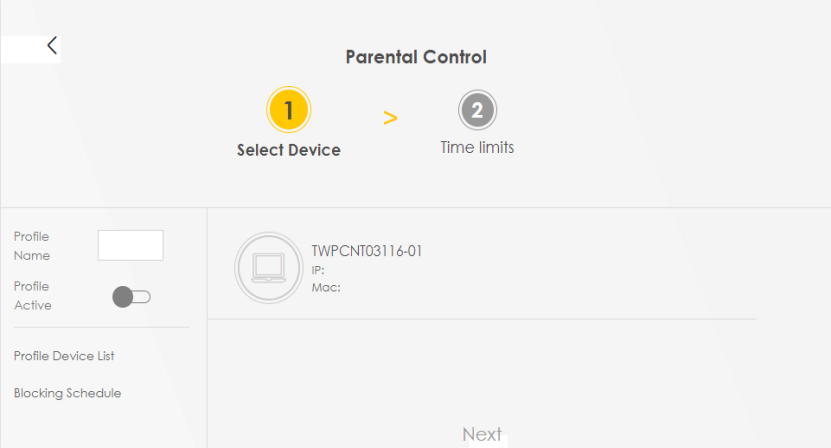
The following table describes the fields in this screen.
Label | Description |
|---|---|
Profile Name | Enter a descriptive name for the profile. You can use up to 17 printable characters except [ " ], [ ` ], [ ' ], [ < ], [ > ], [ ^ ], [ $ ], [ | ], [ & ], or [ ; ]. Spaces are allowed. |
Profile Active | Click this switch to enable or disable this profile. |
Profile Device List | This field shows the devices selected on the right for this profile. |
Blocking Schedule | This field shows the time during which Internet access is blocked on the profile devices. |
Next | Click Next to go to the next step to set a schedule for this profile. |
Define a Schedule
This screen allow you to define time periods and days during which Internet access is blocked on the profile devices. Finish the settings in the Select Device step and click Next to access this screen.
Security > Parental Control > Add more Profile: Time limits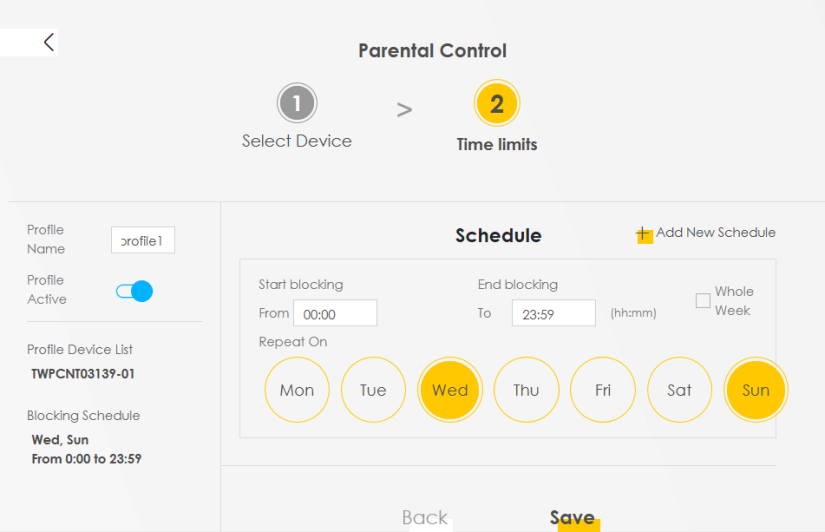
The following table describes the fields in this screen.
Label | Description |
|---|---|
Profile Name | Enter a descriptive name for the profile. |
Profile Active | Click this switch to enable or disable this profile. When the switch goes to the right (  ), this profile is active. Otherwise, it is not. ), this profile is active. Otherwise, it is not. |
Profile Device List | This field shows the devices selected on the right for this profile. |
Blocking Schedule | This field shows the time during which Internet access is blocked on the profile devices. |
Schedule | |
Add New Schedule | Click this to add a new block for scheduling. |
Start/End blocking | Select the time period when Internet access is blocked on the profile devices. |
Repeat On | Select the days when Internet access is blocked on the profile devices. Select Whole Week and the scheduler rule will be activated for the whole week. |
Back | Click Back to return to the previous screen. |
Save | Click Save to save your changes. |
Parental Control Scheduled Profile
Use this screen to view and manage the created parental control profiles.
Security > Parental Control > Scheduled Profile
The following table describes the fields in this screen.
Label | Description |
|---|---|
Parental Control | Click this switch to enable or disable parental control. When the switch goes to the right (  ), the function is enabled. Otherwise, it is not. ), the function is enabled. Otherwise, it is not. |
Scheduled Profile | This screen shows all the created profiles. Only the Add more Profile button displays if there is no profile created. |
Profile Active | Click this switch to enable or disable a created profile. When the switch goes to the right (  ), this profile is active. Otherwise, it is not. ), this profile is active. Otherwise, it is not. |
Profile Device List | Click beside Profile Device List to view more information about the profile. You can click Delete to remove the profile or click Edit to change the profile settings. |
Add more Profile | Click this button to create a new profile. |
Parental Control Schedule and URL Filter
Use this screen to enable parental control and view parental control rules and schedules. You can limit the time a user can access the Internet and prevent users from viewing inappropriate content or participating in specified online activities. These rules are defined in a Parental Control Profile (PCP).
Click Security > Parental Control to open the following screen.
Security > Parental Control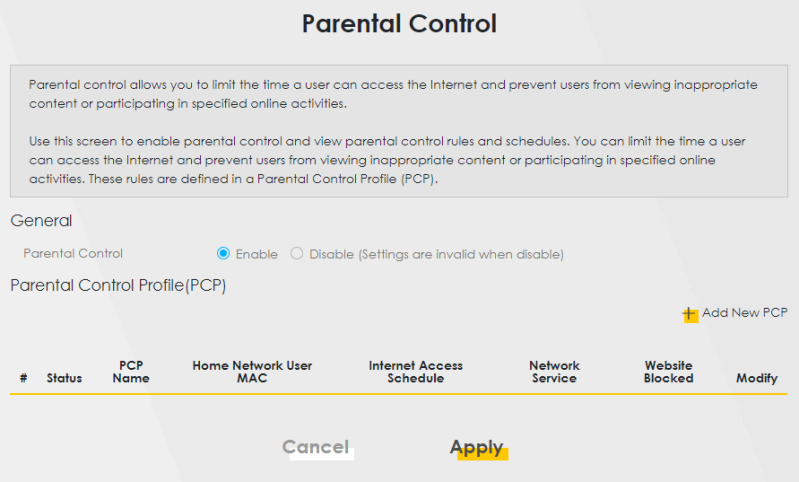
The following table describes the fields in this screen.
Label | Description |
|---|---|
General | |
Parental Control | Select Enable to activate parental control on the Zyxel Device. |
Parental Control Profile (PCP) | |
Add new PCP | Click this if you want to configure a new Parental Control Profile (PCP). |
# | This shows the index number of the rule. |
Status | This indicates whether the rule is active or not. A yellow bulb signifies that this rule is active. A gray bulb signifies that this rule is not active. |
PCP Name | This shows the name of the rule. |
Home Network User MAC | This shows the MAC address of the LAN user’s computer to which this rule applies. |
Internet Access Schedule | This shows the days and time on which parental control is enabled. |
Network Service | This shows whether the network service is configured. If not, None will be shown. |
Website Blocked | This shows whether the website block is configured. If not, None will be shown. |
Modify | Click the Edit icon to go to the screen where you can edit the rule. Click the Delete icon to delete an existing rule. |
Cancel | Click Cancel to restore your previously saved settings. |
Apply | Click Apply to save your changes. |
Add or Edit a Parental Control Profile
Click Add new PCP in the Parental Control screen to add a new rule or click the Edit icon next to an existing rule to edit it. Use this screen to configure a restricted access schedule and/or URL filtering settings to block the users on your network from accessing certain web sites.
Security > Parental Control > Add or Edit PCP (General, Rule List & Internet Access Schedule)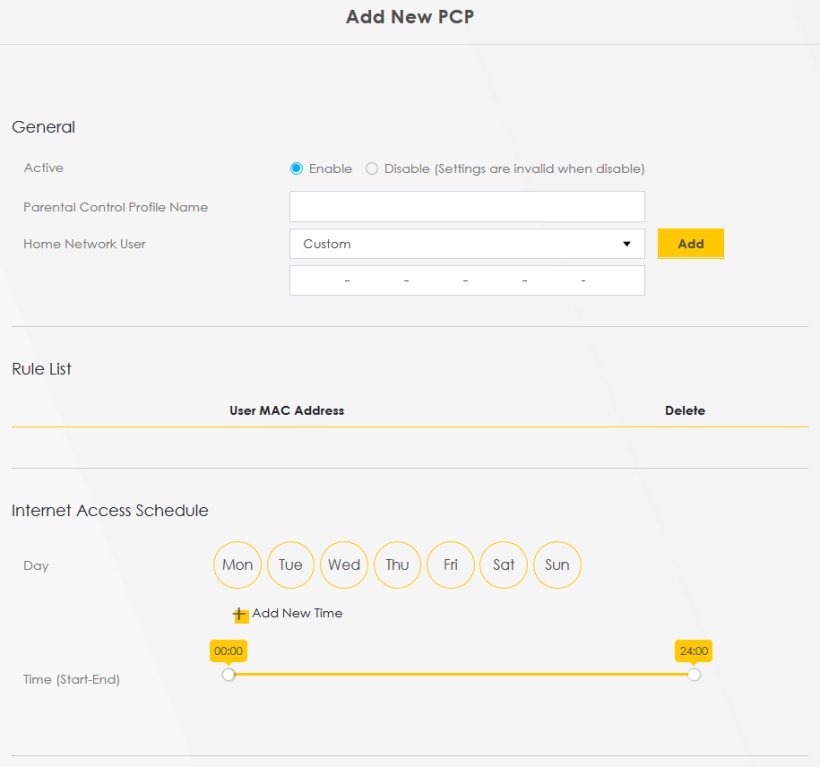
Security > Parental Control > Add or Edit PCP (Network Service & Site/URL Keyword)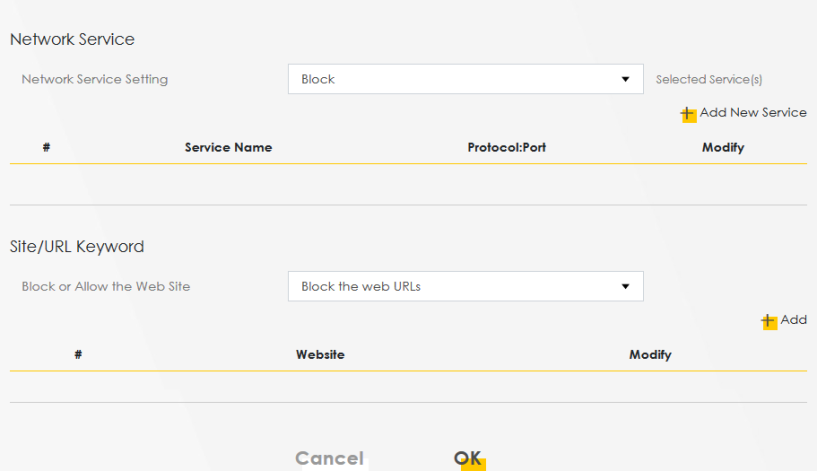
The following table describes the fields in this screen.
Label | Description |
|---|---|
General | |
Active | Select Enable or Disable to activate or deactivate the parental control rule. |
Parental Control Profile Name | Enter a descriptive name for the profile. You can use up to 17 printable characters except [ " ], [ ` ], [ ' ], [ < ], [ > ], [ ^ ], [ $ ], [ | ], [ & ], or [ ; ]. Spaces are allowed. |
Home Network User | Select the LAN user that you want to apply this rule to from the drop-down list box. If you select Custom, enter the LAN user’s MAC address. If you select All, the rule applies to all LAN users. |
Rule List | In Home Network User, select Custom, enter the LAN user’s MAC address, then click the Add icon to enter a computer MAC address for this PCP. Up to five are allowed. Click the Delete icon to remove one. |
Internet Access Schedule | |
Day | Select checkboxes for the days that you want the Zyxel Device to perform parental control. |
Time (Start–End) | Drag the time bar to define the time that the LAN user is allowed access (Authorized access) or denied access (No access). |
Add New Time | Click this to add a new time bar. Up to three are allowed. |
Network Service | |
Network Service Setting | If you select Block, the Zyxel Device prohibits the users from viewing the web sites with the URLs listed below. If you select Allow, the Zyxel Device blocks access to all URLs except ones listed below. |
Add New Service | Click this to show a screen in which you can add a new service rule. You can configure the Service Name, Protocol, and Port of the new rule, as shown in Security > Parental Control > Add or Edit PCP > Add New Service. |
# | This shows the index number of the rule. |
Service Name | This shows the name of the rule. |
Protocol:Port | This shows the protocol and the port of the rule. |
Modify | Click the Edit icon to go to the screen where you can edit the rule. Click the Delete icon to delete an existing rule. |
Site/URL Keyword | |
Block or Allow the Web Site | If you select Block the Web URLs, the Zyxel Device prohibits the users from viewing the Web sites with the URLs listed below. If you select Allow the Web URLs, the Zyxel Device blocks access to all URLs except ones listed below. |
Add | Click Add to show a screen to enter the URL of web site or URL keyword to which the Zyxel Device blocks or allows access. |
# | This shows the index number of the rule. |
Website | This shows the URL of web site or URL keyword to which the Zyxel Device blocks or allows access. |
Modify | Click the Edit icon to go to the screen where you can edit the rule. Click the Delete icon to delete an existing rule. |
Cancel | Click Cancel to exit this screen without saving any changes. |
OK | Click OK to save your changes. |
Add New Service
Use this screen to add a new service rule.
Security > Parental Control > Add or Edit PCP > Add New Service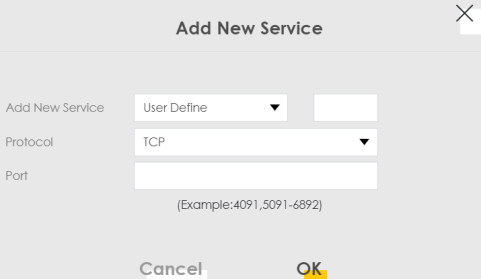
The following table describes the fields in this screen.
Label | Description |
|---|---|
Add New Service | Select the name of the service from the drop-down list. Otherwise, select User Define and specify the name, protocol, and port of the service. If you have chosen a pre-defined service in the Service Name field, this field will not be configurable. |
Protocol | Select the transport layer protocol used for the service. Choices are TCP, UDP, or TCP & UDP. |
Port | Enter the port of the service. If you have chosen a pre-defined service in the Service Name field, this field will not be configurable. |
Cancel | Click Cancel to exit this screen without saving any changes. |
OK | Click OK to save your changes. |
Add Site/URL Keyword
Click Add in the Site/URL Keyword section of the Edit or Add new PCP screen to open the following screen.
Security > Parental Control > Add or Edit PCP > Add Keyword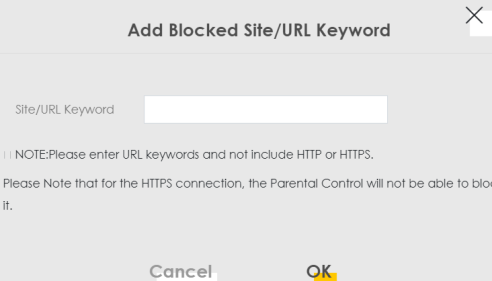
The following table describes the fields in this screen.
Label | Description |
|---|---|
Site/URL Keyword | Enter a keyword and click OK to have the Zyxel Device block access to the website URLs that contain the keyword. |
Cancel | Click Cancel to exit this screen without saving any changes. |
OK | Click OK to save your changes. |