Static Multicast Forwarding
Static Multicast Forwarding Overview
This chapter discusses how to configure static multicast forwarding rules based on multicast MAC addresses or multicast IPv4 addresses.
Use these screens to configure static multicast address forwarding by defining the ports and VLANs that multicast traffic can pass through the Switch. If a subscriber is on a different port or VLAN, then the subscriber will not get the multicast.
What You Can Do
Use the Static Multicast Forwarding By MAC screen (Static Multicast Forwarding By MAC) to configure rules to forward specific multicast frames, such as streaming or control frames, to specific ports.
Use the Static Multicast Forwarding By IP screen (Configure Static Multicast Forwarding by IP) to configure static multicast IPv4 addresses for ports to receive the multicast stream.
What You Need To Know
A multicast MAC address or multicast IP address is the MAC address or IP address of a multicast group, and not a receiving device.
A static multicast address is a multicast MAC address or multicast IPv4 address that has been manually entered in the multicast table. This identifies the destination of the multicast content. Multicast IPv4 addresses uses the Class D IP addresses range 224.0.0.0 to 239.255.255.255. Multicast MAC addresses have a “1” as the last binary bit of the first octet pair (for example, 01:00:5e:00:00:0A). Static multicast addresses do not age out. See IP Multicast Addresses for more information on IP multicast addresses.
 Static (manual) multicast forwarding allows you (the administrator) to forward multicast frames to a member without the member having to join the group first.
If a multicast group has no members, then the Switch cannot forward to specific ports unless you configure static (manual) multicast entries. The Switch will either flood the multicast frames to all ports (default) or drop them. No Multicast Forwarding shows such unknown multicast frames flooded to all ports. With static multicast forwarding, you can forward these multicasts to ports within a VLAN group.
No Multicast Forwarding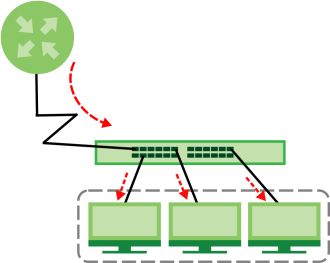
Static Multicast Forwarding By MAC
Use this screen to view and configure static multicast MAC addresses for ports to receive the multicast stream. Click SWITCHING > Multicast > Static Multicast Forwarding By MAC to display the screen as shown next.
SWITCHING > Multicast > Static Multicast Forwarding By MAC
The following table describes the labels in this screen.
label | description |
|---|---|
Index | This is the index number of the static multicast MAC address rule. |
Active | This field displays whether a static multicast MAC address forwarding rule is active or not. You may temporarily deactivate a rule without deleting it. |
Name | This field displays the descriptive name for identification purposes for a static multicast MAC address-forwarding rule. |
MAC Address | This field displays the multicast MAC address that identifies a multicast group. |
VID | This field displays the ID number of a VLAN group to which frames containing the specified multicast MAC address will be forwarded. |
Port | This field displays the ports within an identified VLAN group to which frames containing the specified multicast MAC address will be forwarded. |
Select an entry’s checkbox to select a specific entry. Otherwise, select the checkbox in the table heading row to select all entries. | |
Add/Edit | Click Add/Edit to add a new rule or edit a selected one. |
Delete | Click Delete to remove the selected rules. |
Add/Edit Static Multicast Forwarding By MAC
Use this screen to add a static multicast MAC address rule for ports to receive the multicast stream.
Click Add/Edit, or select an entry and click Add/Edit in the SWITCHING > Multicast > Static Multicast Forwarding By MAC to display this screen.
SWITCHING > Multicast > Static Multicast Forwarding By MAC > Add/Edit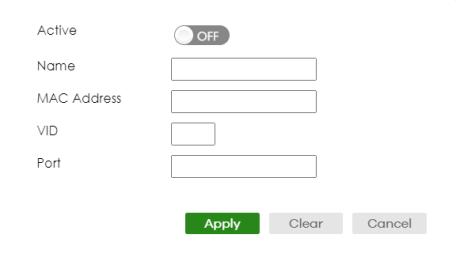
The following table describes the labels in this screen
label | description |
|---|---|
Active | Enable the switch button to activate your rule. You may temporarily deactivate a rule without deleting it by disabling the switch. |
MAC Address | Enter a multicast MAC address which identifies the multicast group. The last binary bit of the first octet pair in a multicast MAC address must be 1. For example, the first octet pair 00000001 is 01 in hexadecimal, so 01:00:5e:00:00:0A and 01:00:5e:00:00:27 are valid multicast MAC addresses. |
VID | You can forward frames with matching destination multicast MAC address to ports within a VLAN group. Enter the ID that identifies the VLAN group here. If you do NOT have a specific target VLAN, enter 1. |
Port | Enter the ports where frames with destination multicast MAC address that matched the entry above are forwarded. You can enter multiple ports separated by (no space) comma (,) or hyphen (-). For example, enter “3-5” for ports 3, 4, and 5. Enter “3,5,7” for ports 3, 5, and 7. |
Apply | Click Apply to save your changes to the Switch’s run-time memory. The Switch loses these changes if it is turned off or loses power, so use the Save link on the top navigation panel to save your changes to the non-volatile memory when you are done configuring. |
Clear | Click Clear to clear the fields to the factory defaults. |
Cancel | Click Cancel to not save the configuration you make and return to the last screen. |
Configure Static Multicast Forwarding by IP
Use this screen to configure static multicast IPv4 addresses for ports to receive the multicast stream. Click SWITCHING > Multicast > Static Multicast Forwarding By IP to display the screen as shown next.
SWITCHING > Multicast > Static Multicast Forwarding By IP
The following table describes the labels in this screen.
label | description |
|---|---|
Index | This is the index number of the static multicast IP address rule. |
Name | This field displays the descriptive name for identification purposes for a static multicast IP address-forwarding rule. |
IP Address | This field displays the multicast IP address that identifies a multicast group. |
VID | This field displays the ID number of a VLAN group to which frames containing the specified multicast IP address will be forwarded. |
Port | This field displays the ports within an identified VLAN group to which frames containing the specified multicast IP address will be forwarded. |
Select an entry’s checkbox to select a specific entry. Otherwise, select the checkbox in the table heading row to select all entries. | |
Add/Edit | Click Add/Edit to add a new rule or edit a selected one. |
Delete | Click Delete to remove the selected rules. |
Add/Edit a Static Multicast Address By IP
Use this screen to configure ports and VLAN to receive the multicast stream with this multicast IPv4 address.
Click Add/Edit, or select an entry and click Add/Edit in the SWITCHING > Multicast > Static Multicast Forwarding By IP to display this screen.
SWITCHING > Multicast > Static Multicast Forwarding By IP > Add/Edit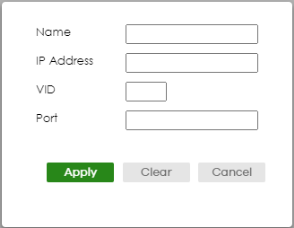
The following table describes the labels in this screen.
label | description |
|---|---|
Name | Enter a descriptive name (up to 32 printable ASCII characters except [ ? ], [ | ], [ ' ], [ " ] or [ , ]) for this static multicast IPv4 address forwarding rule. This is for identification only. |
IP Address | Enter a multicast IPv4 address (224.0.0.0 – 239.255.255.255) which identifies the multicast group. |
VID | You can forward frames with matching destination multicast IPv4 address to ports within a VLAN group. Enter the ID that identifies the VLAN group here. If you do NOT have a specific target VLAN, enter 1. |
Port | Enter the ports where frames with destination multicast IPv4 address that matched the entry above are forwarded. You can enter multiple ports separated by (no space) comma (,) or hyphen (-). For example, enter “3-5” for ports 3, 4, and 5. Enter “3,5,7” for ports 3, 5, and 7. |
Apply | Click Apply to save your changes to the Switch’s run-time memory. The Switch loses these changes if it is turned off or loses power, so use the Save link on the top navigation panel to save your changes to the non-volatile memory when you are done configuring. |
Clear | Click Clear to clear the fields to the factory defaults. |
Cancel | Click Cancel to not save the configuration you make and return to the last screen. |