Hardware
See the Quick Start Guide for hardware installation and connections.
Port and Antennas
Locate the mounting handle on the back of the Leaf Plus. Remove the cover below the handle to access the PoE port inside. Place the Leaf Plus with the mounting handle facing upward and the port facing toward you.
Leaf Plus Port and Button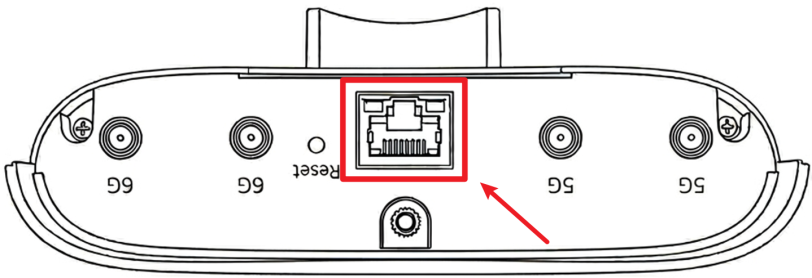
The following are the items on the ports panels for your Leaf Plus.
label | description |
|---|---|
PoE | Connect the PoE port to provide power and network access to the Leaf Plus. |
Reset | Press the button for more than 5 seconds to return the Leaf Plus to the factory defaults. |
The Leaf Plus has four RP-SMA female antenna connectors for external antennas: two for the 5 GHz band and two for the 6 GHz band. Connect all four antennas to the Leaf Plus before use.
 External antennas are not included and must be purchased separately. Zyxel recommends the ACCESSORY-ZZ0114F antenna. Customers may also use other compatible antennas that meet the required frequency bands and applicable regulatory requirements.
The Zyxel ACCESSORY-ZZ0114F antenna specifications are shown in the following table for your reference.
label | Specification | |||
|---|---|---|---|---|
Antenna | 5G-1 | 5G-2 | 6G-1 | 6G-2 |
Connector | RP-SMA male | RP-SMA male | RP-SMA male | RP-SMA male |
Polarization | -45 | +45 | -45 | +45 |
Frequency | 5150 to 5850 | 5150 to 5850 | 5925 to 7125 | 5925 to 7125 |
Peak Gain (dBi) | 12.5 | 12.1 | 12.9 | 12.9 |
Voltage Standing Wave Ratio (VSWR) | < 2.5 | < 3 | ||
Half-Power Beamwidth (HPBW)-Azimuth | 19.2 to 23.3⁰ | 16.8 to 24.1⁰ | 17.2 to 26.9⁰ | 17.2 to 25.7⁰ |
Half-Power Beamwidth (HPBW)-Elevation | 14.3 to 21.8⁰ | 15.7 to 19.2⁰ | 12.9 to 16.1⁰ | 12.0 to 16.8⁰ |
Isolation (dB) | 17 | 17 | ||
Cross Isolation (dB) | 25 | |||
Power (Watts) | 5 | |||
Impedance (Ohms) | 50 | |||
Type | Patch |
PoE
Power Over Ethernet (PoE) is a technology that allows Ethernet cables to supply power and transmit data simultaneously through a single Ethernet cable.
The following figure shows a PoE injector supplying power to the Leaf Plus from a power outlet, and providing an Ethernet connection to a wired client (such as a desktop computer) through its LAN port.
Leaf Plus’s PoE Application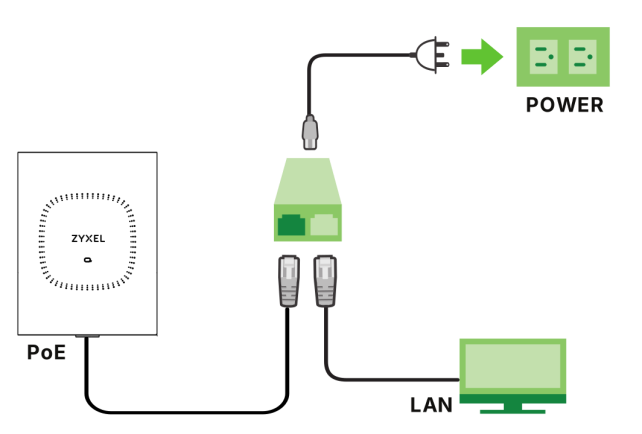
To view the Leaf Plus’s supported PoE standards, see Leaf Plus Feature Table. Use Ethernet cables that correspond to the PoE standard your Leaf Plus supports (see PoE Standards).
The supported PoE standards for Leaf Plus are:
• IEEE 802.3af Power over Ethernet (PoE)
• IEEE 802.3at Power over Ethernet + (PoE+)
The following table describes the PoE standards.
PoE FEATURES | PoE | PoE+ |
|---|---|---|
IEEE Standard | IEEE 802.3af | IEEE 802.3at |
PoE Type | Type 1 | Type 2 |
PSE Port Power | PSE Port Power | PSE Port Power |
IEEE Power Classification | Class 0, 1, 2, 3 | Class 4 |
Maximum Power Per Port | 15.4 W | 30 W |
Port Voltage Range | 44 – 57 V | 50 – 57 V |
Cables | Cables | Cables |
Twisted Pairs Used | 2-pair | 2-pair |
Supported Cables | Cat 3 or better | Cat 5 or better |
Mounting and Installer Mode
Installer Mode provides an interface for installers to quickly verify the wireless bridge connection between the Leaf Plus and Root (Plus) during installation. Installers can use a mobile phone browser to log in to this interface while mounting the Leaf Plus.
This interface displays real-time data, allowing installers to adjust the mounting position as needed. You can also verify uplink status, configure device height, and run speed tests to measure network throughput.
Use this mode:
• During installation: to align the Leaf Plus and check uplink connection.
• When troubleshooting: to check signal strength and network throughput.
Accessing the Installer Mode
1 Enter the Username (default: “admin”) and default password to log in to the local GUI.
The default password is unique to each Leaf Plus device and shown on the label. See Accessing the Local GUI for more information.
Once you register your Leaf Plus with NCC, the local GUI login password will change to an NCC assigned password. To view or change the NCC assigned password, log in to NCC and go to Site-wide > Configure > Site settings > Local credentials.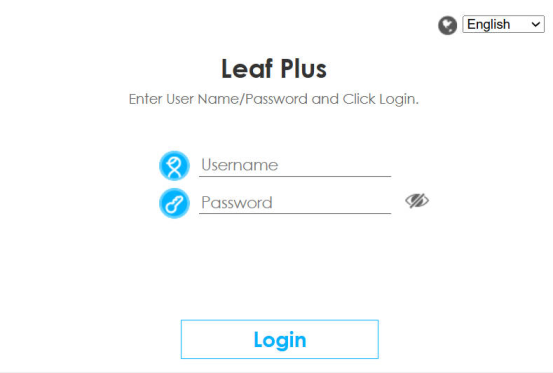
2 Select the language you prefer for the local GUI. Click Login.
3 After logging in to the local GUI, select Installer Mode.
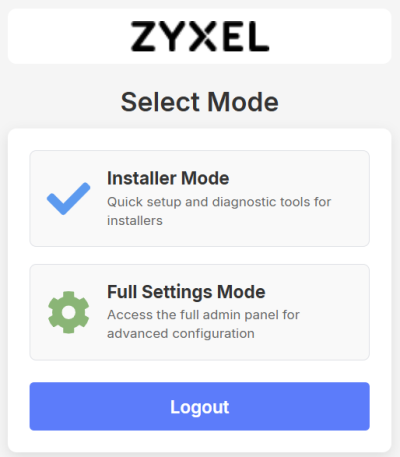 Full Settings Mode is intended for troubleshooting purposes. If your Leaf Plus is registered with NCC, use NCC for complete configuration. See Overview for more information about the Full Settings Mode.
Installer Mode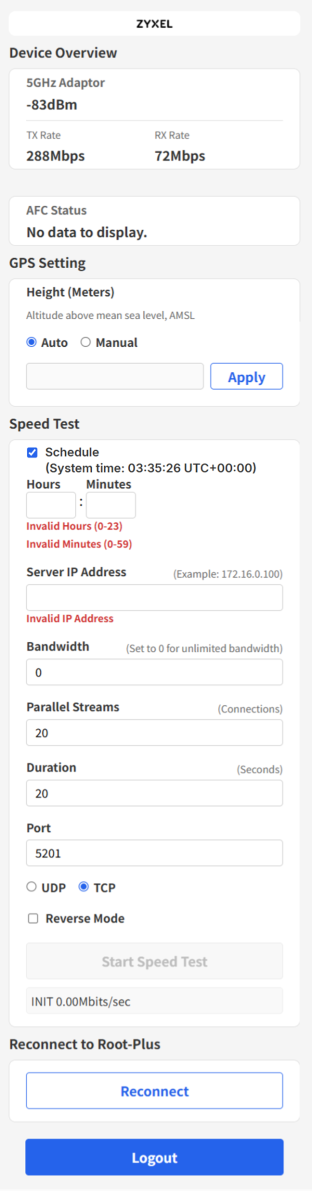
The following table describes the labels in this screen.
Label | Description |
|---|---|
Device Overview | |
5GHz Adaptor | This field displays the 5 GHz radio uplink RSSI (Received Signal Strength Indicator) in dBm. A value closer to 0 dBm indicates a stronger received signal. For the Leaf Plus to Root (Plus) wireless bridge connection, a signal strength between -65 dBm and -75 dBm is recommended. If the signal falls below -75 dBm, try the following: • Reduce the distance between the two Leaf Plus devices. • Realign the Leaf Plus devices so they face each other. • Remove any obstacles in the line of sight between the Leaf Plus devices. |
6GHz Adaptor | This field displays the 6 GHz radio uplink RSSI (Received Signal Strength Indicator) in dBm. A value closer to 0 dBm indicates a stronger received signal. For the Leaf Plus to Root (Plus) wireless bridge connection, a signal strength between -65 dBm and -75 dBm is recommended. If the signal falls below -75 dBm, try the following: • Reduce the distance between the two Leaf Plus devices. • Realign the Leaf Plus devices so they face each other. • Remove any obstacles in the line of sight between the Leaf Plus devices. |
TX Rate | This field displays the transmit data rate of the wireless uplink. The TX Rate and RX Rate should remain stable and similar in value. Low or fluctuating values may indicate poor alignment, interference, or obstacles in the signal path. |
RX Rate | This field displays the receive data rate of the wireless uplink. The TX Rate and RX Rate should remain stable and similar in value. Low or fluctuating values may indicate poor alignment, interference, or obstacles in the signal path. |
AFC Status | AFC (Automated Frequency Coordination) is a system that automatically assigns approved 6 GHz channels and maximum transmit power levels to outdoor devices based on their location and installation height. It prevents interference with other licensed services. • SUCCESS: The Leaf Plus successfully obtains an AFC grant and can operate on the approved 6 GHz channels and transmit power levels. AFC is only supported in the United States and Canada. Devices located outside these two countries will display No data to display in this field. |
GPS Setting | |
Height (Meters) | Set the Leaf Plus’s altitude Above Mean Sea Level (AMSL). • Auto: Obtain the altitude automatically from the GPS signal. Use this option when the GPS signal is strong and the detected height is accurate. • Manual: Configure the altitude manually. Use this option when the GPS signal is weak and cannot obtain the accurate height. Enter the height in meters. At the time of writing, the value accepts up to 4 digits with up to 2 decimal places (for example, 60 or 15.02). |
Apply | Click Apply to save the height setting. |
Speed Test | An iPerf server is a machine running the network testing tool iPerf in server mode so other devices can test network performance against it. Run an iPerf test to measure network performance such as bandwidth and throughput between an iPerf client, the Leaf Plus, and an iPerf server. |
Schedule | Select this to set when the speed test runs automatically. If Schedule is not selected, the speed test runs immediately. Refer to the current System Time (UTC+0) when setting the schedule. |
Hours | Specifies the system hour when the test starts. For example, hours 23 minutes 0 schedules the test to start at 11 PM system time. Enter a value between 0 to 23. |
Minutes | Specifies the system minute when the test starts. For example, hours 5 minutes 15 schedules the test to start at 5:15 AM system time. Enter a value between 0 to 59. |
Server IP Address | Specifies the IP address of the remote iPerf server that the Leaf Plus connects to. |
Bandwidth | Sets the transmission bandwidth. The recommended value depends on the expected link capacity. The default value is set to 0 for unlimited bandwidth. • 10 to 50 Mbps: For basic capacity links or initial testing • 100 to 300 Mbps: For typical WiFi 5 (802.11ac) environment • 500 Mbps to 1 Gbps: For high-performance WiFi 6 (802.11ax) environment |
Parallel Streams | Sets the number of parallel data streams. Enter a value between 1 to 32. Recommended value: 20. Higher values can improve throughput on high-bandwidth links, while lower values are sufficient for lower-bandwidth links. |
Duration | Specifies the test duration in seconds. Enter a value between 1 to 999. Recommended duration: 20 seconds. |
Port | Specifies the UDP or TCP port number. The default port is 5201. |
UDP | Sets the protocol to UDP to measure performance at a fixed transmission rate, allowing you to evaluate packet loss and jitter. |
TCP | Sets the protocol to TCP to measure throughput. TCP automatically adjusts its transmission rate based on network conditions. |
Reverse Mode | Select this to reverses the traffic direction. • disable: The Leaf Plus sends traffic to the iPerf server. • enable: iPerf server sends traffic to the Leaf Plus. |
Start Speed Test | Click this to start the speed test. If the Schedule is not selected, the test runs immediately. |
Reconnect to Root Plus | |
Reconnect | If the wireless link is unstable, click this to reconnect to the Root (Plus) within the network area. The Leaf Plus disconnects from the currently connected Root (Plus), scans for available Root (Plus), and automatically reconnects to one. |
Logout | Click this to log out and go back to the Select Mode screen. |
Leaf Plus LED
Locate the mounting handle on the upper rear of the Leaf Plus. The LED is located on the lower front of the Leaf Plus.
Leaf Plus LED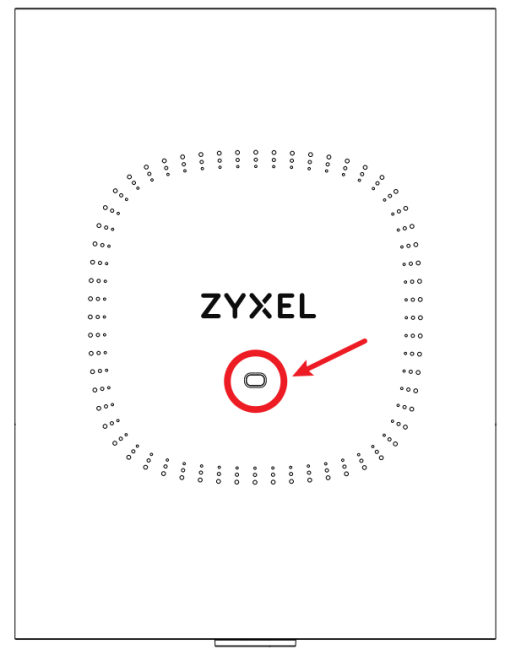
The following are the LED descriptions for your Leaf Plus. For a complete description and simulation of LED behavior, see the LED Simulator.
Color | status | description | |
|---|---|---|---|
 | Amber | Blinks between amber and green alternately (300 milliseconds interval). | The Leaf Plus is booting up. |
Green | |||
 | Green | Steady On | The signal power is good and the Leaf Plus is connected to and registered with NCC. |
 | Green | Slow Blinking (On for 1 second, Off for 1 second) | The signal power is acceptable and the Leaf Plus is connected to and registered with NCC. |
| Green | Fast Blinking (On for 300 milliseconds, Off for 300 milliseconds) | The signal power is weak and the Leaf Plus is connected to and registered with NCC. |
 | Amber | Steady On | The signal power is good and the Leaf Plus is not connected to NCC. |
 | Amber | Slow Blinking (On for 1 second, Off for 1 second) | The signal power is acceptable and the Leaf Plus is not connected to NCC. |
| Amber | Fast Blinking (On for 300 milliseconds, Off for 300 milliseconds) | The signal power is weak and the Leaf Plus is not connected to NCC. |
 | Bright Blue | Steady On | The Leaf Plus successfully completed the boot up process. |
 | Red | Steady On | The Leaf Plus failed to complete the boot up process. |
 | Red | Fast Blinking (On for 50 milliseconds, Off for 50 milliseconds) | The Leaf Plus is undergoing firmware upgrade. |
 | Red | Slow Blinking (On for 1 second, Off for 5 seconds) | The Leaf Plus is connected to but not registered with NCC. |
| Red | Cycle Blinking (Blink 3 times, Off for 3 seconds) | The Network Management Smart Mesh is disconnected or connecting. |
Resetting the Leaf Plus
If you cannot access the Leaf Plus by any method, try restarting it by turning the power off and then on again. If you still cannot access the Leaf Plus or you forget the administrator password(s), you can reset the Leaf Plus to its factory-default settings. Any configuration files or shell scripts that you saved on the Leaf Plus should still be available afterwards.
Use the following procedure to reset the Leaf Plus to its factory-default settings. This overwrites the settings in the startup-config.conf file with the settings in the system-default.conf file.
This procedure removes the current configuration.1 Make sure the Power LED is on and not blinking.
2 Press and hold the Reset button with a pin until the Power LED begins to blink. (This usually takes about ten seconds.)
3 Release the Reset button, and wait for the Leaf Plus to restart.
You should be able to access the Leaf Plus using the local GUI’s default settings.