Web Interface Tutorials
Web Interface Overview
This chapter shows you how to use the Zyxel Device’s various features.
• SIM Card Setup - Activate and unblock the SIM card.
• Device Settings - Rename your Zyxel Device, change the admin password, change the management IP address, and create another admin or user account.
• Wired Network Setup - Set up a wired network connection using DSL, GPON, or Ethernet.
• Wi-Fi Network Setup - Change the Wi-Fi name, password, and security mode; connect to the Wi-Fi network using the WPS; set up a guest Wi-Fi network with different Wi-Fi bands; and configure the channel and bandwidth for each Wi-Fi band.
• Cellular Network Setup - Set up a cellular network connection and cellular APN setting.
• USB Applications - Set up file sharing, play files through Windows Media Player with a USB device, and set up a print server.
• Network Security - Configure a firewall rule and scheduler rule, set up parental control rule, set up home security, and configure a MAC Filter rule.
• Secure Server Setup - Set up a DMZ server.
• IP Passthrough Mode Setup - How and when to use IP Passthrough mode.
• Device Maintenance - Upgrade the firmware, back up the firmware, restore the Zyxel Device configuration, and reset the Zyxel Device to factory defaults.
• Remote Access from WAN - Configure remote access to your Zyxel Device and configure the trust domain.
SIM Card Setup
This section shows you how to:
Unlock the SIM Card
This section shows you how to unlock the SIM card if the SIM card you insert into the Zyxel Device has PIN code protection.
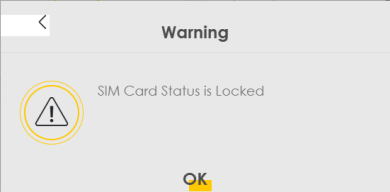
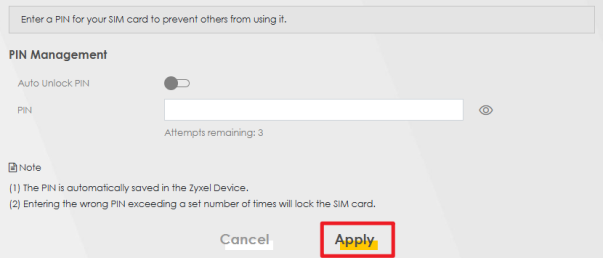
1 When you access the Web Configurator Home screen, a warning message will appear. Click OK. If you accidentally close the message, go to Network Setting > Broadband > Cellular SIM.
2 Enter the 4-digit PIN code (0000 for example) provided by your ISP in the PIN field.
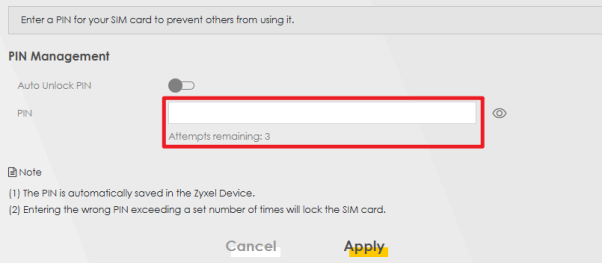
3 To avoid unlocking the SIM card after each restart, slide the Auto Unlock PIN switch to the right to have the Zyxel Device automatically unlock the SIM card. Otherwise, slide the switch to the left, you will need to manually enter the PIN every time you restart the Zyxel Device or reinsert the SIM card.
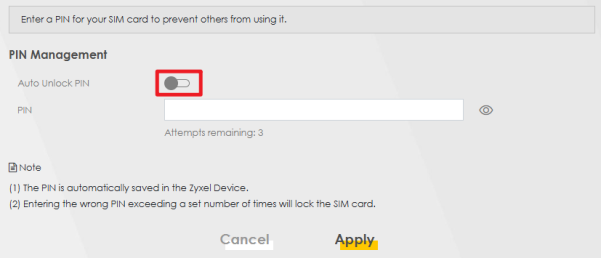
4 Click Apply.
Unblock the SIM Card
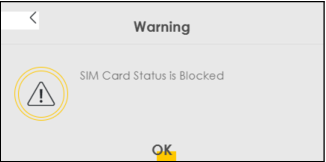
This SIM card will be blocked if you enter the PIN code incorrectly too many times. Follow the steps below to unblock the SIM card.
1 Contact your ISP for the Personal Unblocking Key (PUK) code.
2 When you access the Web Configurator Home screen, a warning message will appear. Click OK. If you accidentally close the message, go to Network Setting > Broadband > Cellular SIM.
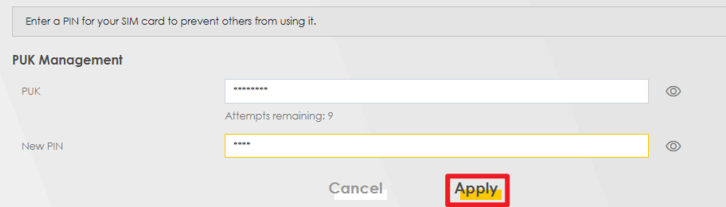
3 Enter the PUK code provided by your ISP in the PUK field.
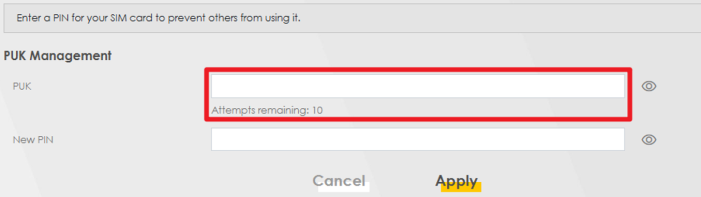
4 Set up a new PIN code by entering a 4-digit PIN code (0000 for example) in the New PIN field.
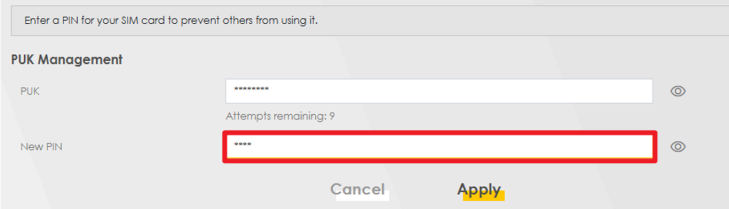
5 Click Apply.
Device Settings
This section shows you how to:
You can rename your device, and change the admin password.
Rename Your Zyxel Device
An FQDN (Fully Qualified Domain Name) is used to identify a specific host on the Internet, consisting of a host name and a domain name.
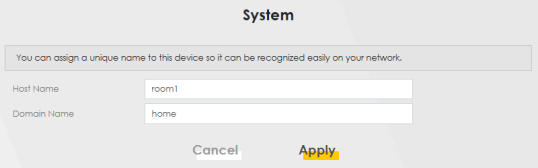
Proper naming of the host name and domain name makes the Zyxel Device and the network easier to identify, manage, and troubleshoot. The host name is the name of your Zyxel Device, while the domain name is the name of the entire network your Zyxel Device belongs to. If your Zyxel Device's host name is room1, and it belongs to the domain you name with home.com, then your Zyxel Device's FQDN would be room1.home.com.
To change the host name and the domain name, please follow the steps below:
1 Go to the Maintenance > System screen. Enter a new host name in the Host Name field and a domain name in the Domain Name field (special characters and spaces are not allowed). Click Apply.
2 Go to the Connection Status > System Info. You can see the new host name has been applied successfully.
Change the Admin Password
Change the Web Configurator login password regularly to secure access to your Zyxel Device. To change the admin password, follow the steps below:
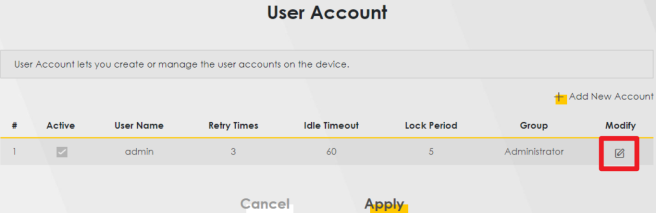
1 Go to the Maintenance > User Account screen. Click the Edit icon.
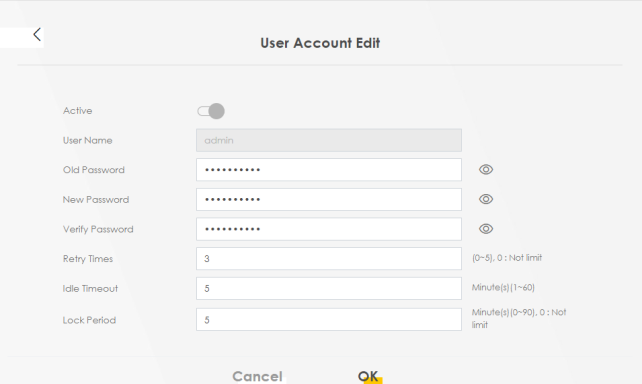
2 The User Account Edit screen appears. Enter your old and new passwords in the corresponding field. Click OK.
Change the Management IP Address
Duplicated IP addresses in the network environment may cause failure to connect to the Zyxel Device. To change the management IP address of your Zyxel Device, please follow the steps below:
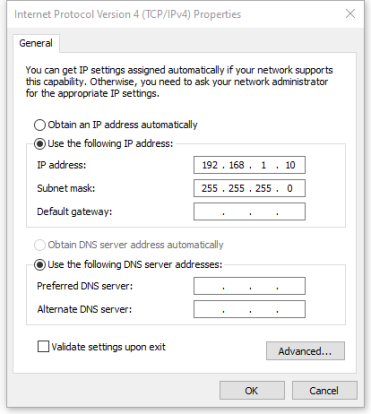
1 Change your computer’s IP address to the same subnet as the Zyxel Device. For example, if the default static IP address of the Zyxel Device is 192.168.1.1, set your computer IP address between 192.168.1.2 and 192.168.1.254.
2 Log into the Zyxel Device using the default IP address “192.168.1.1”. Go to Network Setting > Home Networking. Enter your preferred IPv4 address in the IP Address field. For example, “192.168.1.15”. Click Apply and the Zyxel Device will disconnect from your computer due to the IP address change.

3 Enter the new IP address “192.168.1.15” in the address bar to check if you can access the Zyxel Device’s Web Configurator.
4 After logging in, click the menu icon ( ) and go to Connection Status. In the LAN section, the IP Address should now be “192.168.1.15”.
) and go to Connection Status. In the LAN section, the IP Address should now be “192.168.1.15”.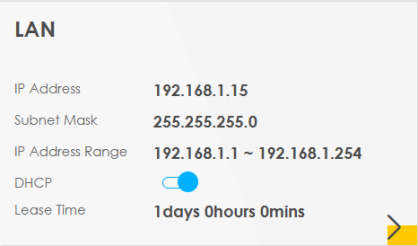
Create Another Admin or User Account
To let multiple users access the Web Configurator, you can create more than one Administrator or User account. A total of eight users can log in to the Zyxel Device at the same time.
The total number of accounts you can create for each group type:
Administrator Account | 4 |
User Account | 4 |
The steps below shows how to create Administrator and User accounts:
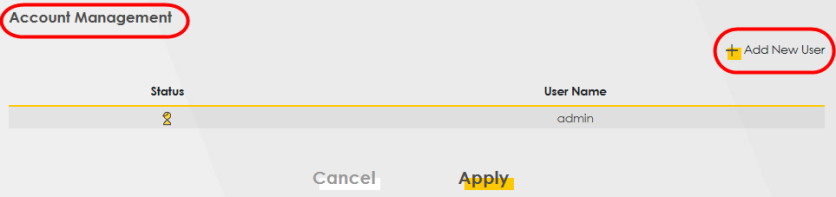
1 Log into the Web Configurator. Go to Maintenance > User Account. Click the  icon on the right to Add New Account.
icon on the right to Add New Account.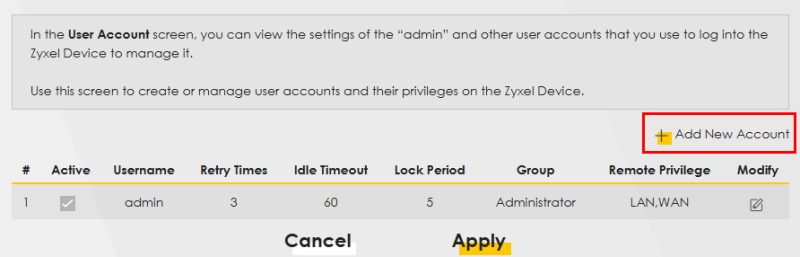
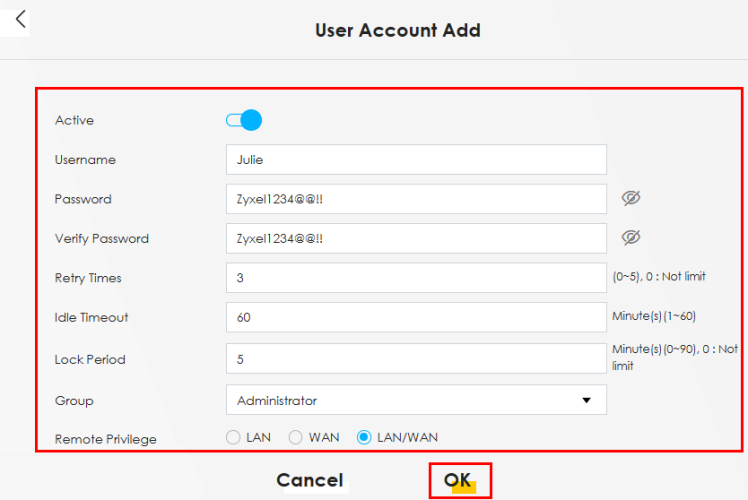
2 The User Account Add screen appears. Enter the information for the new account. In the Group drop-down list, select Administrator for the account. Click OK.
Administrator and User accounts have different privileges. For more details, please refer to User Account.
The example below uses the following parameters for the new Administrator account.
Username | Julie |
Password | Zyxel1234@@!! |
Retry Times | 3 Times |
Idle Timeout | 60 Minutes |
Lock Period | 5 Minutes |
Remote Privilege | LAN/WAN |
3 In the Maintenance > User Account screen, an Administrator account named Julie has been created. To add a User account, click the  icon on the right to Add New Account.
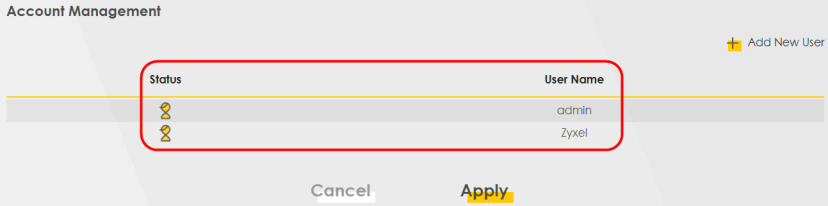
icon on the right to Add New Account.The grayed-out box  indicates the logged-in account. The highlighted box
  indicates that the status of the other account can be modified. In the below example, the logged-in admin account can block Julie’s account by deselecting Julie’s Active checkbox.
indicates the logged-in account. The highlighted box indicates that the status of the other account can be modified. In the below example, the logged-in admin account can block Julie’s account by deselecting Julie’s Active checkbox.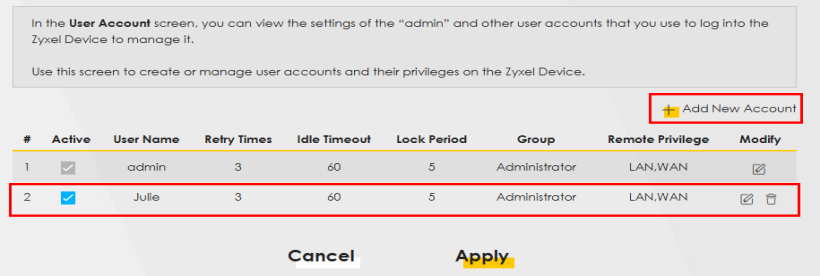
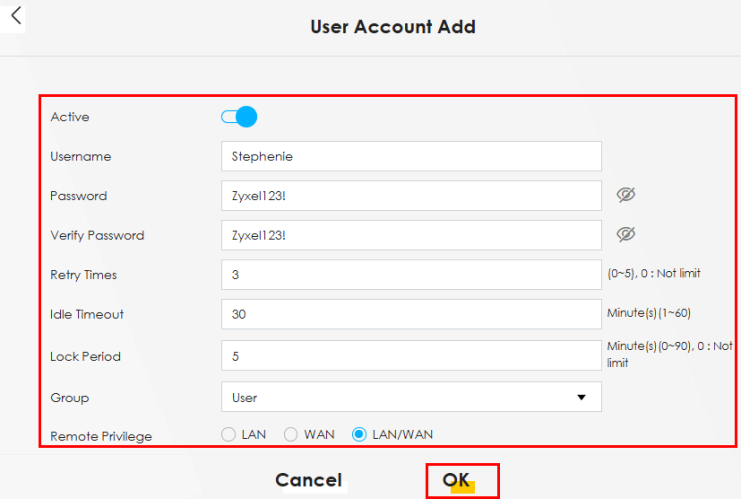
4 The User Account Add screen appears. Enter the information for the new account. In the Group drop-down list, select User for the account. Click OK.
The example below uses the following parameters for the new User account.
Username | Stephenie |
Password | Zyxel123! |
Retry Times | 3 Times |
Idle Timeout | 30 Minutes |
Lock Period | 5 Minutes |
Remote Privilege | LAN/WAN |
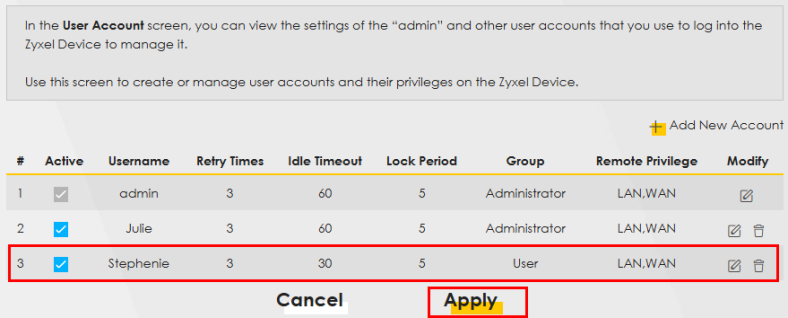
5 In the Maintenance > User Account screen, a User account named Stephenie has been created. Click Apply to save the newly created accounts.
In the below example, the logged-in admin account can block Julie’s account by deselecting Julie and Stephenie’s Active checkbox  .
.
.
Wired Network Setup
This section shows you how to:
Set the Zyxel Device to Routing mode or Bridge mode on this connection as follows:
• Use Routing mode if you want the Zyxel Device to use routing mode functions such as NAT, Firewall, or DHCP Server. You will need to reconfigure your network if you have an existing router.
• Use Bridge mode to pass the ISP-assigned IP address(es) to your devices connected to the LAN port. All traffic from the Internet passes through the Zyxel Device directly to devices connected to the LAN port. Use this mode if you already have a router with complete routing functions in your network.
Set Up an Ethernet Connection
If you connect to the Internet through an Ethernet connection, you need to connect a broadband modem or router with Internet access to the WAN Ethernet port on the Zyxel Device. You need to configure the Internet settings from the broadband modem or router on the Zyxel Device. First, make sure you have Internet access through the broadband modem or router by connecting directly to it.
This example shows you how to configure an Ethernet WAN connection.
1 Make sure you have the Ethernet WAN port connect to a modem or router.
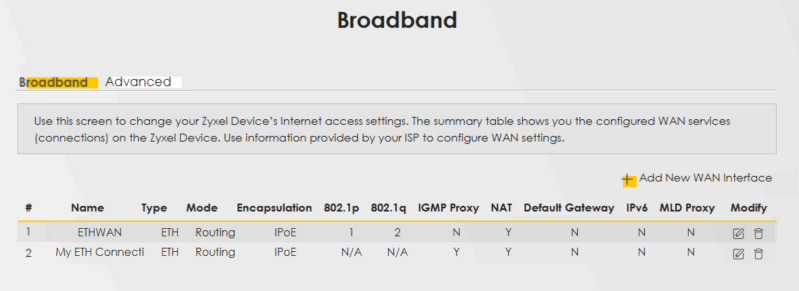
2 Go to Network Setting > Broadband and then the following screen appears. Click Add New WAN Interface to add a WAN connection.

3 To set the Zyxel Device to Routing mode, see Routing Mode.
To set the Zyxel Device to Bridge mode, see Bridge Mode.
To set the Zyxel Device to Bridge mode, see Bridge Mode.
Routing Mode
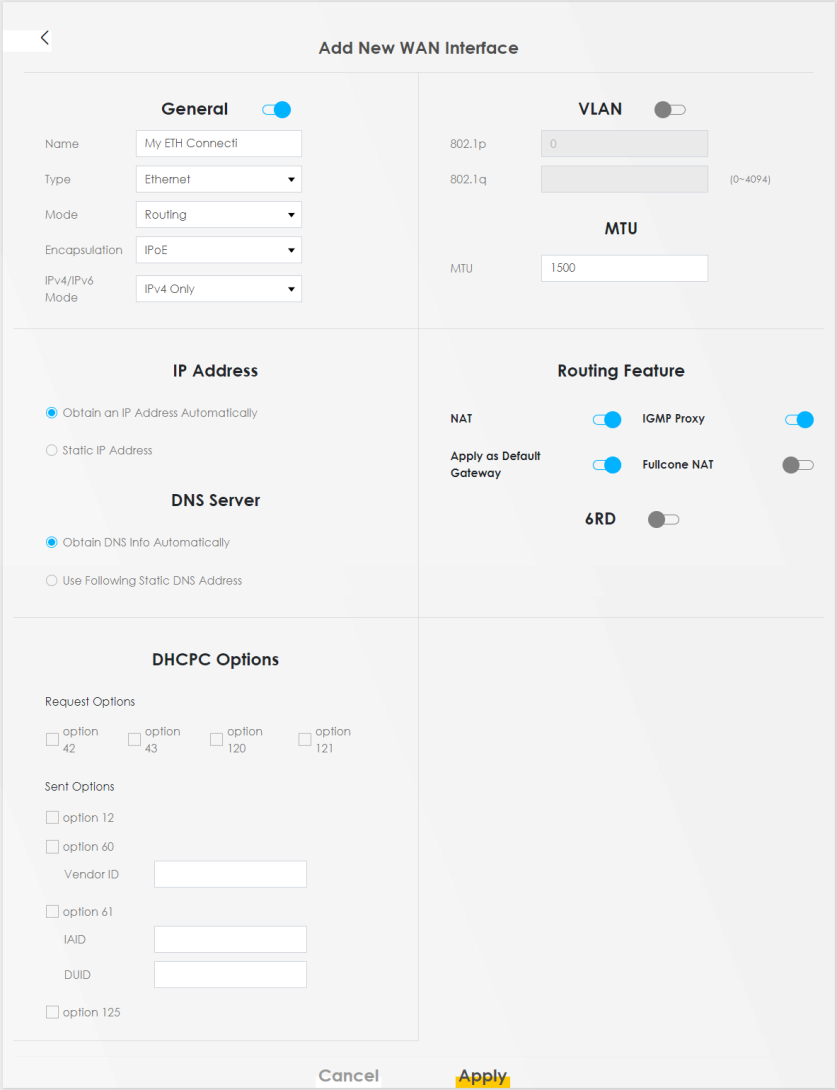
1 In this routing mode example, configure the following information for the Ethernet WAN connection.
General | |
Name | My ETH Connection |
Type | Ethernet |
Connection Mode | Routing |
Encapsulation (Internet Type) | IPoE |
IPv6/IPv4 Mode | IPv4 Only |
2 Enter the General settings provided by your Internet service provider.
• Enter a Name to identify your WAN connection.
• Set the Type to Ethernet.
• Set your Ethernet connection Mode to Routing.
• Choose the Encapsulation specified by your Internet service provider. For this example, select IPoE as the WAN encapsulation type.
• Set the IPv4/IPv6 Mode to IPv4 Only.
3 Under Routing Feature, enable NAT and Apply as Default Gateway.
4 For the rest of the fields, use the default settings.
5 Click Apply to save your settings.
6 Go to the Network Setting > Broadband screen to view the established Ethernet connection. The new connection is displayed on the Broadband screen.
Bridge Mode
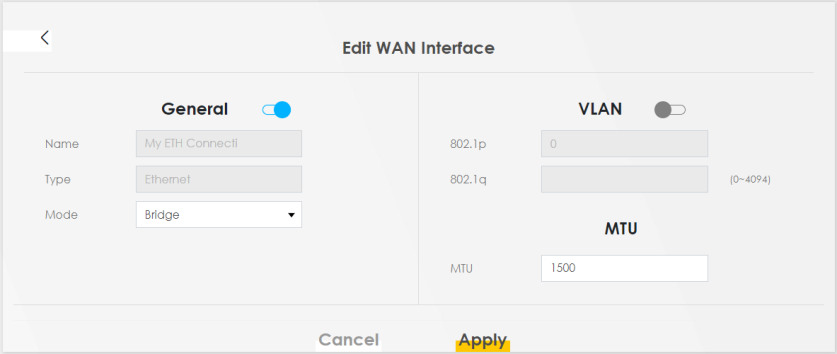
1 In this bridge mode example, configure the following information for the Ethernet WAN connection.
General | |
Name | My ETH Connection |
Type | Ethernet |
Connection Mode | Bridge |
2 Enter the General settings provided by your Internet service provider.
• Enter a Name to identify your WAN connection.
• Set the Type to Ethernet.
• Set your Ethernet connection Mode to Bridge.
3 For the rest of the fields, use the default settings.
4 Click Apply to save your settings.
Wi-Fi Network Setup
This section shows you how to:
In this example, you want to set up a Wi-Fi network so that you can use your notebook to access the Internet. In this Wi-Fi network, the Zyxel Device is an access point (AP), and the notebook is a Wi-Fi client. The Wi-Fi client can access the Internet through the AP.
For NR Outdoor devices, the Wi-Fi network if only for configuring the Zyxel Device. Remember to turn it off after all configurations are done.
See the label on the Zyxel Device for the Wi-Fi network settings and then connect manually to the Zyxel Device. Alternatively, you can connect to the Zyxel Device Wi-Fi network using WPS. See Connect to the Zyxel Device’s Wi-Fi Network Using WPS.
Wi-Fi Network Setup
Zyxel Device Configuration through Wi-Fi Connection
Change the Zyxel Device Wireless Network Name (SSID)
You set up the Zyxel Device at home but have trouble finding its Wi-Fi network among many nearby networks. To make it easier to identify, you can change the default Wireless Network Name.
To modify the Wireless Network Name, follow the steps below:
1 Log into the Web Configurator.
2 Go to Network Setting > Wireless > General.
3 In Wireless Network Setup, select the Band you want to change the Wireless Network Name in the drop down list.
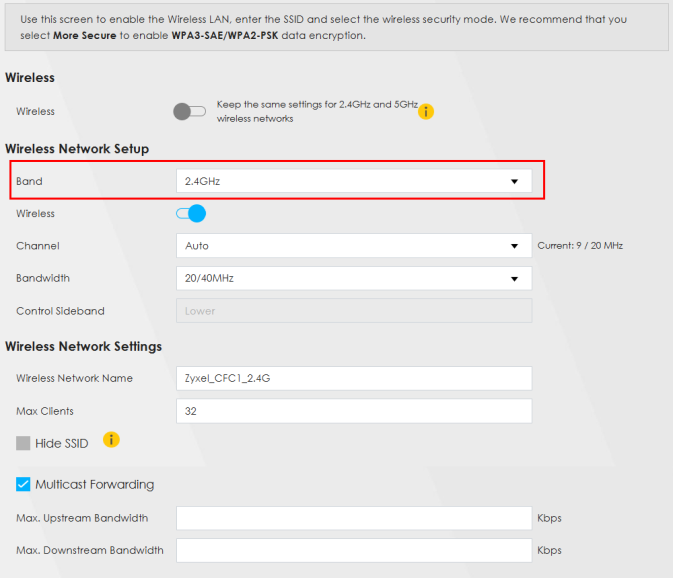
4 In Wireless Network Settings, enter the new Wi-Fi network name in the Wireless Network Name field. You can use up to 32 printable characters, including spaces. In the example below, the 2.4GHz Wi-Fi network is renamed to “Julie’s Wi-Fi_2.4G”.
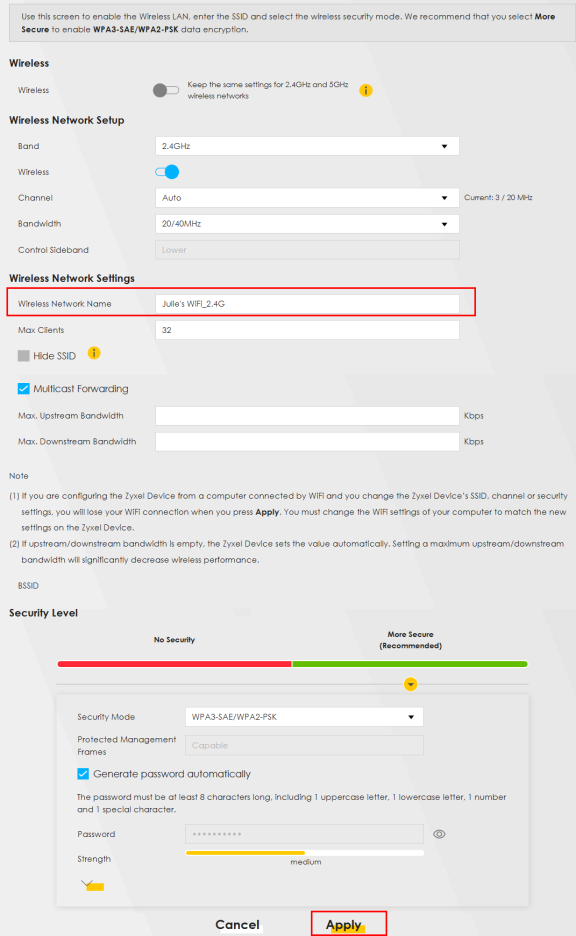
5 When finished, scroll down and click Apply.
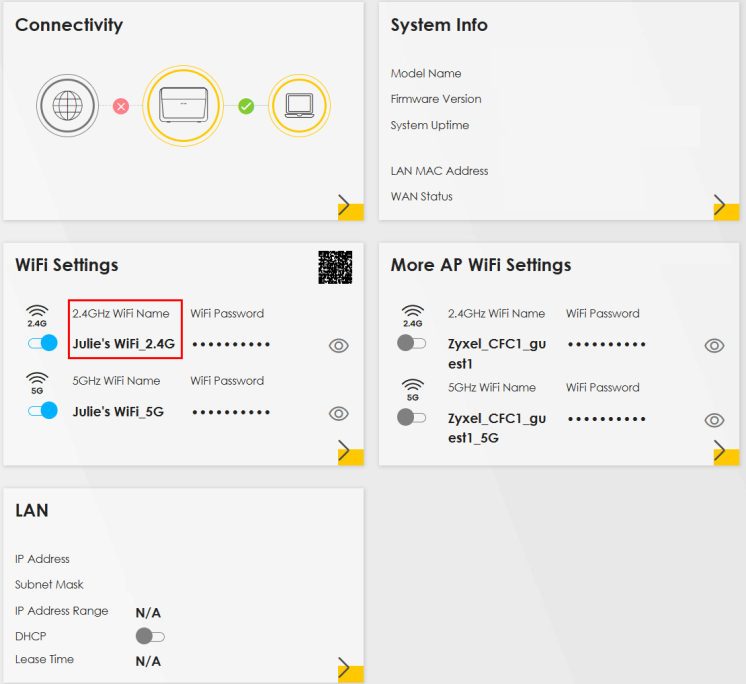
6 Click the menu icon ( ) in the upper right corner, and then click Connection Status.
) in the upper right corner, and then click Connection Status.
7 In the Wi-Fi Settings section, your new 2.4GHz Wi-Fi Name is now set to “Julie’s Wi-Fi_2.4G”.
Change the Zyxel Device Wi-Fi Password
You set up the Zyxel Device at home but have trouble remembering the complicated default Wi-Fi Password on the device label. To make it easier to remember, you can change the default Wi-Fi Password. Changing the Zyxel Device Wi-Fi Password regularly can also enhance your Wi-Fi network’s security and privacy.
To change the Zyxel Device Wi-Fi Password, follow the steps below:
1 Log into the Web Configurator.
2 Go to Network Setting > Wireless > General.
3 In Security Level, select More Secure for better protection of your Wi-Fi network.
4 Choose a Security Mode from the drop-down list:
• If your Wi-Fi client supports WPA3-SAE, select this mode.
• If you are not sure whether your Wi-Fi client supports WPA3-SAE, select WPA3-SAE/WPA2-PSK or WPA2-PSK.
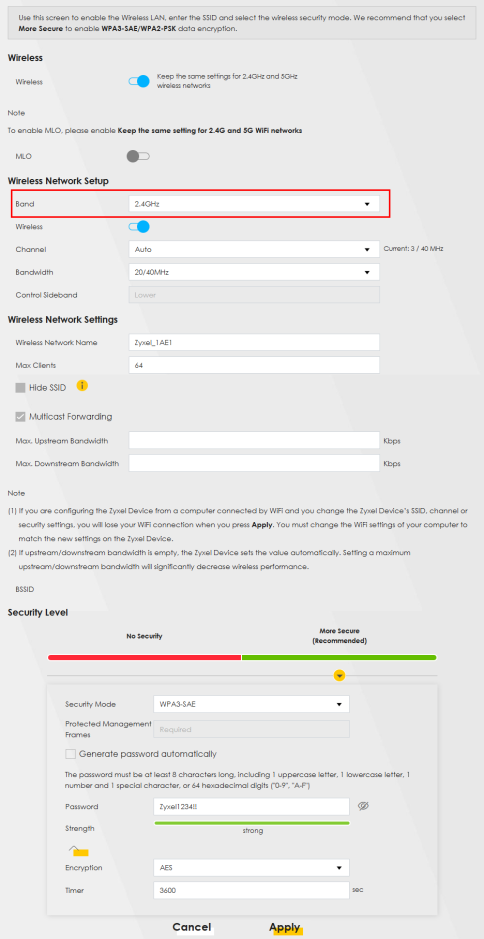
The example below uses WPA3-SAE/WPA2-PSK as the Security Mode.
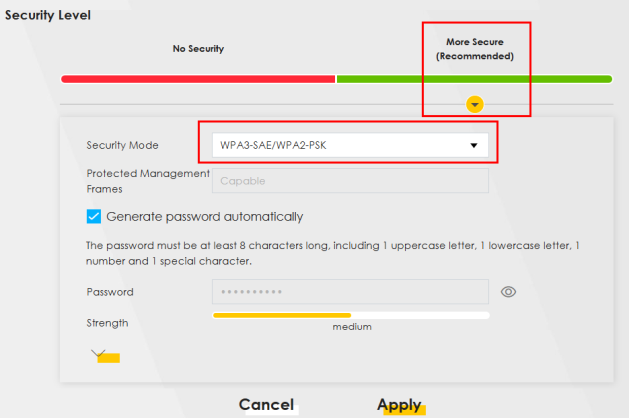
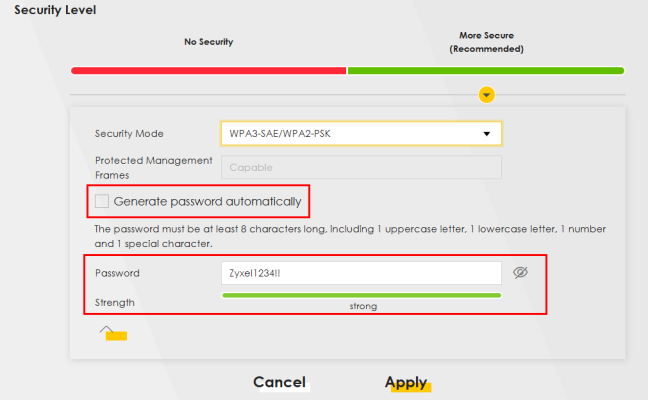
5 After selecting the Security Mode, you have two methods to create a new Password.
• Select the Generate password automatically checkbox to have the Zyxel Device create a Password for you.
• Enter your own Wi-Fi Password. The Password must be 8 characters long and include at least 1 uppercase letter, 1 lowercase letter, 1 number, 1 special character, or 64 hexadecimal digits (“0-9”, “A-F”).
The Strength bar shows the current Password strength: weak, medium, or strong.
In the example below, the 2.4GHz Wi-Fi network’s Password has been changed to “Zyxel1234!!”.
6 Click this  to view the Encryption type and set the Timer for data transmission on the Zyxel Device:
to view the Encryption type and set the Timer for data transmission on the Zyxel Device:• Encryption: The Zyxel Device Wi-Fi network uses AES with a 128-bit key for data encryption.
• Timer: This defines how often the RADIUS server sends a new group key out to all clients.
The example below uses AES as Encryption type and sets the Timer to 3600 seconds. For more details about the Encryption settings for your Zyxel Device network, please refer to More Secure (Recommended).
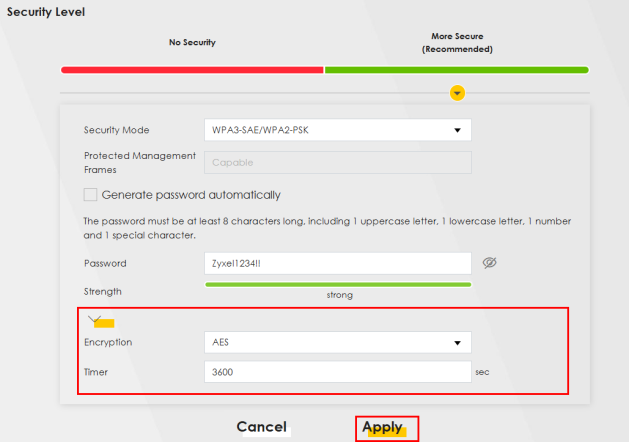
7 When finished, click Apply to save the settings.
8 Click the menu icon ( ) in the upper right corner, and then click Connection Status.
) in the upper right corner, and then click Connection Status.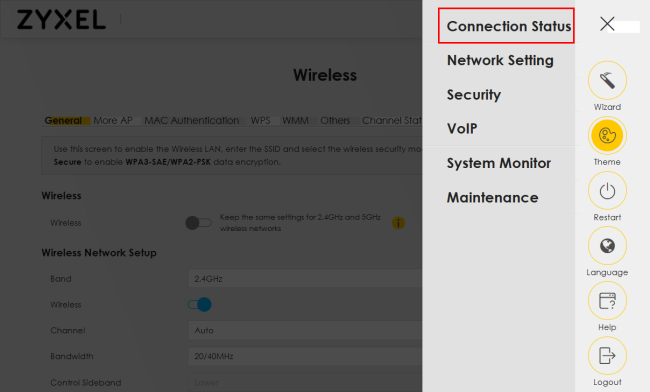
9 In the Wi-Fi Settings section, your new 2.4GHz Wi-Fi Password is now set to “Zyxel1234!!”.

Change Security Settings on a Wi-Fi Network
This example changes the default security settings of a Wi-Fi network to the following:
SSID | Example |
Security Mode | WPA3-SAE/WPA2-PSK |
Pre-Shared Key | Admin1234!! |
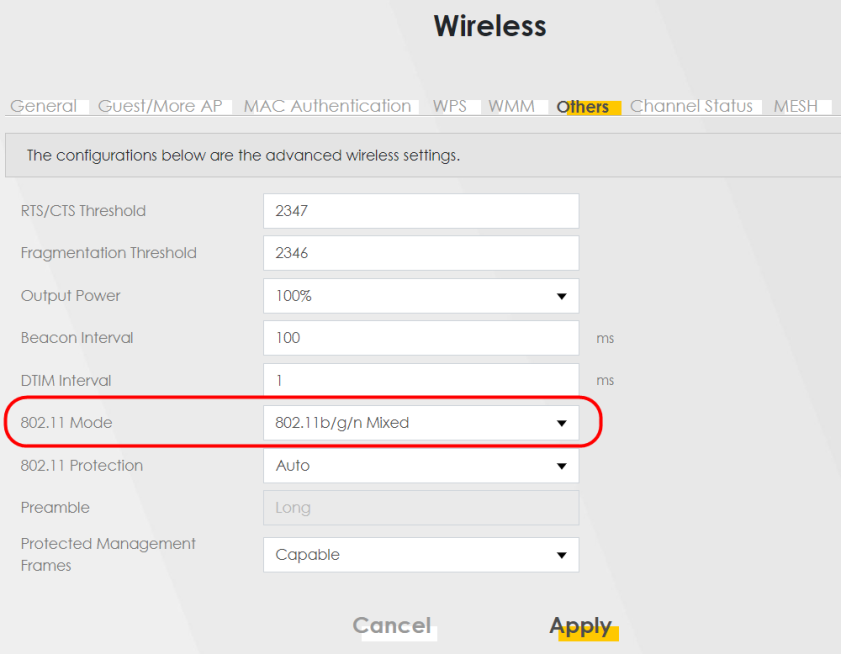
802.11 Mode | 802.11b/g/n Mixed |
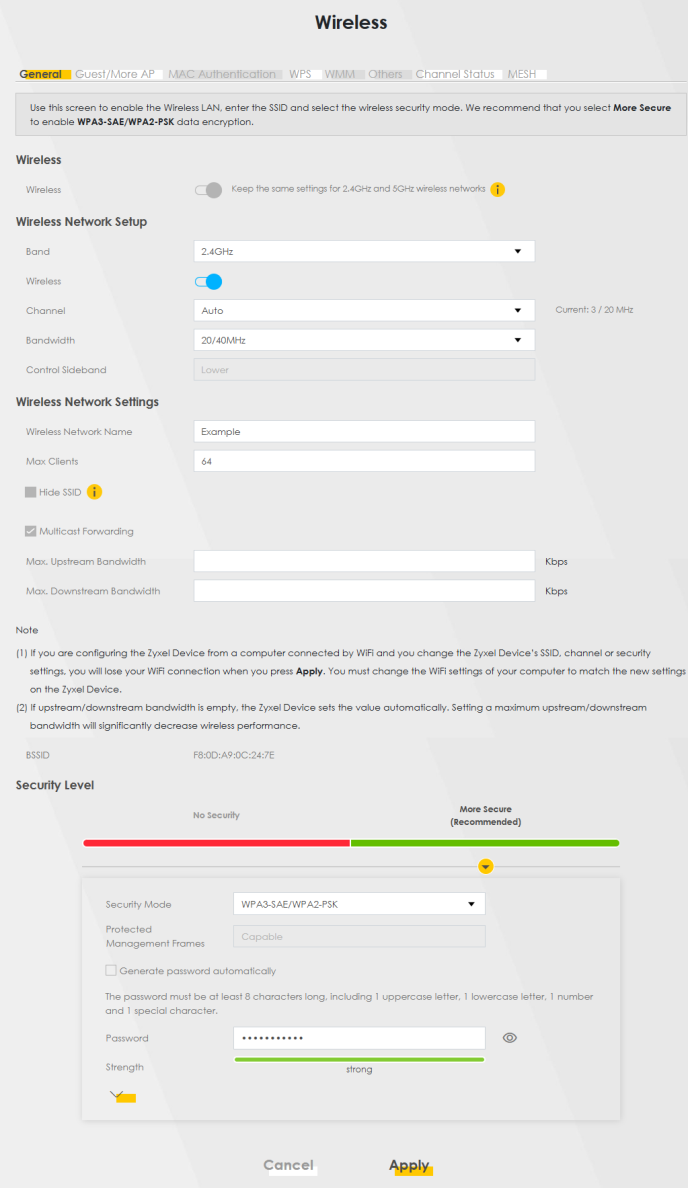
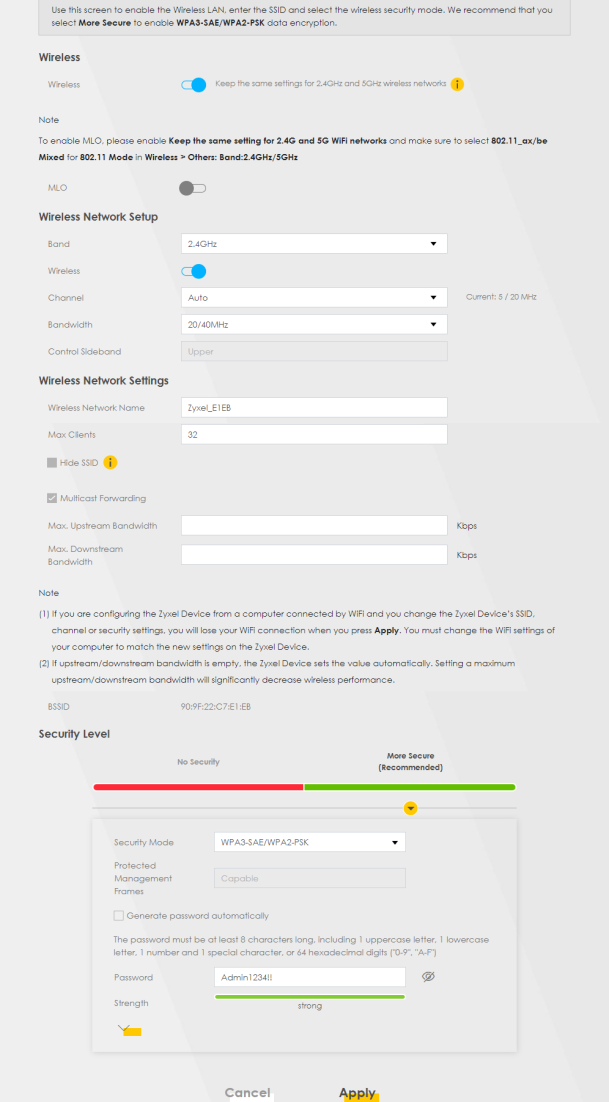
1 Go to the Network Setting > Wireless > General screen. Select More Secure as the security level and WPA3-SAE/WPA2-PSK as the security mode. Configure the screen using the provided parameters. Click Apply.
2 Go to the Wireless > Others screen. Set 802.11 Mode to 802.11b/g/n Mixed, and then click Apply.
You can now use the WPS feature to establish a Wi-Fi connection between your notebook and the Zyxel Device. Now use the new security settings to connect to the Internet through the Zyxel Device using Wi-Fi.
Enhance Security Settings on a Zyxel Device Wi-Fi Network
To enhance the security of your Zyxel Device Wi-Fi network, you need to select the strongest Security Mode. To do this, follow the below steps:
1 Go to the Network Setting > Wireless > General screen. In Wireless Network Setup, select the Band you want to change the Security Mode.
Connect to the Zyxel Device’s Wi-Fi Network Using WPS
This section shows you how to connect a Windows 10 notebook to the Zyxel Device’s Wi-Fi network using WPS. WPS (Wi-Fi Protected Setup) is a security standard that allows devices to connect to a router securely without having to enter a password. There are two methods:
• Push Button Configuration (PBC) – Connect to the Wi-Fi network by pressing a button. This is the simplest method.
• PIN Configuration – Connect to the Wi-Fi network by entering a PIN (Personal Identification Number) from a Wi-Fi-enabled device in the Zyxel Device’s Web Configurator. This is the more secure method, because one device can authenticate the other.
WPS Push Button Configuration (PBC)
1 Make sure the Zyxel Device is turned on, and your notebook is within range of the Zyxel Device’s Wi-Fi signal.
2 Log into the Web Configurator to enable the notebook to connect to the Zyxel Device’s Wi-Fi network by pressing the WPS button on the Zyxel Device. Go to Network Setting > Wireless > WPS. Select the band you want to use to connect to the Wi-Fi network. Click the Method 1 PBC switch  to the right. Click Apply.
to the right. Click Apply.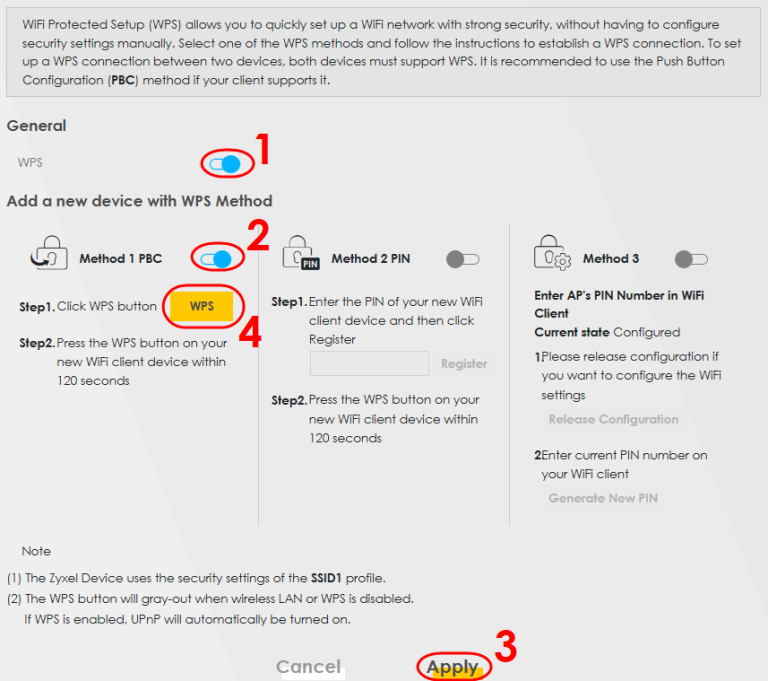
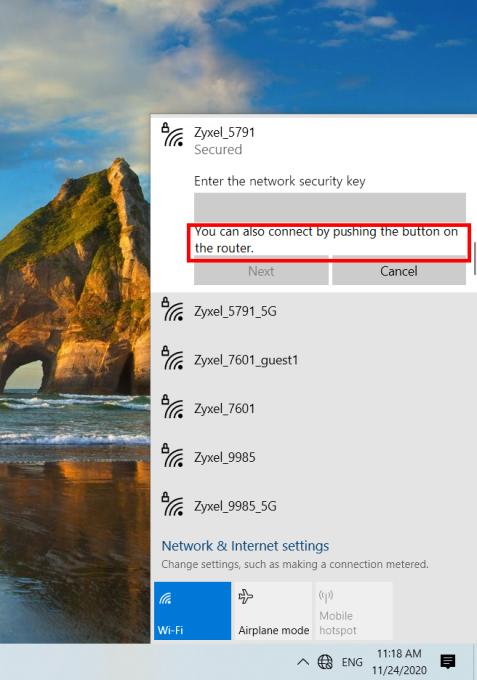
3 In Windows 10, click the Network icon in the system tray to open the list of available Wi-Fi networks.

4 The pop-up list displays the Wi-Fi networks near you. In the screen below, locate the Zyxel Device’s Wi-Fi network, Zyxel_5791 in this example. Zyxel_5791 is the default SSID shown on the Zyxel Device label. Select the Connect automatically checkbox, and then click Connect.
checkbox, and then click Connect.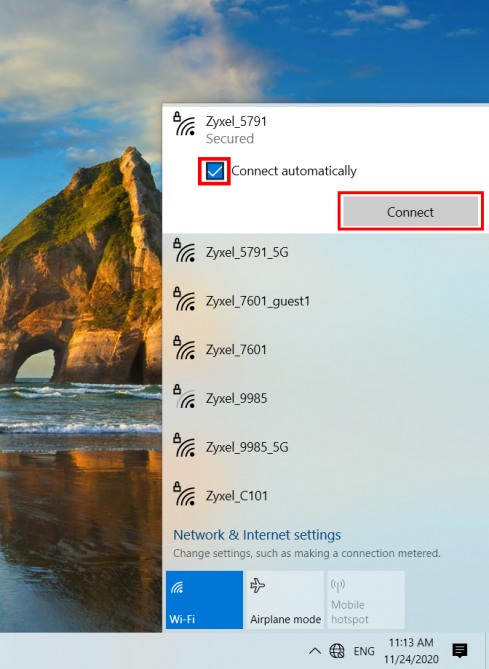
5 You do not need to enter the network security key for the Zyxel Device’s Wi-Fi network because you are using the WPS button to connect to the Zyxel Device’s Wi-Fi network.
6 Push and hold the WPS button located on the Zyxel Device for two minutes or until the Wi-Fi or WPS LED starts blinking slowly. This allows the Zyxel Device to send the Wi-Fi network settings to Windows 10 using WPS. To see the location of the WPS button on the Zyxel Device, please refer to WiFi/WPS Button.
7 Windows 10 will display Getting settings from the router.
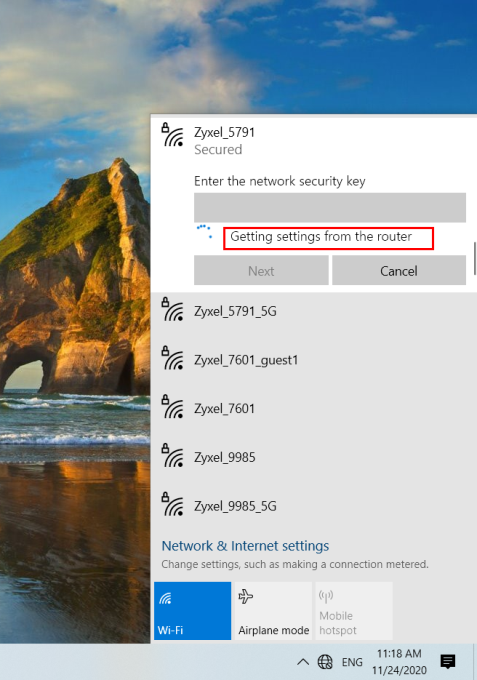
Your Windows 10 notebook can now connect securely to the Zyxel Device Wi-Fi network.
WPS PIN Configuration
The WPS PIN (Personal Identification Number) method is a more secure version of WPS, used by Wi-Fienabled devices such as printers. To use this connection method, you need to log into the Zyxel Device’s Web Configurator.
1 Enable Wi-Fi on the device you want to connect to the Wi-Fi network. Then, note down the WPS PIN in the device’s Wi-Fi settings.
2 Log into Zyxel Device’s Web Configurator, and then go to the Network Setting > Wireless > WPS screen. Enable WPS, and then click Apply.
3 Enable Method 2 PIN, and then click Apply. Enter the PIN of the Wi-Fi device, and then click Register.
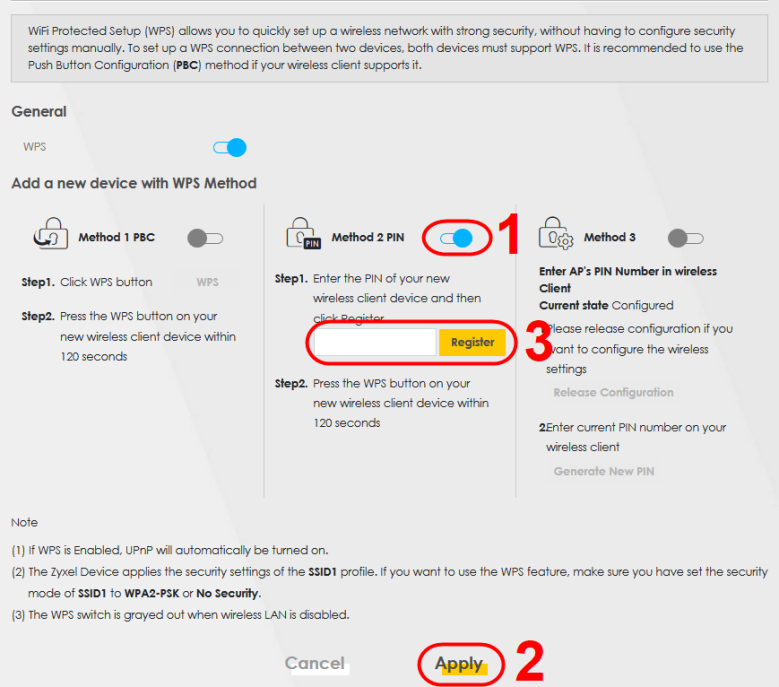
4 Within 2 minutes, enable WPS on the Wi-Fi device.
Set Up a Guest Network
The Zyxel Device authenticates the Wi-Fi device using the PIN, and then sends the Wi-Fi network settings to the device using WPS. This process may take up to 2 minutes. The Wi-Fi device is then able to connect to the Wi-Fi network securely. A company wants to create two Wi-Fi networks for different groups of users as shown in the following figure. Each Wi-Fi network has its own SSID and security mode. Both networks are accessible on both 2.4 GHz and 5 GHz Wi-Fi bands.
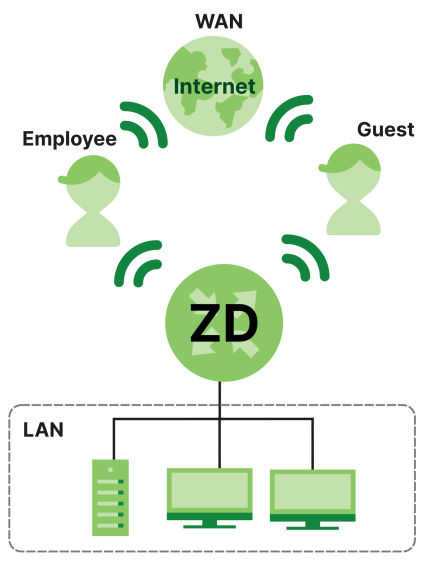
• Employees using the General Wi-Fi network group will have access to the local network and the Internet.
• Visitors using the Guest Wi-Fi network group with a different SSID and password will have access to the Internet only.
Use the following parameters to set up the Wi-Fi network groups.
General | Guest | |
|---|---|---|
2.4/5G SSID | Example | Guest |
Security Level | More Secure | More Secure |
Security Mode | WPA2-PSK | WPA2-PSK |
Pre-Shared Key | ForCompanyOnly123! | Guest123456! |
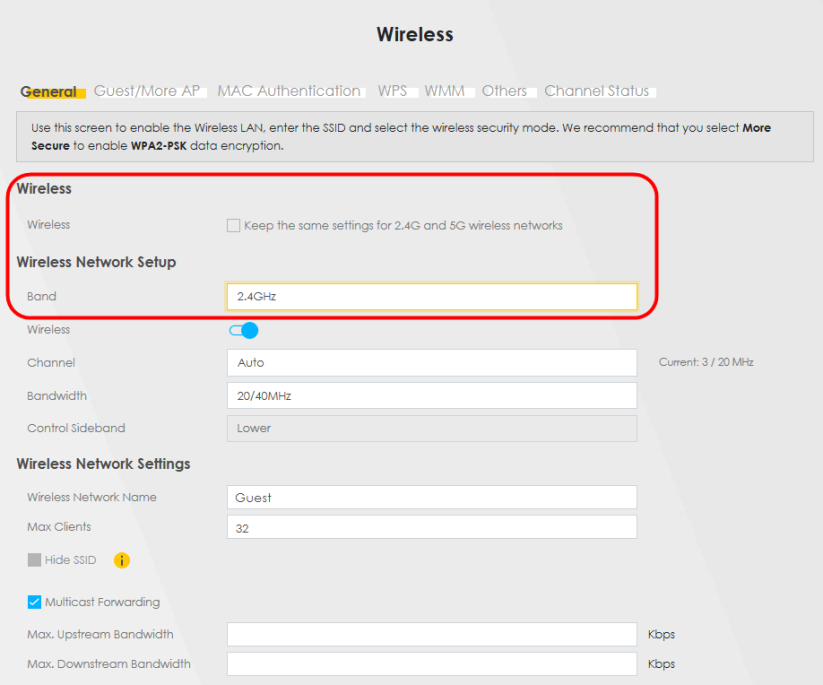
1 Go to the Network Setting > Wireless > General screen. Use this screen to set up the company’s general Wi-Fi network group. Configure the screen using the provided parameters and click Apply. Note that if you have employees using 2.4 GHz and 5 GHz devices, enable Keep the same settings for 2.4GHz and 5GHz wireless networks to use the same SSID and password. Clear it if you want to configure different SSIDs and passwords for 2.4 GHz and 5 GHz bands.
Network Setting > Wireless > General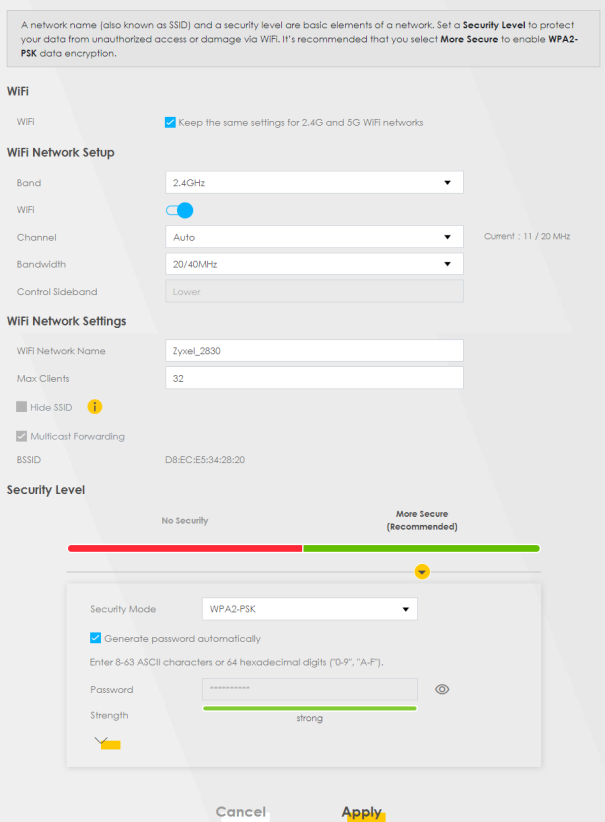
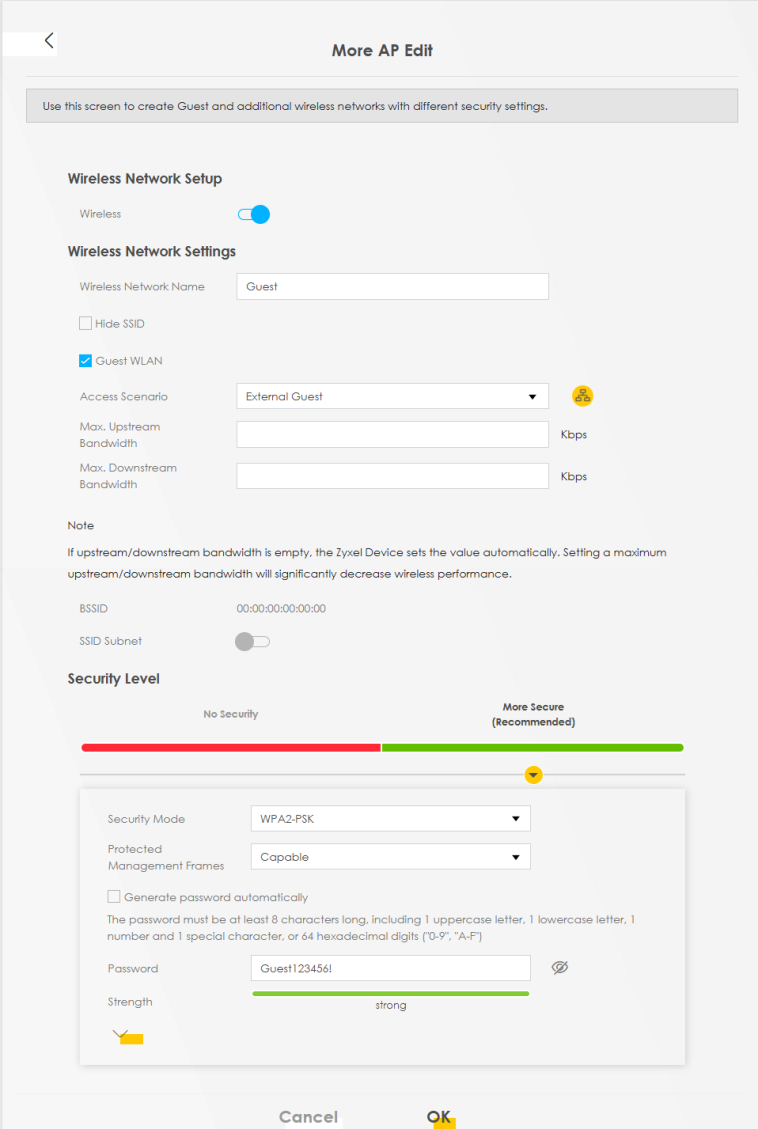
2 Go to the Network Setting > Wireless > Guest/More AP screen. Click the Modify icon to configure the second Wi-Fi network group. A Home Guest can access the Internet and other Home Guest Wi-Fi clients on the same Wi-Fi network. They cannot communicate with wired devices connected to the Zyxel Device’s LAN. An External Guest can just access the Internet through the Zyxel Device.

3 On the Guest/More AP screen, click the Modify icon to configure the other Guest Wi-Fi network group. Configure the screen using the provided parameters and click OK.

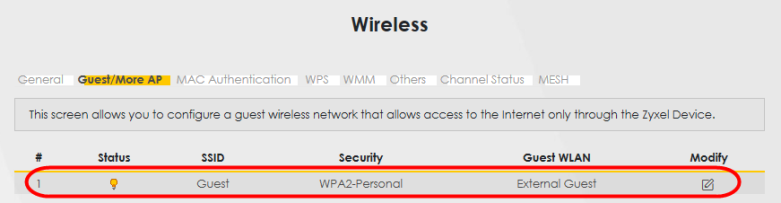
4 Check the status of Guest in the Guest/More AP screen. A yellow bulb under Status means the SSID is active and ready for Wi-Fi access.

Set Up Two Guest Wi-Fi Networks on Different Wi-Fi Bands
In this example, a company wants to create two Guest Wi-Fi networks: one for the Guest group and the other for the VIP group as shown in the following figure. Each network will have its SSID and security mode to access the internet.
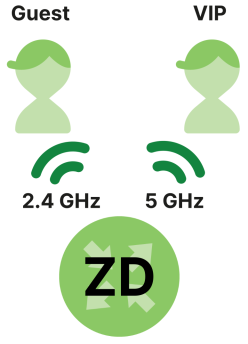
• The Guest group will use the 2.4 GHz band.
• The VIP group will use the 5 GHz band.
The Company will use the following parameters to set up the Wi-Fi network groups.
Band | 2.4 GHz | 5 GHz |
|---|---|---|
SSID | Guest | VIP |
Security Mode | WPA2-PSK | WPA2-PSK |
Pre-Shared Key | Guest123456! | Zyxel1234@@! |
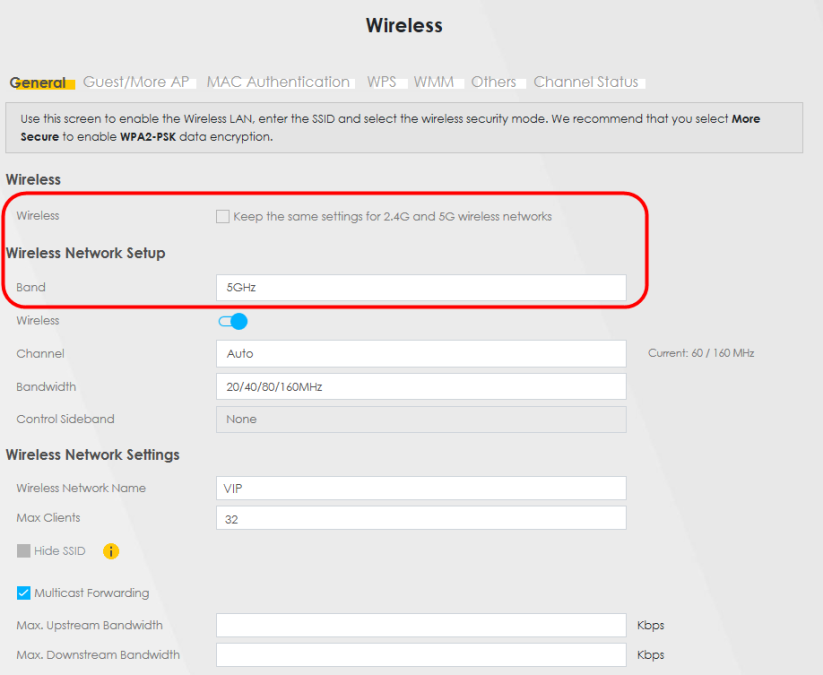
1 Go to the Wireless > General screen and set Band to 2.4GHz to configure 2.4 GHz Guest Wi-Fi settings for Guest. Click Apply.
2 Go to the Wireless > Guest/More AP screen and click the Modify icon. The following screen appears. Configure the Security Mode and Password using the provided parameters and click OK.
The 2.4 GHz Guest Wi-Fi network is now configured.
3 Go to the Wireless > General screen and set Band to 5GHz to configure the 5G Guest Wi-Fi settings for VIP. Click OK.
4 Go to the Wireless > Guest/More AP screen and click the Modify icon. The following screen appears. Configure the Security Mode and Password using the provided parameters and click OK.

The 5G VIP Wi-Fi network is now configured.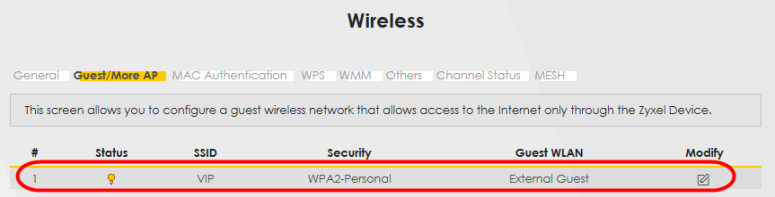
Configure the Channel and Bandwidth for Each Wi-Fi Band
For optimal Wi-Fi network performance, you can change the bandwidth and channel for a specific band to improve the throughput and minimize the interference. You can refer to Recommended Application for Each Band for the recommended setup.
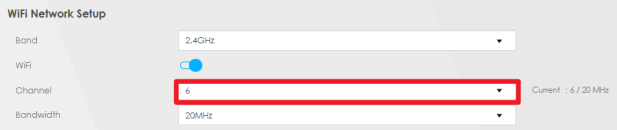
In this tutorial, you want to configure the channel to 6 and bandwidth to 20 MHz for 2.4 GHz band.
1 Go to Network Setting > Wireless > General.
2 In Band, select 2.4GHz from the drop-down list.

3 In Bandwidth, select 20MHz from the drop-down list.
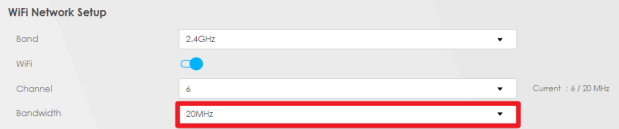
4 In Channel, select 6 from the drop-down list.
The table below shows the recommended application for each band, along with the suggested channel and bandwidth.
Band | Bandwidth | channel | Application |
|---|---|---|---|
2.4 GHz | 20 MHz | 1, 6, 11 | Web browsing, email, IoT (Internet of Things) |
5 GHz | 40 MHz | 36, 40, 44, 48 | HD streaming, online meetings |
5 GHz | 80 MHz | 36, 40, 44, 48 or 52-128 | 4K or 8K streaming, multiplayer gaming |
Cellular Network Setup
This section shows you how to:
Set Up a Cellular Network Connection
This section gives you an example on how to connect to the Internet using over a cellular connection.
1 Insert a SIM Card into your Zyxel Device SIM slot. Make sure this SIM card has an active data plan with your Internet Service Provider (ISP).
2 Connect your Zyxel Device to your computer, and log into the Web Configurator.
3 If your SIM has a PIN Code, enter this code in the Network Setting > Broadband > Cellular SIM screen.
Use the Home screen to check the Internet Status (IPv4) or Internet Status (IPv6). If it shows Connected this means your Internet connection is up.
Set Up a Cellular APN Setting
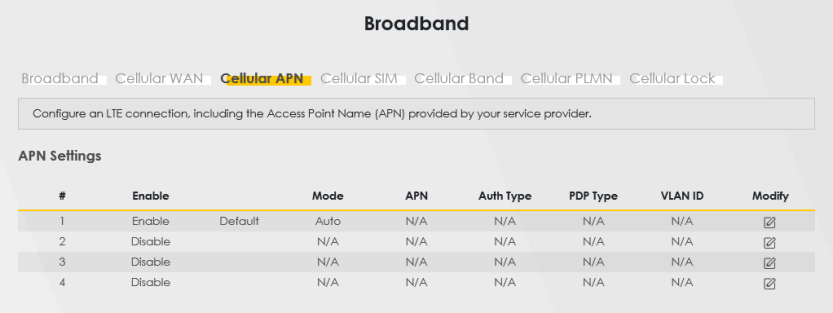
You can define an APN (Access Point Name) which is a connection profile with the parameters you need to connect to a cellular network.
Click Network Setting > Broadband > Cellular APN to display the following screen.
Click the Edit icon ( ) in the Cellular APN screen, the following screen appears.
) in the Cellular APN screen, the following screen appears.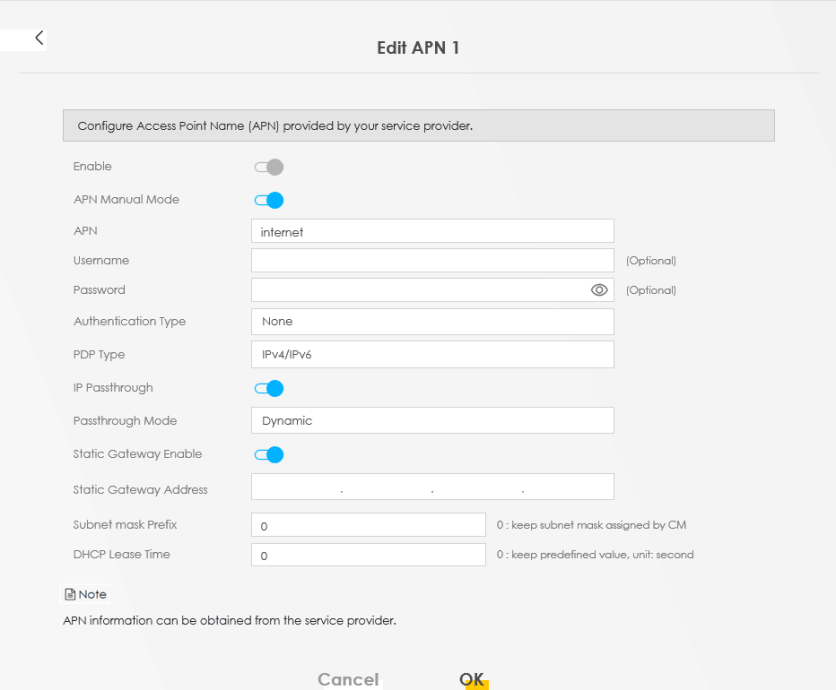
• VLAN ID Enable: Enable this to set your VLAN ID.
• APN Manual Mode: Enable this to configure your APN cellular information manually.
• APN: Enter the Access Point Name (APN) provided by your ISP. You can enter a name up to 30 printable ASCII characters, including spaces.
• Username: Type the username provided by your ISP for authentication. The allowed username is up to 31 printable ASCII characters.
• Password: Type the password provided by your ISP for authentication. The allowed password is up to 31 printable ASCII characters.
• Authentication Type: Select the authentication type (PAP, CHAP, PAP/CHAP) used by the Zyxel Device.
• PDP Type: Select the IP address type (IPv4, IPv6, IPv4/IPv6) the Zyxel Device uses for connection.
• VLAN ID: Enter a unique ID number, from 1 to 4,094, to identify this VLAN group.
• IP Passthrough: Enable this to turn off the routing functionality on the Zyxel Device.
• Passthrough Mode: Select Fixed to specify the MAC address of the computer using the public IP address provided by the ISP. Otherwise, select Dynamic.
• Static Gateway Enable: Select Enable to use a static IP address for your gateway.
• Static Gateway Address: Enter the IP address of your gateway.
• Subnet mask Prefix: Enter the subnet address of your gateway.
• DHCP Lease Time: Enter the lease time provided by your DHCP server.
USB Applications
This section shows you how to:
File Sharing
This section shows you how to create a shared folder on your Zyxel Device through a USB device and allow others to access the shared folder with File Sharing services.
Set Up File Sharing on Your Zyxel Device
1 Before enabling file sharing in the Zyxel Device, please set up your shared folders beforehand in your USB device.
2 Connect your USB device to the USB port of the Zyxel Device.
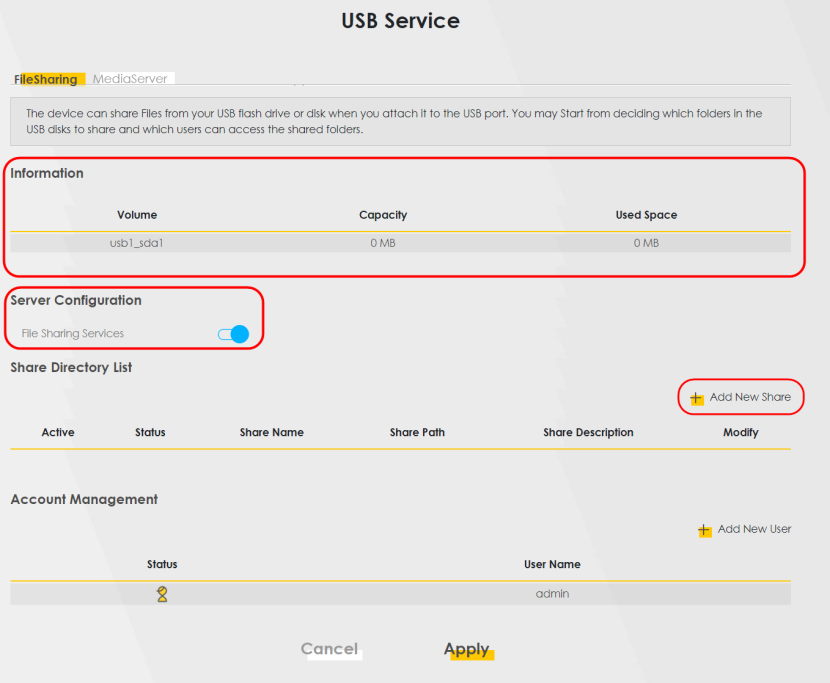
3 Go to the Network Setting > USB Service > File Sharing screen. Enable File Sharing Services and click Apply to activate the file sharing function. The Zyxel Device automatically adds your USB device to the Information table.

4 Click + Add New Share to add a new share.
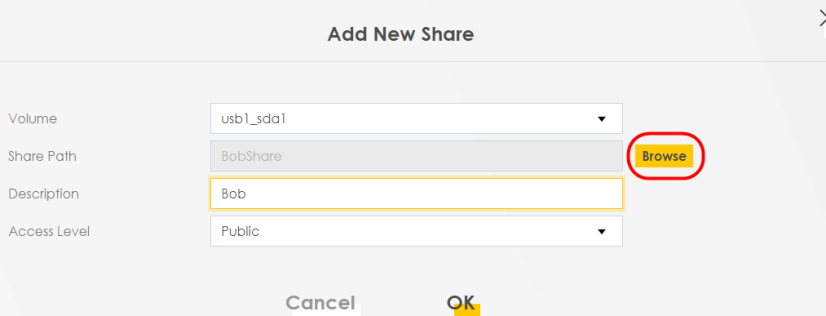
5 The Add New Share screen appears.
• Select your USB device from the Volume drop-down list box.
• Enter a Description name for the added share to identify the device.
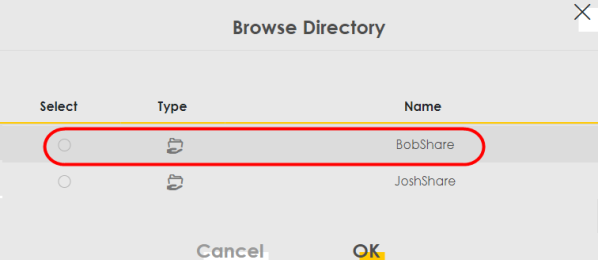
• Click Browse and the Browse Directory screen appears.
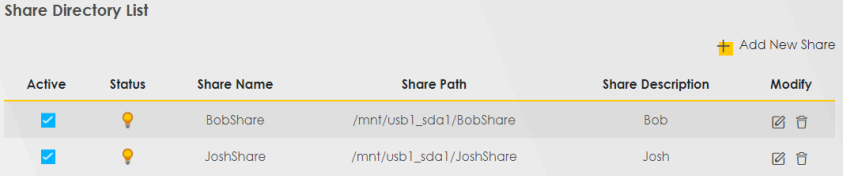
• On the Browse Directory screen, select the folder that you want to add as a share. In this example, select BobShare and then click OK.
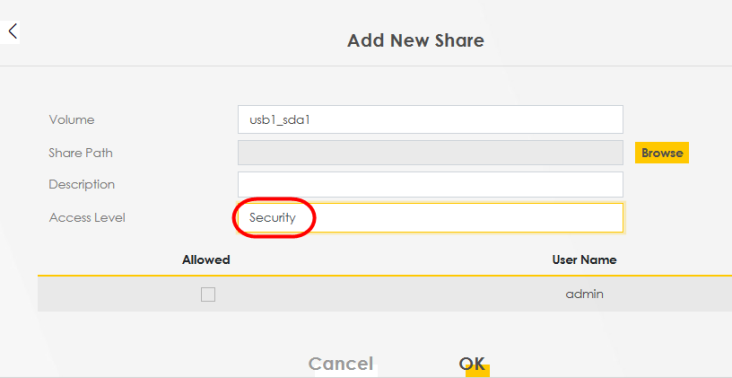
• In Access Level, select Public to let the share to be accessed by all users connected to the Zyxel Device. Otherwise, select Security to let the share to be accessed by specific users to access only. Click OK to save the settings.
6 To set Access level to Security, you need to create one or more users accounts. Under Account Management, click + Add New User to open the User Account screen.
7 After you create a new user account, the screen looks like the following.
8 File sharing is now configured. You can see the USB storage device listed in the table below.
Access Your Shared Files From a Computer
You can use Windows Explorer to access the USB storage devices connected to the Zyxel Device.
1 Open Windows Explorer.
2 In the Windows Explorer’s address bar, enter a double backslash “\\” followed by the IP address of the Zyxel Device (the default IP address of the Zyxel Device is 192.168.1.1
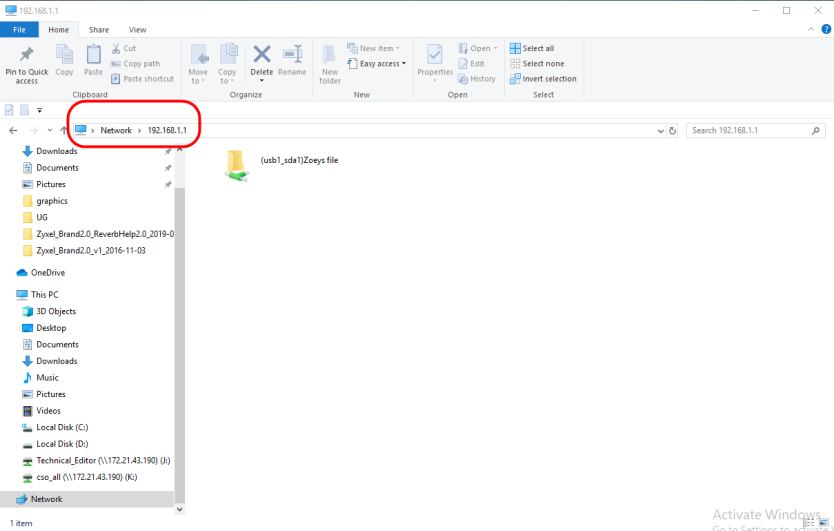
3 Double-click on (usb1_sda)Zoeys file, and then enter the share's username and password if prompted.
4 After you access (usb1_sda)Zoeys file through your Zyxel Device, you do not have to log in again unless you restart your computer.
Media Server
Use the media server feature to play files on a computer or on your television.
This section shows you how the media server feature works using the following:
• Microsoft (MS) Windows Media Player
Media Server works with Windows 10. Make sure your computer is able to play media files (music, videos and pictures).
Media Server works with Windows 10. Make sure your computer is able to play media files (music, videos and pictures).
• A digital media adapter
You need to set up the media adapter to work with your television (TV).
You need to set up the media adapter to work with your television (TV).
Before you begin, connect the USB storage device containing the media files you want to play to the USB port of your Zyxel Device.
Configure the Zyxel Device as a Media server
To use your Zyxel Device as a media server, follow the steps below.
1 Go to the Network Setting > USB Service > Media Server screen.

Network Security
This section shows you how to:
Configure a Firewall Rule
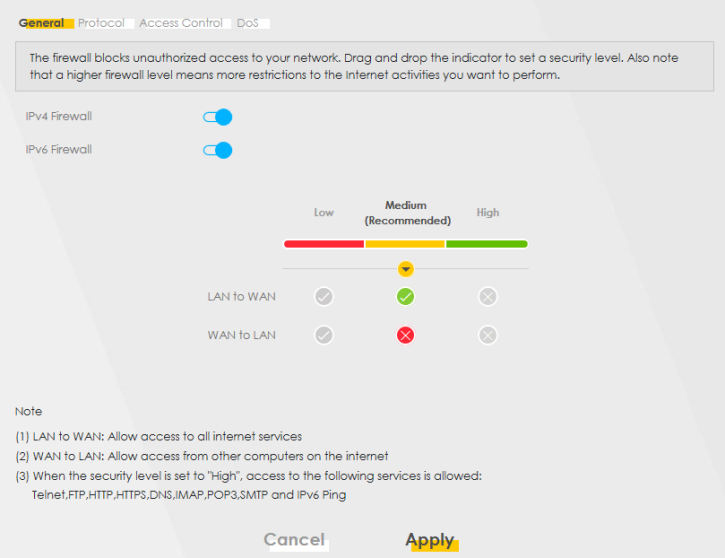
You can enable the firewall to protect your LAN computers from malicious attacks from the Internet.
1 Go to the Security > Firewall > General screen.
2 Select IPv4 Firewall/IPv6 Firewall to enable the firewall, and then click Apply.
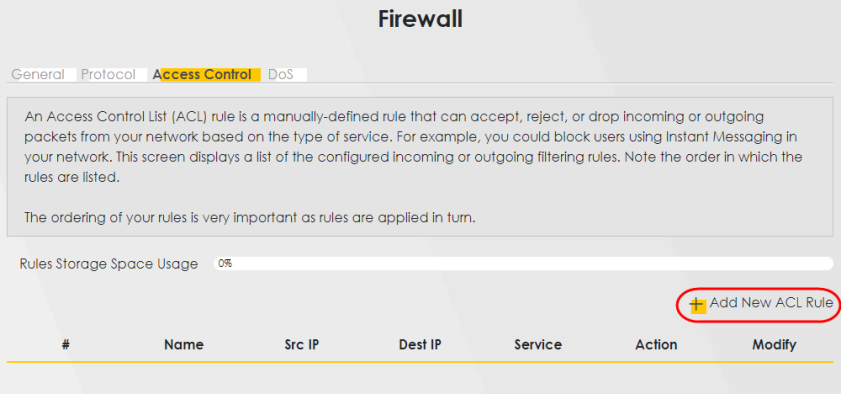
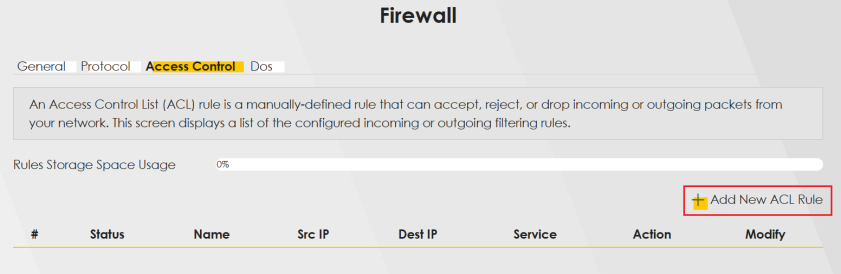
3 Open the Access Control screen, click + Add New ACL Rule to create a rule.
4 Use the following fields to configure and apply a new ACL (Access Control List) rule.
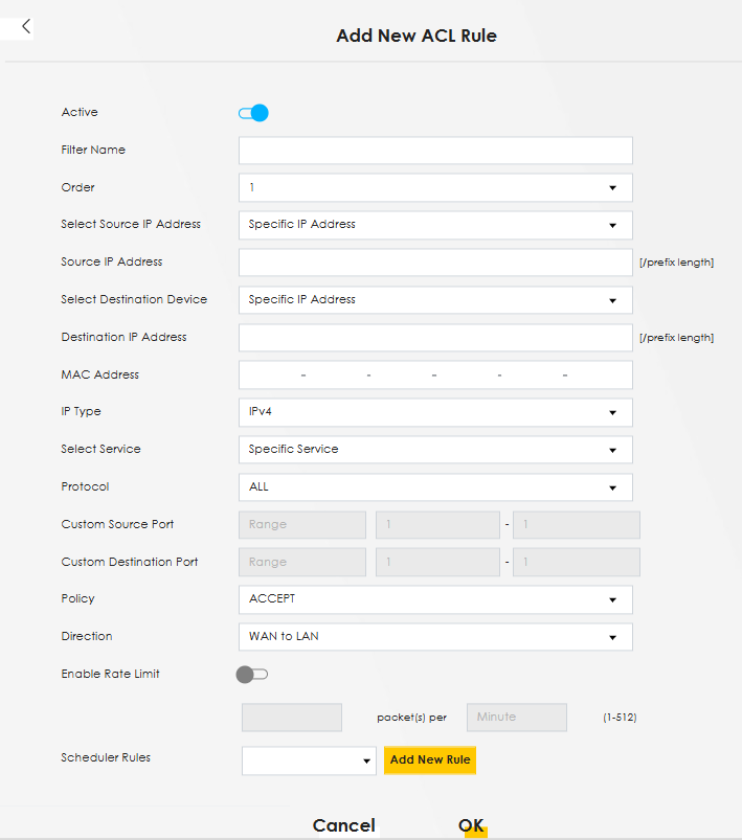
• Active: Click this button to the right to enable this rule.
• Filter Name: Enter a name to identify the firewall rule.
• Source IP Address: Enter the IP address of the computer that initializes traffic for the application or service.
• Destination IP Address: Enter the IP address of the computer to which traffic for the application or service is entering.
• Protocol: Select the protocol (ALL, TCP/UDP, TCP, UDP, ICMP or ICMPv6) used to transport the packets.
• Policy: Select whether to (ACCEPT, DROP, or REJECT) the packets.
• Direction: Select the direction (WAN to LAN, LAN to WAN, WAN to ROUTER, or LAN to ROUTER) of the traffic to which this rule applies.
5 Select Enable Rate Limit to limit the number of requests a client can make within a specific time period. Click OK.
Configure a Schedule for Firewall ACL Rules
This section shows you how to create a Scheduler Rule and apply it to a Firewall ACL Rule to block employees’ access to Youtube during work hours.
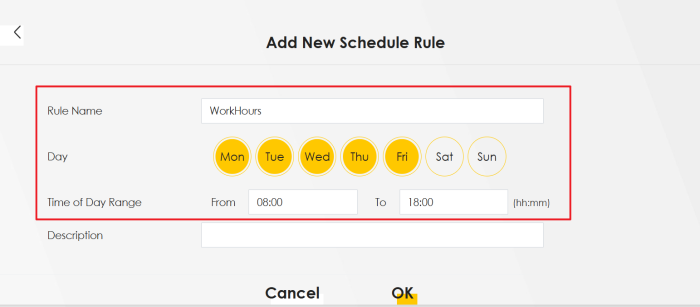
Add New Scheduler Rule screen
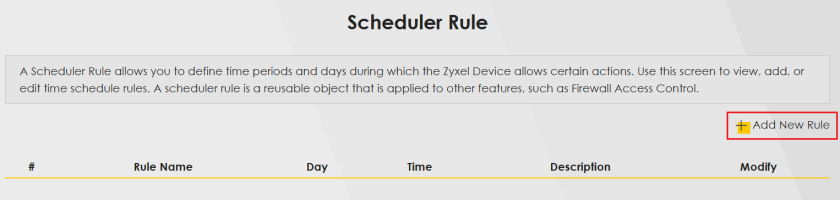
1 Go to Security > Scheduler Rule > + Add New Rule
2 In the Add New Schedule Rule screen:
• Enter WorkHours for the Rule Name.
• Under Day, select Monday to Friday.
• Set Time of Day Range to 08:00 to 18:00.
• Click OK to save.
Add New ACL Rule Screen
3 Go to Security > Firewall > Access Control > + Add New ACL Rule
4 In the Add New ACL Rule screen:
• Click the Active button to the right to enable this rule.
• Enter YT_WorkHours for the Filter Name.
• Set Source IP Address to your office’s internal network.
• Use nslookup to find Youtube’s IP address and set the Destination IP Address accordingly.
• Select TCP for Protocol.
• Set Custom Destination Port to 443.
• Select REJECT for Policy to discard the packets.
• Set Direction to LAN to WAN.
• Under Scheduler Rules, select WorkHours that you created earlier.
• Click OK.
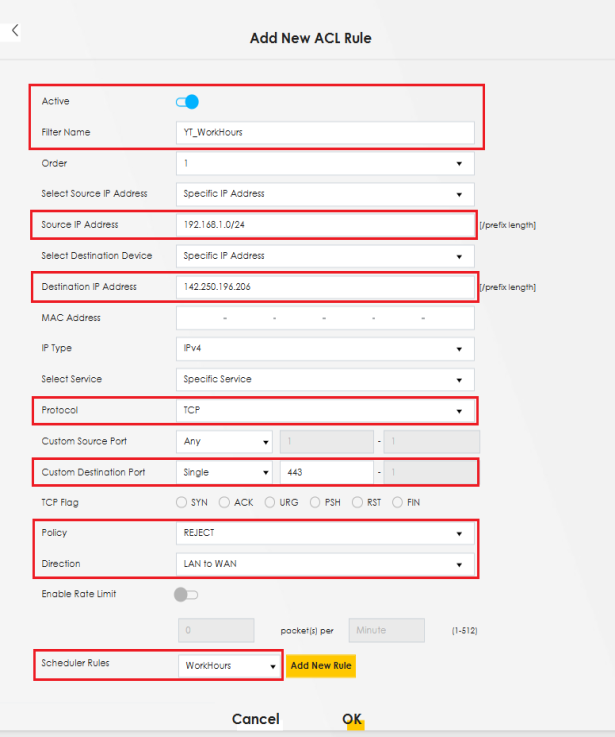
Youtube access will now be blocked from 08:00 to 18:00, Monday to Friday.
Set Up Home Security
This section shows you how to use Home Security to block social media at all times.
1 Go to Security > Home Security to open the Connected Home Security screen.
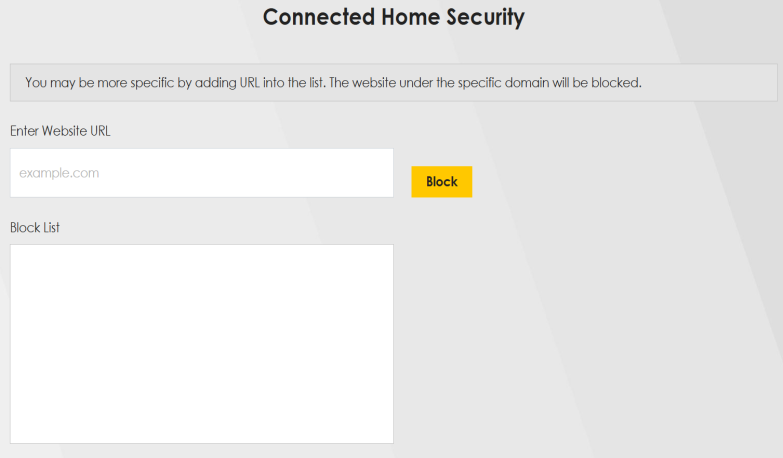
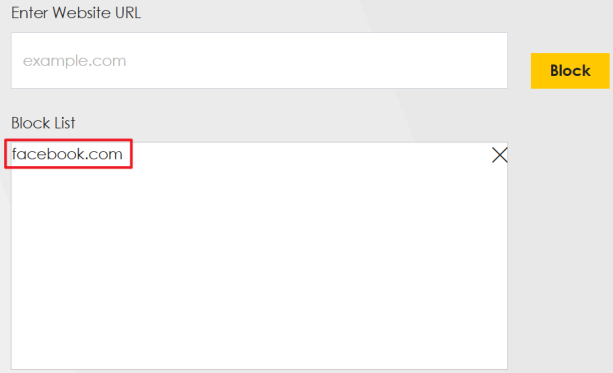
2 Enter Facebook’s domain name (e.g., facebook.com) in the Enter Website URL field, then click Block.
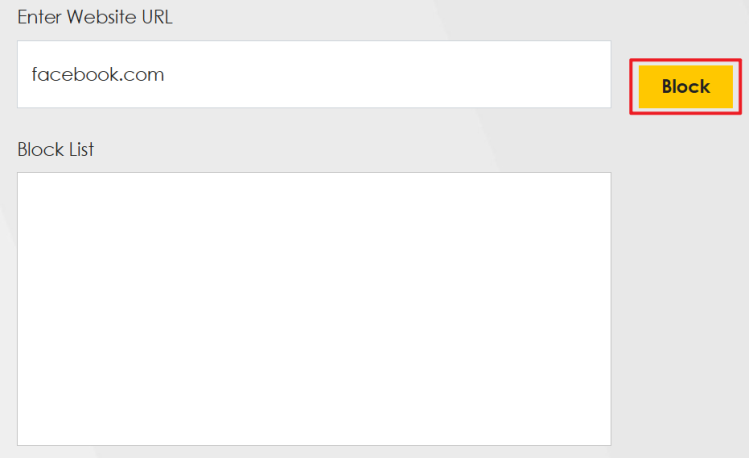
3 The domain name will appear in the Block List below. Facebook will now be blocked for all devices on your network.
Set Up Parental Control
This section shows you how to configure PC to restrict access to certain Internet websites.
Configure Parental Control Schedule and Filter
Parental Control Profile (PCP) allows you to set up a rule for:
• Internet usage scheduling.
• Websites and URL keyword blocking.
Use this feature to:
• Limit the days and times a user can access the Internet.
• Limit the websites a user can access on the Internet.
This example shows you how to block a user from accessing the Internet during time for studying. It also shows you how to stop a user from accessing specific websites.
Use the parameters below to configure a schedule rule and a URL keyword blocking rule.
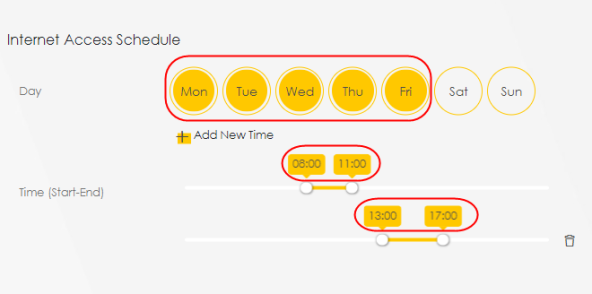
profile name | INTERNET ACCESS schedule | network service | Site / url keyword |
|---|---|---|---|
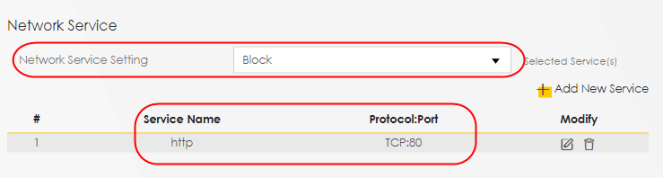
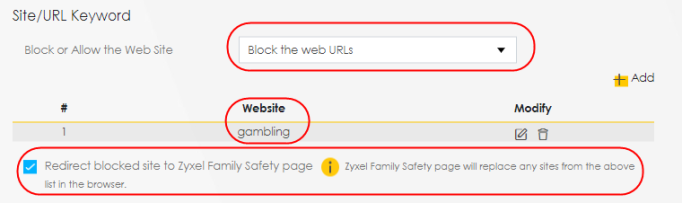
Study | Day: Monday to Friday Time: 8:00 to 11:00 13:00 to 17:00 | Network Service Setting: Block Service Name: HTTP Protocol: TCP Port: 80 | Block or Allow the Web Site: Block the web URLs Website: gambling |
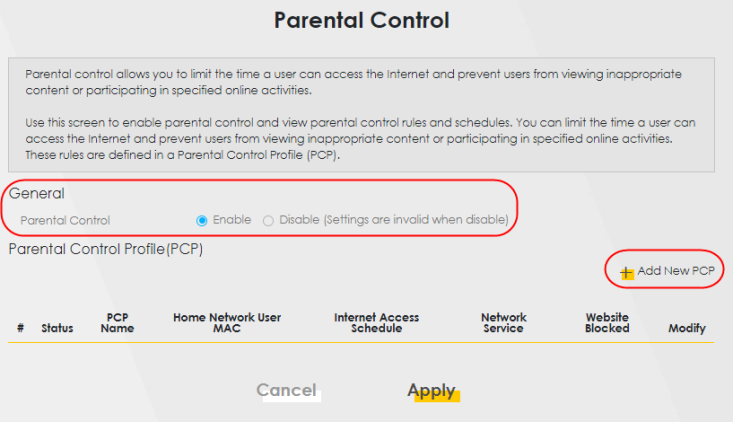
Parental Control Screen
Open the Parental Control screen. Select Enable under General to enable parental control. Then click + Add New PCP to add a rule.
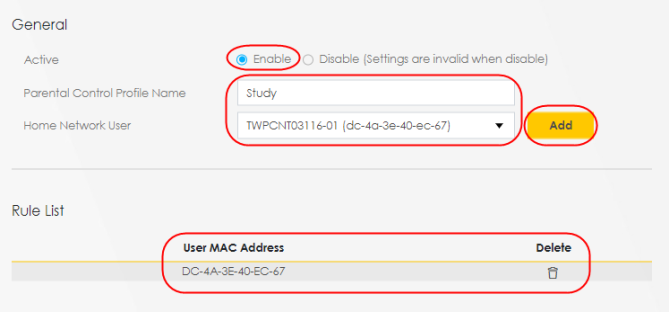
Add New PCP Screen
1 Go to Parental Control > Add New PCP. Under General:
• Select Enable to enable the rule you are configuring.
• Enter the Parental Control Profile Name given in the above parameter.
• Select an user this rule applies to in Home Network User, then click Add. You will see the MAC address of the user you just select in Rule List.
2 Under Internet Access Schedule:
• Click + Add New Time to add a second schedule.
• Use the parameter given above to configure the time settings of your schedule.
3 Under Network Service:
• In Network Service Setting, select Block.
• Click + Add New Service, then use the parameter given above to configure settings for the Internet service you are blocking.
4 Under Site / URL Keyword:
• Select Block the web URLs in Block or Allow the Web Site.
• Click Add, then use the parameter given above to configure settings for the URL keyword you are blocking.
• Select Redirect blocked site to Zyxel Family Safety page to redirect the web browser to the Zyxel Family Safety page if he or she tries to access a website with the blocked URL keyword.
5 Click OK to save your settings.
Configuring a Parental Control Schedule
Parental Control Profile allows you to set up a schedule rule for Internet usage. Use this feature to limit the days and times a user can access the Internet.
This example shows you how to block an user from accessing the Internet during time for studying. Use the parameter below to configure a schedule rule.
profile name | start blocking | end blocking | repeat on |
|---|---|---|---|
Study | 8:00 am | 11:00 am | from Monday to Friday |
Study | 1:00 pm | 5:00 pm | from Monday to Friday |
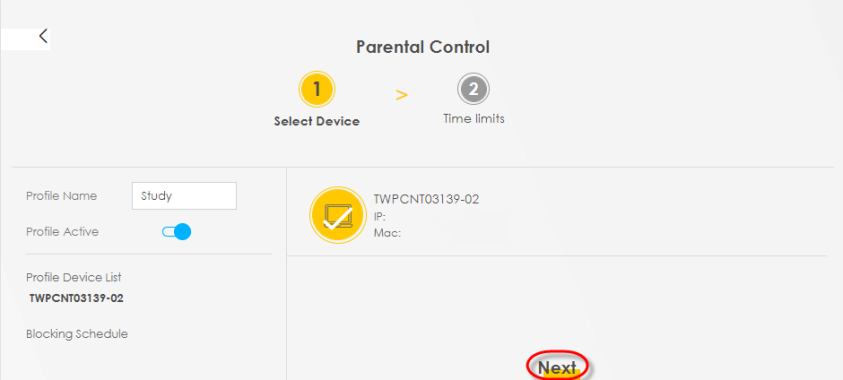
1 Click Add more Profile to open the Parental Control screen.
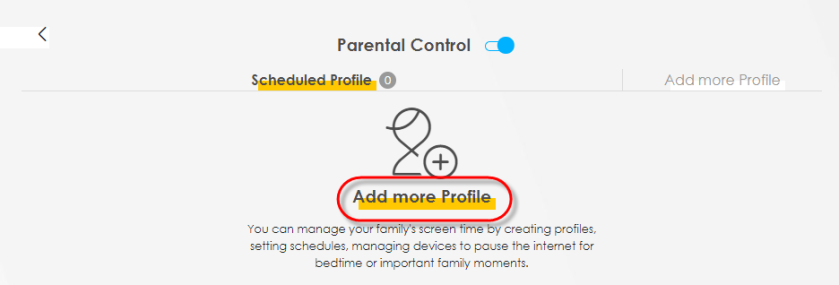
2 Use this screen to add a Parental Control rule.
• Enter the Profile Name given in the above parameter.
• Click on the switch to enable Profile Active.
• Select a device, and then click Next to proceed.
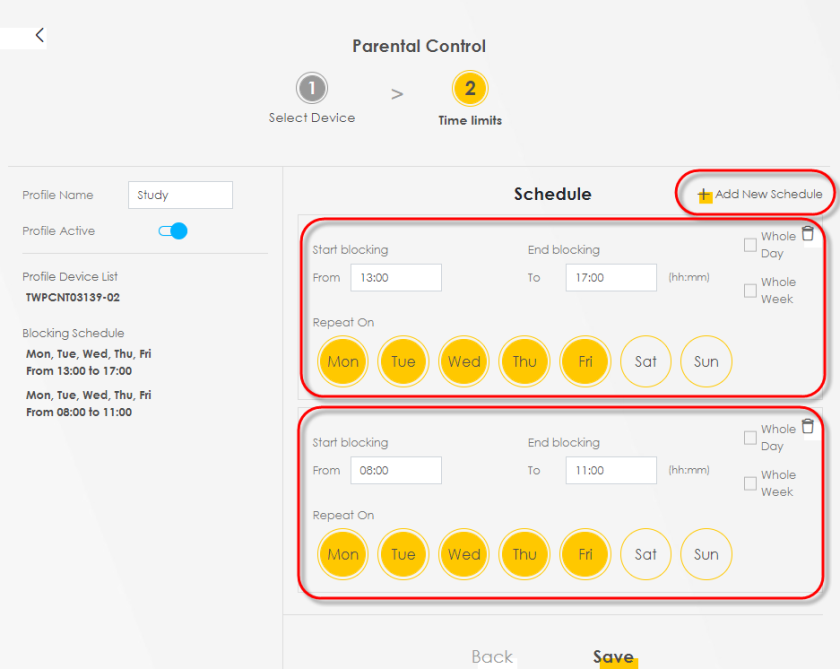
3 Use this screen to edit the Parental Control schedule.
• Click Add New Schedule to add a second schedule.
• Use the parameter given above to configure the time settings of your schedules.
• Click Save to save the settings.
Configure a MAC Address Filter for Wired LAN Connections
You can use a MAC address filter to exclusively allow or permanently block someone from the wired LAN network.
This example shows that computer B is not allowed access to the wired LAN network.
Configure a MAC Address Filter Example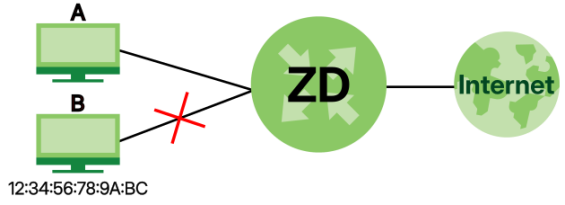
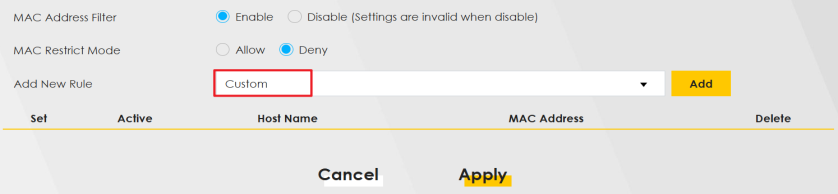
1 Go to the Security > MAC Filter > MAC Filter screen. Under MAC Address Filter, select Enable.
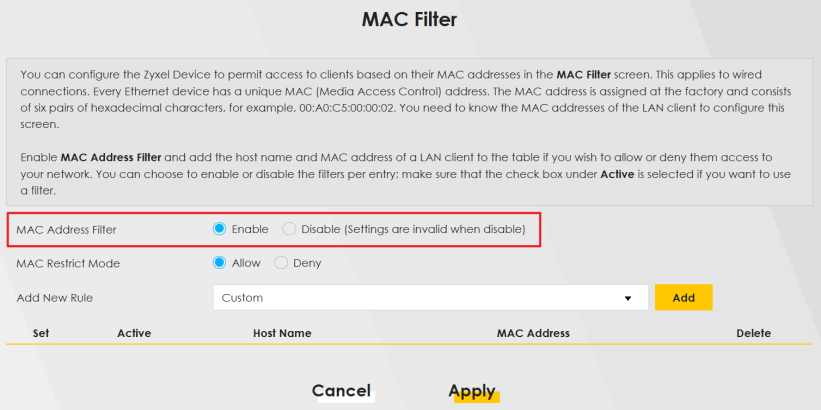
2 Under MAC Restrict Mode, select Deny to block access from computer B.

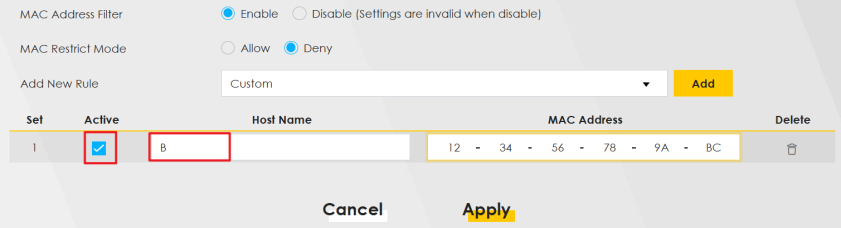
3 Under Add New Rule, select Custom to enter the MAC address of computer B. Click Add to add a new entry.
4 Select Active, and then enter the Host Name and MAC Address of computer B. Click Apply.
Configure a MAC Address Filter for Wi-Fi Clients
This section shows you how to deny or allow specific Wi-Fi clients to access the Wi-Fi network.
Deny Access
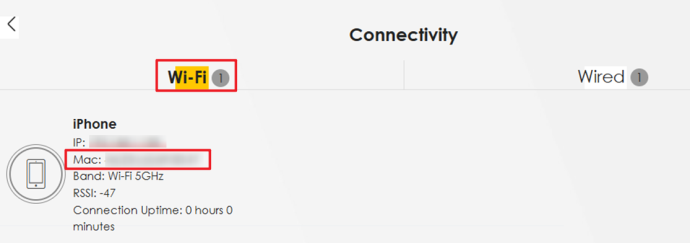
If you want to block access from smartphone C, follow the steps below:
1 Log into the Web Configurator of your Zyxel Device. Go to Connectivity > Wi-Fi screen to find the MAC address of smartphone C.
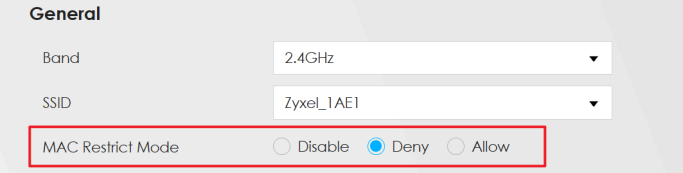
2 Go to Network Setting > Wireless > MAC Authentication screen. Under General, select the Band and SSID of the Wi-Fi network that smartphone C is using.
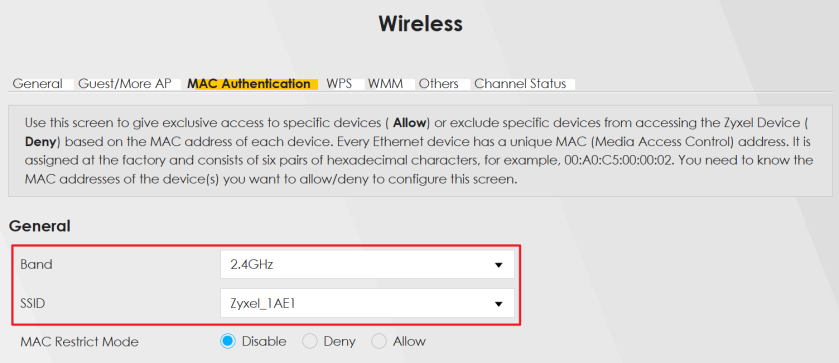
3 Under MAC Restrict Mode, select Deny to block smartphone C from accessing your Wi-Fi network.
4 Click + Add new MAC address and select Custom to enter the MAC address of smartphone C.
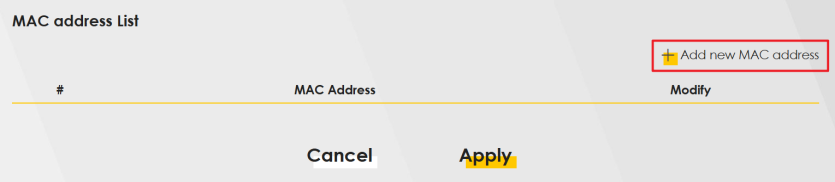

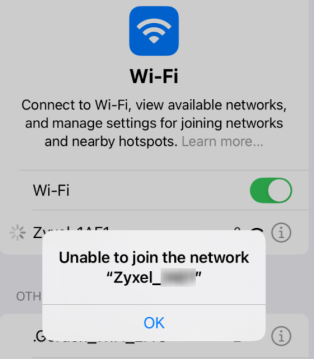
5 Click Apply. Now smartphone C will not be able to join the Wi-Fi network.
Allow Access
If you want to permit access from smartphone C, follow the steps below:
1 Find the MAC address of smartphone C. For the iOS system, go to Settings > General > About > Wi-Fi Address. For Android system, go to Settings > About device > Status > Device MAC Address.

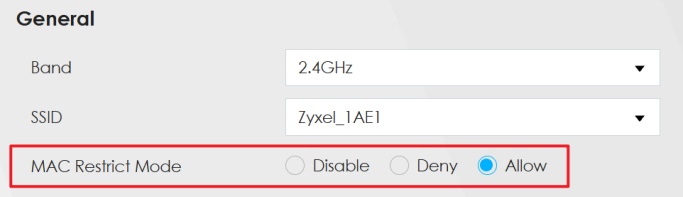
2 Log into the Web Configurator of your Zyxel Device. Go to Network Setting > Wireless > MAC Authentication screen. Under General, select the Band and SSID of the Wi-Fi network that you want to allow smartphone C to connect to.

3 Under MAC Restrict Mode, select Allow to give smartphone C access to the Wi-Fi network.
4 Click + Add new MAC address and select Custom to enter the MAC address of smartphone C.

5 Click Apply. Now only smartphone C should be able to join the Wi-Fi network.
Secure Server Setup
Use DMZ (DeMilitarized Zone) when you want to make specific devices or servers accessible from the Internet while keeping your internal (LAN) network secure. The DMZ allows traffic from the WAN and LAN but blocks traffic from the DMZ to the LAN. This helps protect client devices within the LAN. To set up a gaming server using DMZ, follow the steps below:
1 Log into the Web Configurator. Go to Network Setting > NAT > DMZ.
2 In the Default Server Address field, enter the default public server IP address 192.168.13.11 that you set up. Click Apply.

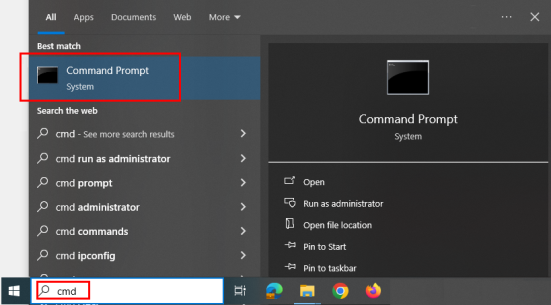
3 To test if the server setup is successful, check the connection between the DMZ server and the LAN. Enter cmd in your client computer’s search bar, and click Command Prompt to open it.
4 The following screen appears. Enter ping 192.168.13.11 to check if the client in the LAN can access the server set up in the DMZ. The example below uses the following settings:
• Client: 192.168.11.33 (LAN)
• Server: 192.168.13.11 (DMZ Server)

The screen shows that ping 192.168.13.11 was successful, indicating that the connection from the LAN to the DMZ server is allowed.
5 On your DMZ server, open Command Prompt. Enter ping 192.168.11.33 to check if the DMZ server can access the client computer in the LAN. Request timed out in the screen below indicates that the DMZ server cannot ping clients within the LAN.
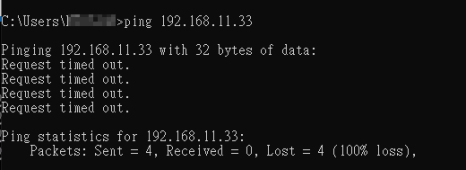
These two tests ensure that the DMZ server setup is complete.
IP Passthrough Mode Setup
Use IP Passthrough mode when you want the Zyxel Device to pass the public IP address from your ISP directly to another device behind the Zyxel Device. If the device behind the Zyxel Device will handle NAT and routing functions, then you want to avoid double NAT (on both the Zyxel Device and the firewall), which can cause issues with VPNs, VoIP, and online gaming. The device behind the Zyxel Device may need a public IP address directly for:
• IPSec (IP Security Protocol) VPNs: to establish a secure tunnel between your private network and a remote public IP address.
• Remote access: to make the device directly accessible from the Internet.
• Hosting services (e.g., web or mail servers): to ensure the servers are reachable from the Internet on a fixed public IP address.
Below are the tutorials for you to:
Outdoor Zyxel Device: IP Passthrough Mode
To set an outdoor Zyxel Device to IP Passthrough mode, follow the steps below:
1 Log into the Web Configurator.
2 Go to Network Setting > Broadband > Cellular APN. In APN Settings, select the client device that you want to receive the public IP address assigned by the ISP. Click the Modify icon  .
.
.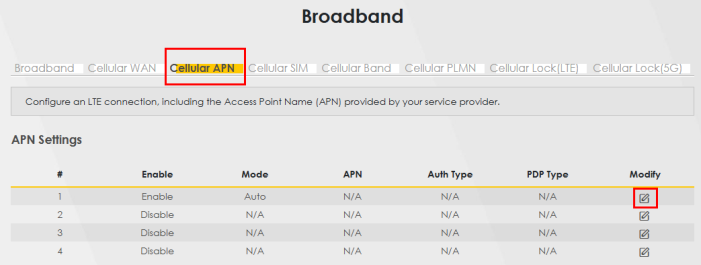
3 The Edit APN screen appears. Click the IP Passthrough switch  to the right to enable IP Passthrough mode on the Zyxel Device for the selected client device.
to the right to enable IP Passthrough mode on the Zyxel Device for the selected client device. 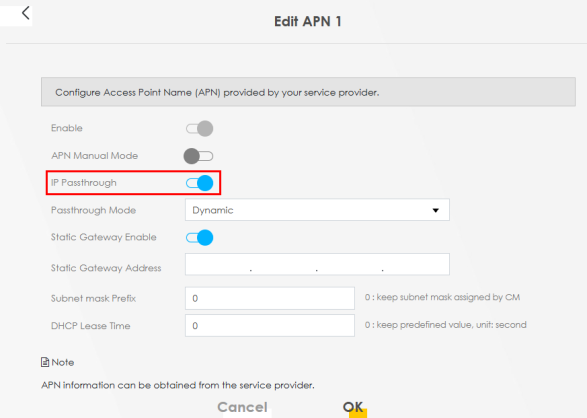
4 In the Passthrough Mode drop-down list, you have two options:
• Dynamic: This option forwards traffic to any LAN computer on the Zyxel Device’s local network.
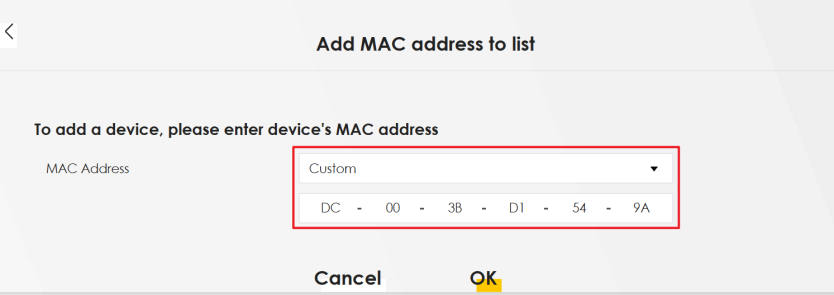
• Fixed: This option forwards traffic to a specific computer by entering its MAC address. When you select Fixed, the Passthrough to fixed MAC field appears. This allows you to enter the MAC address of the specific computer.
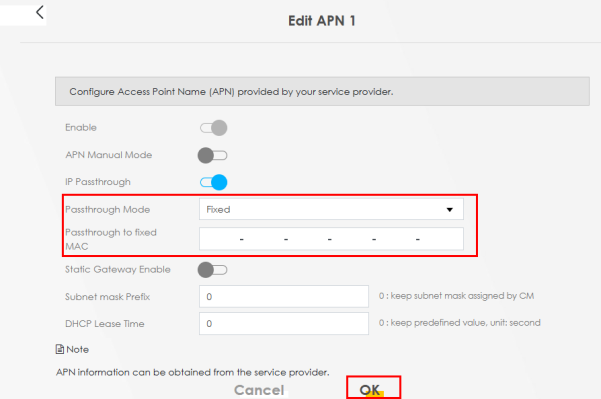
5 Click OK to save the settings.
6 When finished, Click the menu icon ( ) in the upper right corner, and then click Home.
) in the upper right corner, and then click Home.
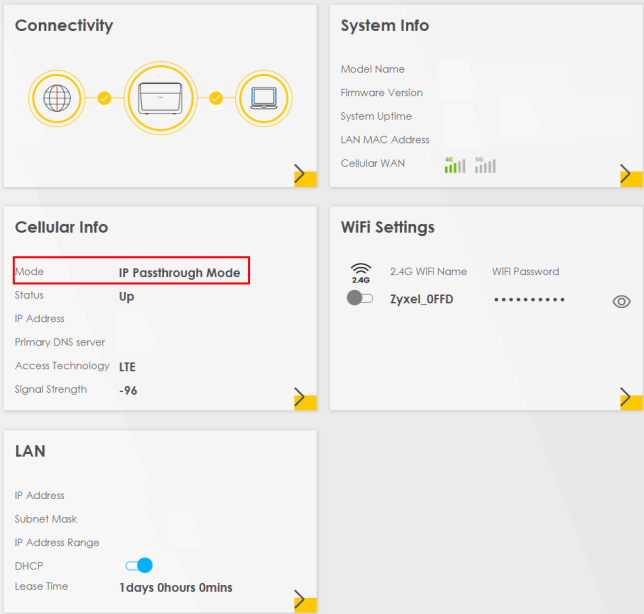
7 In the Cellular Info section, your Mode is set to IP Passthrough Mode.

Indoor Zyxel Device: IP Passthrough Mode
To set an indoor Zyxel Device to IP Passthrough mode, follow the steps below:
1 Log into the Web Configurator.
2 Go to Network Setting > Broadband > Cellular IP Passthrough.
3 In IP Passthrough Management, click the IP Passthrough switch  to the right to enable IP Passthrough on the Zyxel Device.
to the right to enable IP Passthrough on the Zyxel Device. 4 In Passthrough Mode, you have two options: Dynamic and Fixed.
• Dynamic: This option forwards traffic to the any LAN computer on the Zyxel Device’s local network.
• Fixed: This option forwards traffic to a specific computer by entering its MAC address. When you select Fixed, the Passthrough to fixed MAC field appears. This allows you to enter the MAC address of the specific computer.
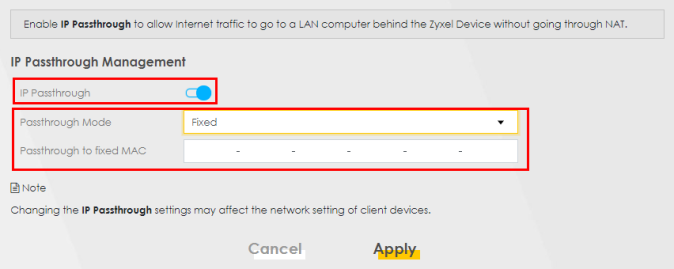
5 Click Apply to save the settings.
6 When finished, Click the menu icon ( ) in the upper right corner, and then click Home.
) in the upper right corner, and then click Home.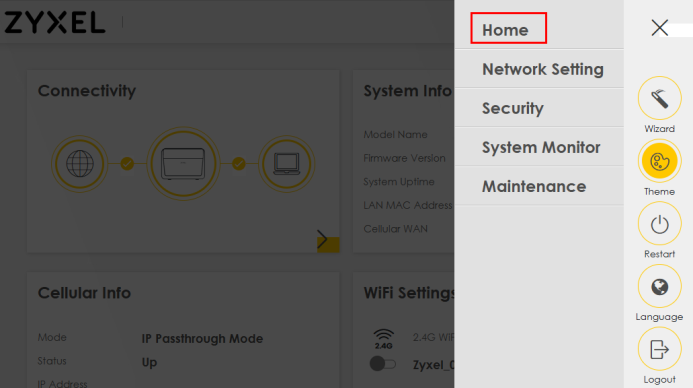
7 In the Cellular Info section, your Mode is set to IP Passthrough Mode.
Device Maintenance
This section shows you how to:
You can upgrade the Zyxel Device firmware, back up the configuration and restore the Zyxel Device to its previous or default settings.
Upgrade the Firmware
Upload the latest firmware to the Zyxel Device for feature enhancements.
1 To download the latest firmware of your Zyxel Device, go to https://www.zyxel.com/service-provider and search for your model. The latest firmware will be available under the Downloads & resources tab. The model code for the Zyxel Device in this example is v5.13(ABLZ.1). Note the model code for your Zyxel Device.
2 Unzip the file.
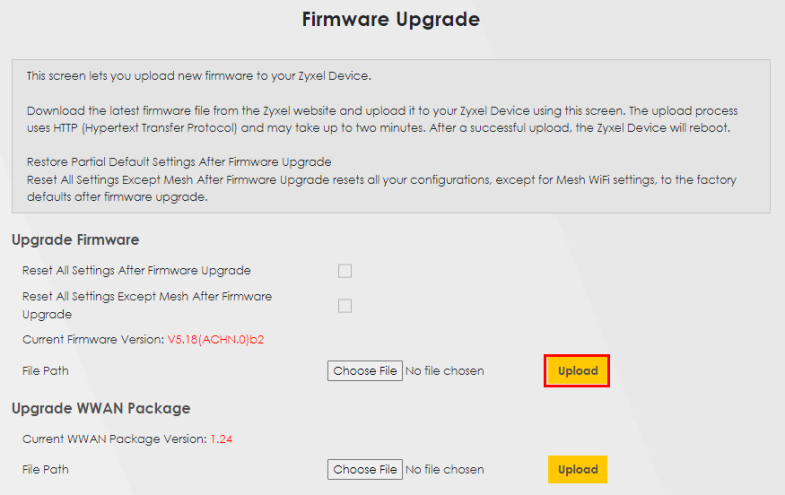
3 Go to the Maintenance > Firmware Upgrade screen.
4 Click Browse/Choose File and select the file with a ".bin" extension to upload. Click Upload.
5 This process may take up to 2 minutes to finish. After 2 minutes, log in again and check your new firmware version in the Connection Status screen.
Back up the Device Configuration
Back up a configuration file allows you to return to your previous settings.
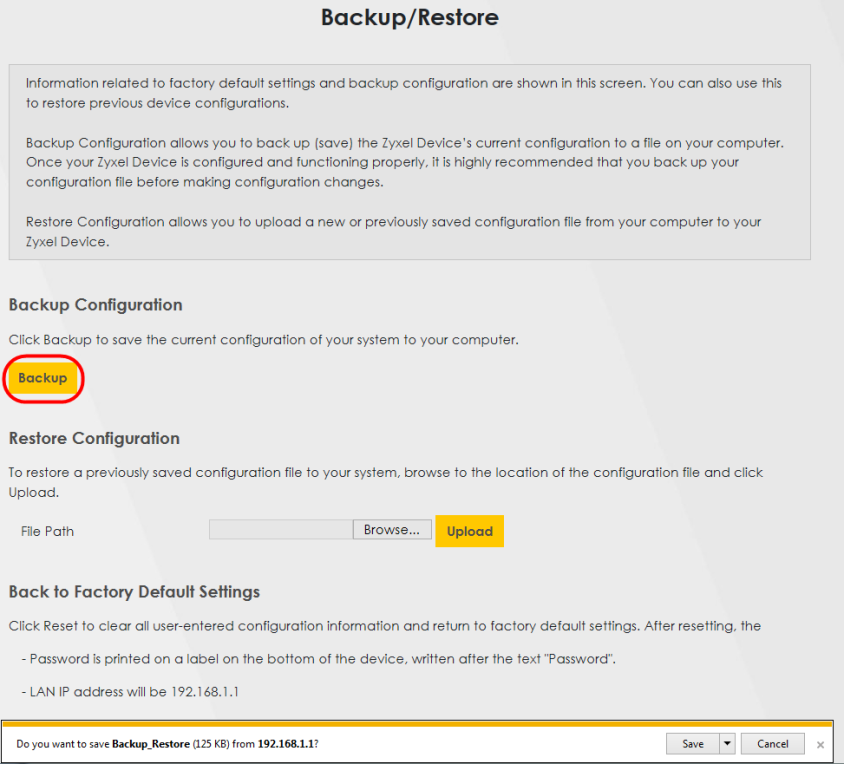
1 Go to the Maintenance > Backup/Restore screen.
2 Under Backup Configuration, click Backup. A configuration file is saved to your computer. In this case, the Backup/Restore file is saved.
Restore the Device Configuration
This section shows you how to restore a previously-saved configuration file from your computer to your Zyxel Device.
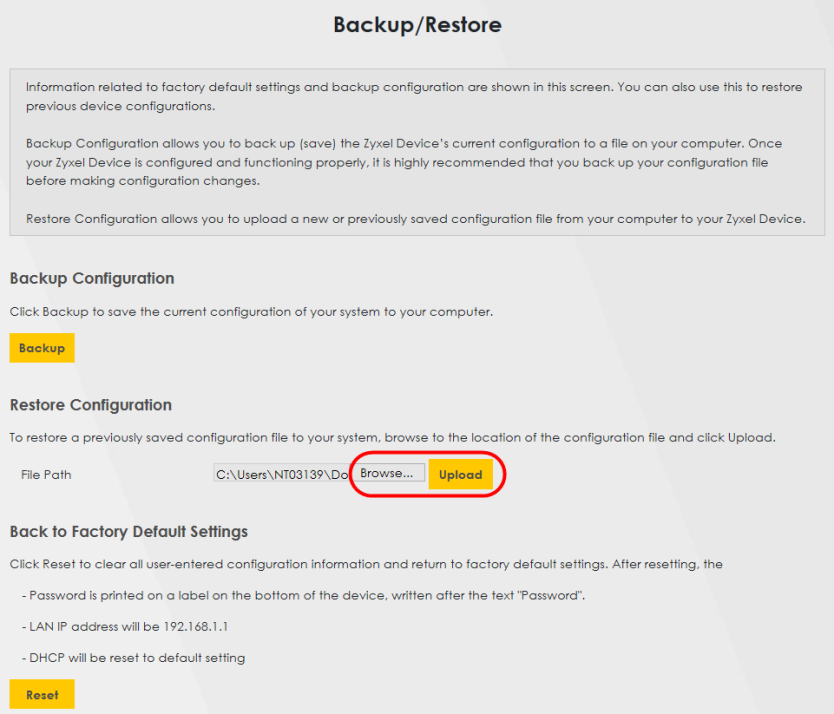
1 Go to the Maintenance > Backup/Restore screen.
2 Under Restore Configuration, click Browse/Choose File, and then select the configuration file that you want to upload. Click Upload.
3 The Zyxel Device automatically restarts after the configuration file is successfully uploaded. Wait for one minute before logging into the Zyxel Device again. Go to the Connection Status page to check the firmware version after the reboot.
How to Reset the Zyxel Device to the Factory Defaults
To reset the Zyxel Device, you can press the RESET button on the rear panel for more than 5 seconds. Alternatively, you can use the web configurator to reset the Zyxel Device.
Go to Maintenance > Backup/Restore and click the Reset All Settings / Reset button. The Zyxel Device will reset to factory defaults and the LAN IP address will be set to the default IP address.
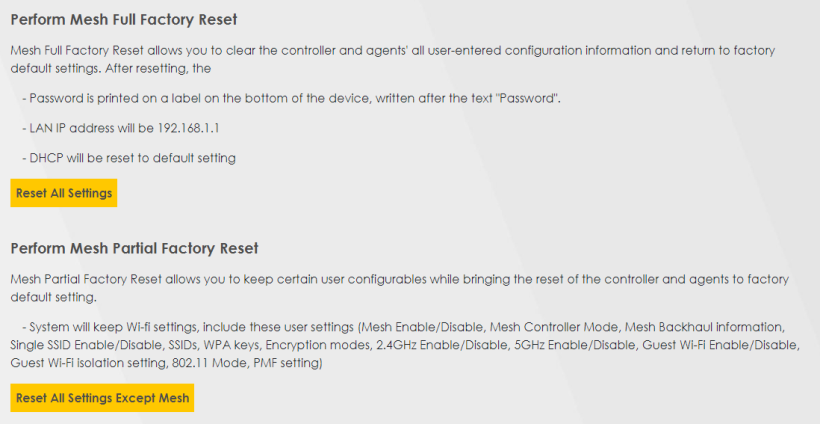
If you want to reset the Zyxel Device while keeping the Mesh Wi-Fi Settings, click the Reset All Settings Except Mesh button. See Backup/Restore for more details.
Remote Access from WAN
This section shows you how to:
You can configure WAN access for a specific trusted computer through HTTPS, SSH to the Zyxel Device. Remote management determines which interface and web services are allowed to access the Zyxel Device. Customer support may also request remote access to your Zyxel Device for debugging purposes.
Configure Access to Your Zyxel Device
Perform the following to configure access to your Zyxel Device:
1 Go to the Maintenance > Remote Management > MGMT Services screen. Select the WAN interface and services allowed to access the Zyxel Device remotely.
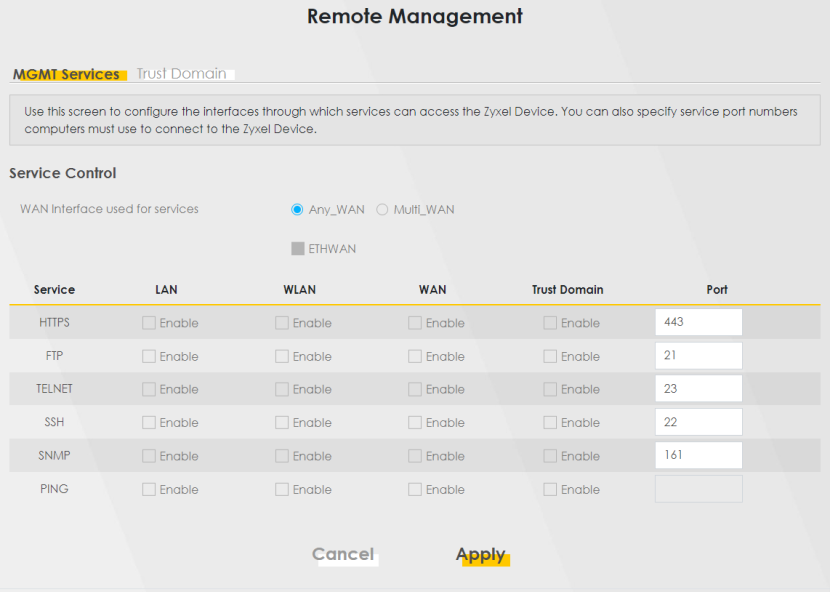
These are the different ways to access the Zyxel Device remotely.
access type | label | Description |
|---|---|---|
LAN / WLAN (Wi-Fi) | LAN / WLAN | This allows access of the selected Service from the local LAN. |
WAN | WAN | This allows access of the selected Service from the WAN connections. |
Trust Domain | Trust Domain | This allows access of the selected Service only from the trusted IPv4 / IPv6 addresses configured under Trust Domain. |
2 Select how you want to access the Zyxel Device remotely.
3 You may change the server Port number for a service if needed, however you must use the same port number in order to use that service for remote management.
Configure the Trust Domain
Perform the following to configure the Trust Domain on your Zyxel Device:
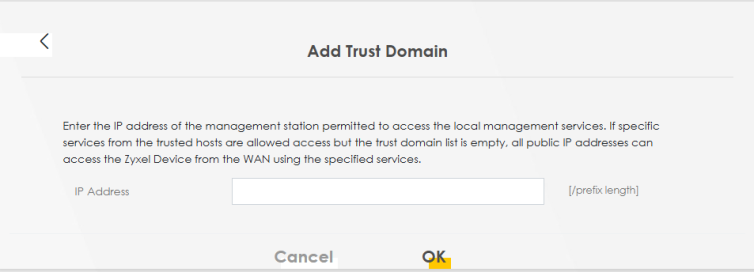
1 Go to the Maintenance > Remote Management > Trust Domain screen. Click + Add Trust Domain to go to the Add Trust Domain screen to add a trusted host IPv4 / IPv6 address.

2 Enter a public IPv4 / IPv6 IP address which is allowed to access the service on the Zyxel Device from the WAN. Then click OK.